mirror of
https://github.com/crewAIInc/crewAI.git
synced 2026-07-12 10:25:14 +00:00
Compare commits
13 Commits
bugfix/con
...
feat/cli-m
| Author | SHA1 | Date | |
|---|---|---|---|
|
|
a5f70d2307 | ||
|
|
b55fc40c83 | ||
|
|
d0ed4f5274 | ||
|
|
ee34399b71 | ||
|
|
39903f0c50 | ||
|
|
c4bf713113 | ||
|
|
5d18c6312d | ||
|
|
1f9baf9b2c | ||
|
|
6fbc97b298 | ||
|
|
08bacfa892 | ||
|
|
1ea8115d56 | ||
|
|
6b906f09cf | ||
|
|
6c29ebafea |
3
.github/ISSUE_TEMPLATE/bug_report.yml
vendored
3
.github/ISSUE_TEMPLATE/bug_report.yml
vendored
@@ -65,6 +65,7 @@ body:
|
||||
- '3.10'
|
||||
- '3.11'
|
||||
- '3.12'
|
||||
- '3.13'
|
||||
validations:
|
||||
required: true
|
||||
- type: input
|
||||
@@ -112,4 +113,4 @@ body:
|
||||
label: Additional context
|
||||
description: Add any other context about the problem here.
|
||||
validations:
|
||||
required: true
|
||||
required: true
|
||||
19
.github/security.md
vendored
19
.github/security.md
vendored
@@ -1,19 +0,0 @@
|
||||
CrewAI takes the security of our software products and services seriously, which includes all source code repositories managed through our GitHub organization.
|
||||
If you believe you have found a security vulnerability in any CrewAI product or service, please report it to us as described below.
|
||||
|
||||
## Reporting a Vulnerability
|
||||
Please do not report security vulnerabilities through public GitHub issues.
|
||||
To report a vulnerability, please email us at security@crewai.com.
|
||||
Please include the requested information listed below so that we can triage your report more quickly
|
||||
|
||||
- Type of issue (e.g. SQL injection, cross-site scripting, etc.)
|
||||
- Full paths of source file(s) related to the manifestation of the issue
|
||||
- The location of the affected source code (tag/branch/commit or direct URL)
|
||||
- Any special configuration required to reproduce the issue
|
||||
- Step-by-step instructions to reproduce the issue (please include screenshots if needed)
|
||||
- Proof-of-concept or exploit code (if possible)
|
||||
- Impact of the issue, including how an attacker might exploit the issue
|
||||
|
||||
Once we have received your report, we will respond to you at the email address you provide. If the issue is confirmed, we will release a patch as soon as possible depending on the complexity of the issue.
|
||||
|
||||
At this time, we are not offering a bug bounty program. Any rewards will be at our discretion.
|
||||
4
.github/workflows/linter.yml
vendored
4
.github/workflows/linter.yml
vendored
@@ -6,11 +6,11 @@ jobs:
|
||||
lint:
|
||||
runs-on: ubuntu-latest
|
||||
steps:
|
||||
- uses: actions/checkout@v4
|
||||
- uses: actions/checkout@v3
|
||||
|
||||
- name: Install Requirements
|
||||
run: |
|
||||
pip install ruff
|
||||
|
||||
- name: Run Ruff Linter
|
||||
run: ruff check
|
||||
run: ruff check --exclude "templates","__init__.py"
|
||||
|
||||
8
.github/workflows/mkdocs.yml
vendored
8
.github/workflows/mkdocs.yml
vendored
@@ -13,10 +13,10 @@ jobs:
|
||||
|
||||
steps:
|
||||
- name: Checkout code
|
||||
uses: actions/checkout@v4
|
||||
uses: actions/checkout@v2
|
||||
|
||||
- name: Setup Python
|
||||
uses: actions/setup-python@v5
|
||||
uses: actions/setup-python@v4
|
||||
with:
|
||||
python-version: '3.10'
|
||||
|
||||
@@ -25,7 +25,7 @@ jobs:
|
||||
run: echo "::set-output name=hash::$(sha256sum requirements-doc.txt | awk '{print $1}')"
|
||||
|
||||
- name: Setup cache
|
||||
uses: actions/cache@v4
|
||||
uses: actions/cache@v3
|
||||
with:
|
||||
key: mkdocs-material-${{ steps.req-hash.outputs.hash }}
|
||||
path: .cache
|
||||
@@ -42,4 +42,4 @@ jobs:
|
||||
GH_TOKEN: ${{ secrets.GH_TOKEN }}
|
||||
|
||||
- name: Build and deploy MkDocs
|
||||
run: mkdocs gh-deploy --force
|
||||
run: mkdocs gh-deploy --force
|
||||
4
.github/workflows/security-checker.yml
vendored
4
.github/workflows/security-checker.yml
vendored
@@ -11,7 +11,7 @@ jobs:
|
||||
uses: actions/checkout@v4
|
||||
|
||||
- name: Set up Python
|
||||
uses: actions/setup-python@v5
|
||||
uses: actions/setup-python@v4
|
||||
with:
|
||||
python-version: "3.11.9"
|
||||
|
||||
@@ -19,5 +19,5 @@ jobs:
|
||||
run: pip install bandit
|
||||
|
||||
- name: Run Bandit
|
||||
run: bandit -c pyproject.toml -r src/ -ll
|
||||
run: bandit -c pyproject.toml -r src/ -lll
|
||||
|
||||
|
||||
8
.github/workflows/stale.yml
vendored
8
.github/workflows/stale.yml
vendored
@@ -1,10 +1,5 @@
|
||||
name: Mark stale issues and pull requests
|
||||
|
||||
permissions:
|
||||
contents: write
|
||||
issues: write
|
||||
pull-requests: write
|
||||
|
||||
on:
|
||||
schedule:
|
||||
- cron: '10 12 * * *'
|
||||
@@ -13,6 +8,9 @@ on:
|
||||
jobs:
|
||||
stale:
|
||||
runs-on: ubuntu-latest
|
||||
permissions:
|
||||
issues: write
|
||||
pull-requests: write
|
||||
steps:
|
||||
- uses: actions/stale@v9
|
||||
with:
|
||||
|
||||
6
.github/workflows/tests.yml
vendored
6
.github/workflows/tests.yml
vendored
@@ -23,10 +23,10 @@ jobs:
|
||||
|
||||
|
||||
- name: Set up Python
|
||||
run: uv python install 3.12.8
|
||||
run: uv python install 3.11.9
|
||||
|
||||
- name: Install the project
|
||||
run: uv sync --dev --all-extras
|
||||
run: uv sync --dev
|
||||
|
||||
- name: Run tests
|
||||
run: uv run pytest tests -vv
|
||||
run: uv run pytest tests
|
||||
|
||||
2
.github/workflows/type-checker.yml
vendored
2
.github/workflows/type-checker.yml
vendored
@@ -14,7 +14,7 @@ jobs:
|
||||
uses: actions/checkout@v4
|
||||
|
||||
- name: Setup Python
|
||||
uses: actions/setup-python@v5
|
||||
uses: actions/setup-python@v4
|
||||
with:
|
||||
python-version: "3.11.9"
|
||||
|
||||
|
||||
6
.gitignore
vendored
6
.gitignore
vendored
@@ -17,9 +17,3 @@ rc-tests/*
|
||||
temp/*
|
||||
.vscode/*
|
||||
crew_tasks_output.json
|
||||
.codesight
|
||||
.mypy_cache
|
||||
.ruff_cache
|
||||
.venv
|
||||
agentops.log
|
||||
test_flow.html
|
||||
@@ -1,7 +1,9 @@
|
||||
repos:
|
||||
- repo: https://github.com/astral-sh/ruff-pre-commit
|
||||
rev: v0.8.2
|
||||
rev: v0.4.4
|
||||
hooks:
|
||||
- id: ruff
|
||||
args: ["--fix"]
|
||||
exclude: "templates"
|
||||
- id: ruff-format
|
||||
exclude: "templates"
|
||||
|
||||
@@ -1,9 +0,0 @@
|
||||
exclude = [
|
||||
"templates",
|
||||
"__init__.py",
|
||||
]
|
||||
|
||||
[lint]
|
||||
select = [
|
||||
"I", # isort rules
|
||||
]
|
||||
203
README.md
203
README.md
@@ -1,18 +1,10 @@
|
||||
<div align="center">
|
||||
|
||||

|
||||

|
||||
|
||||
# **CrewAI**
|
||||
|
||||
**CrewAI**: Production-grade framework for orchestrating sophisticated AI agent systems. From simple automations to complex real-world applications, CrewAI provides precise control and deep customization. By fostering collaborative intelligence through flexible, production-ready architecture, CrewAI empowers agents to work together seamlessly, tackling complex business challenges with predictable, consistent results.
|
||||
|
||||
**CrewAI Enterprise**
|
||||
Want to plan, build (+ no code), deploy, monitor and interare your agents: [CrewAI Enterprise](https://www.crewai.com/enterprise). Designed for complex, real-world applications, our enterprise solution offers:
|
||||
|
||||
- **Seamless Integrations**
|
||||
- **Scalable & Secure Deployment**
|
||||
- **Actionable Insights**
|
||||
- **24/7 Support**
|
||||
🤖 **CrewAI**: Cutting-edge framework for orchestrating role-playing, autonomous AI agents. By fostering collaborative intelligence, CrewAI empowers agents to work together seamlessly, tackling complex tasks.
|
||||
|
||||
<h3>
|
||||
|
||||
@@ -30,17 +22,13 @@ Want to plan, build (+ no code), deploy, monitor and interare your agents: [Crew
|
||||
- [Why CrewAI?](#why-crewai)
|
||||
- [Getting Started](#getting-started)
|
||||
- [Key Features](#key-features)
|
||||
- [Understanding Flows and Crews](#understanding-flows-and-crews)
|
||||
- [CrewAI vs LangGraph](#how-crewai-compares)
|
||||
- [Examples](#examples)
|
||||
- [Quick Tutorial](#quick-tutorial)
|
||||
- [Write Job Descriptions](#write-job-descriptions)
|
||||
- [Trip Planner](#trip-planner)
|
||||
- [Stock Analysis](#stock-analysis)
|
||||
- [Using Crews and Flows Together](#using-crews-and-flows-together)
|
||||
- [Connecting Your Crew to a Model](#connecting-your-crew-to-a-model)
|
||||
- [How CrewAI Compares](#how-crewai-compares)
|
||||
- [Frequently Asked Questions (FAQ)](#frequently-asked-questions-faq)
|
||||
- [Contribution](#contribution)
|
||||
- [Telemetry](#telemetry)
|
||||
- [License](#license)
|
||||
@@ -48,51 +36,22 @@ Want to plan, build (+ no code), deploy, monitor and interare your agents: [Crew
|
||||
## Why CrewAI?
|
||||
|
||||
The power of AI collaboration has too much to offer.
|
||||
CrewAI is a standalone framework, built from the ground up without dependencies on Langchain or other agent frameworks. It's designed to enable AI agents to assume roles, share goals, and operate in a cohesive unit - much like a well-oiled crew. Whether you're building a smart assistant platform, an automated customer service ensemble, or a multi-agent research team, CrewAI provides the backbone for sophisticated multi-agent interactions.
|
||||
CrewAI is designed to enable AI agents to assume roles, share goals, and operate in a cohesive unit - much like a well-oiled crew. Whether you're building a smart assistant platform, an automated customer service ensemble, or a multi-agent research team, CrewAI provides the backbone for sophisticated multi-agent interactions.
|
||||
|
||||
## Getting Started
|
||||
|
||||
### Learning Resources
|
||||
|
||||
Learn CrewAI through our comprehensive courses:
|
||||
- [Multi AI Agent Systems with CrewAI](https://www.deeplearning.ai/short-courses/multi-ai-agent-systems-with-crewai/) - Master the fundamentals of multi-agent systems
|
||||
- [Practical Multi AI Agents and Advanced Use Cases](https://www.deeplearning.ai/short-courses/practical-multi-ai-agents-and-advanced-use-cases-with-crewai/) - Deep dive into advanced implementations
|
||||
|
||||
### Understanding Flows and Crews
|
||||
|
||||
CrewAI offers two powerful, complementary approaches that work seamlessly together to build sophisticated AI applications:
|
||||
|
||||
1. **Crews**: Teams of AI agents with true autonomy and agency, working together to accomplish complex tasks through role-based collaboration. Crews enable:
|
||||
- Natural, autonomous decision-making between agents
|
||||
- Dynamic task delegation and collaboration
|
||||
- Specialized roles with defined goals and expertise
|
||||
- Flexible problem-solving approaches
|
||||
|
||||
2. **Flows**: Production-ready, event-driven workflows that deliver precise control over complex automations. Flows provide:
|
||||
- Fine-grained control over execution paths for real-world scenarios
|
||||
- Secure, consistent state management between tasks
|
||||
- Clean integration of AI agents with production Python code
|
||||
- Conditional branching for complex business logic
|
||||
|
||||
The true power of CrewAI emerges when combining Crews and Flows. This synergy allows you to:
|
||||
- Build complex, production-grade applications
|
||||
- Balance autonomy with precise control
|
||||
- Handle sophisticated real-world scenarios
|
||||
- Maintain clean, maintainable code structure
|
||||
|
||||
### Getting Started with Installation
|
||||
|
||||
To get started with CrewAI, follow these simple steps:
|
||||
|
||||
### 1. Installation
|
||||
|
||||
Ensure you have Python >=3.10 <3.13 installed on your system. CrewAI uses [UV](https://docs.astral.sh/uv/) for dependency management and package handling, offering a seamless setup and execution experience.
|
||||
Ensure you have Python >=3.10 <=3.13 installed on your system. CrewAI uses [UV](https://docs.astral.sh/uv/) for dependency management and package handling, offering a seamless setup and execution experience.
|
||||
|
||||
First, install CrewAI:
|
||||
|
||||
```shell
|
||||
pip install crewai
|
||||
```
|
||||
|
||||
If you want to install the 'crewai' package along with its optional features that include additional tools for agents, you can do so by using the following command:
|
||||
|
||||
```shell
|
||||
@@ -100,22 +59,6 @@ pip install 'crewai[tools]'
|
||||
```
|
||||
The command above installs the basic package and also adds extra components which require more dependencies to function.
|
||||
|
||||
### Troubleshooting Dependencies
|
||||
|
||||
If you encounter issues during installation or usage, here are some common solutions:
|
||||
|
||||
#### Common Issues
|
||||
|
||||
1. **ModuleNotFoundError: No module named 'tiktoken'**
|
||||
- Install tiktoken explicitly: `pip install 'crewai[embeddings]'`
|
||||
- If using embedchain or other tools: `pip install 'crewai[tools]'`
|
||||
|
||||
2. **Failed building wheel for tiktoken**
|
||||
- Ensure Rust compiler is installed (see installation steps above)
|
||||
- For Windows: Verify Visual C++ Build Tools are installed
|
||||
- Try upgrading pip: `pip install --upgrade pip`
|
||||
- If issues persist, use a pre-built wheel: `pip install tiktoken --prefer-binary`
|
||||
|
||||
### 2. Setting Up Your Crew with the YAML Configuration
|
||||
|
||||
To create a new CrewAI project, run the following CLI (Command Line Interface) command:
|
||||
@@ -157,7 +100,7 @@ You can now start developing your crew by editing the files in the `src/my_proje
|
||||
|
||||
#### Example of a simple crew with a sequential process:
|
||||
|
||||
Instantiate your crew:
|
||||
Instatiate your crew:
|
||||
|
||||
```shell
|
||||
crewai create crew latest-ai-development
|
||||
@@ -178,7 +121,7 @@ researcher:
|
||||
You're a seasoned researcher with a knack for uncovering the latest
|
||||
developments in {topic}. Known for your ability to find the most relevant
|
||||
information and present it in a clear and concise manner.
|
||||
|
||||
|
||||
reporting_analyst:
|
||||
role: >
|
||||
{topic} Reporting Analyst
|
||||
@@ -198,7 +141,7 @@ research_task:
|
||||
description: >
|
||||
Conduct a thorough research about {topic}
|
||||
Make sure you find any interesting and relevant information given
|
||||
the current year is 2025.
|
||||
the current year is 2024.
|
||||
expected_output: >
|
||||
A list with 10 bullet points of the most relevant information about {topic}
|
||||
agent: researcher
|
||||
@@ -262,7 +205,7 @@ class LatestAiDevelopmentCrew():
|
||||
tasks=self.tasks, # Automatically created by the @task decorator
|
||||
process=Process.sequential,
|
||||
verbose=True,
|
||||
)
|
||||
)
|
||||
```
|
||||
|
||||
**main.py**
|
||||
@@ -321,16 +264,13 @@ In addition to the sequential process, you can use the hierarchical process, whi
|
||||
|
||||
## Key Features
|
||||
|
||||
**Note**: CrewAI is a standalone framework built from the ground up, without dependencies on Langchain or other agent frameworks.
|
||||
|
||||
- **Deep Customization**: Build sophisticated agents with full control over the system - from overriding inner prompts to accessing low-level APIs. Customize roles, goals, tools, and behaviors while maintaining clean abstractions.
|
||||
- **Autonomous Inter-Agent Delegation**: Agents can autonomously delegate tasks and inquire amongst themselves, enabling complex problem-solving in real-world scenarios.
|
||||
- **Flexible Task Management**: Define and customize tasks with granular control, from simple operations to complex multi-step processes.
|
||||
- **Production-Grade Architecture**: Support for both high-level abstractions and low-level customization, with robust error handling and state management.
|
||||
- **Predictable Results**: Ensure consistent, accurate outputs through programmatic guardrails, agent training capabilities, and flow-based execution control. See our [documentation on guardrails](https://docs.crewai.com/how-to/guardrails/) for implementation details.
|
||||
- **Model Flexibility**: Run your crew using OpenAI or open source models with production-ready integrations. See [Connect CrewAI to LLMs](https://docs.crewai.com/how-to/LLM-Connections/) for detailed configuration options.
|
||||
- **Event-Driven Flows**: Build complex, real-world workflows with precise control over execution paths, state management, and conditional logic.
|
||||
- **Process Orchestration**: Achieve any workflow pattern through flows - from simple sequential and hierarchical processes to complex, custom orchestration patterns with conditional branching and parallel execution.
|
||||
- **Role-Based Agent Design**: Customize agents with specific roles, goals, and tools.
|
||||
- **Autonomous Inter-Agent Delegation**: Agents can autonomously delegate tasks and inquire amongst themselves, enhancing problem-solving efficiency.
|
||||
- **Flexible Task Management**: Define tasks with customizable tools and assign them to agents dynamically.
|
||||
- **Processes Driven**: Currently only supports `sequential` task execution and `hierarchical` processes, but more complex processes like consensual and autonomous are being worked on.
|
||||
- **Save output as file**: Save the output of individual tasks as a file, so you can use it later.
|
||||
- **Parse output as Pydantic or Json**: Parse the output of individual tasks as a Pydantic model or as a Json if you want to.
|
||||
- **Works with Open Source Models**: Run your crew using Open AI or open source models refer to the [Connect CrewAI to LLMs](https://docs.crewai.com/how-to/LLM-Connections/) page for details on configuring your agents' connections to models, even ones running locally!
|
||||
|
||||

|
||||
|
||||
@@ -365,98 +305,6 @@ You can test different real life examples of AI crews in the [CrewAI-examples re
|
||||
|
||||
[](https://www.youtube.com/watch?v=e0Uj4yWdaAg "Stock Analysis")
|
||||
|
||||
### Using Crews and Flows Together
|
||||
|
||||
CrewAI's power truly shines when combining Crews with Flows to create sophisticated automation pipelines. Here's how you can orchestrate multiple Crews within a Flow:
|
||||
|
||||
```python
|
||||
from crewai.flow.flow import Flow, listen, start, router
|
||||
from crewai import Crew, Agent, Task
|
||||
from pydantic import BaseModel
|
||||
|
||||
# Define structured state for precise control
|
||||
class MarketState(BaseModel):
|
||||
sentiment: str = "neutral"
|
||||
confidence: float = 0.0
|
||||
recommendations: list = []
|
||||
|
||||
class AdvancedAnalysisFlow(Flow[MarketState]):
|
||||
@start()
|
||||
def fetch_market_data(self):
|
||||
# Demonstrate low-level control with structured state
|
||||
self.state.sentiment = "analyzing"
|
||||
return {"sector": "tech", "timeframe": "1W"} # These parameters match the task description template
|
||||
|
||||
@listen(fetch_market_data)
|
||||
def analyze_with_crew(self, market_data):
|
||||
# Show crew agency through specialized roles
|
||||
analyst = Agent(
|
||||
role="Senior Market Analyst",
|
||||
goal="Conduct deep market analysis with expert insight",
|
||||
backstory="You're a veteran analyst known for identifying subtle market patterns"
|
||||
)
|
||||
researcher = Agent(
|
||||
role="Data Researcher",
|
||||
goal="Gather and validate supporting market data",
|
||||
backstory="You excel at finding and correlating multiple data sources"
|
||||
)
|
||||
|
||||
analysis_task = Task(
|
||||
description="Analyze {sector} sector data for the past {timeframe}",
|
||||
expected_output="Detailed market analysis with confidence score",
|
||||
agent=analyst
|
||||
)
|
||||
research_task = Task(
|
||||
description="Find supporting data to validate the analysis",
|
||||
expected_output="Corroborating evidence and potential contradictions",
|
||||
agent=researcher
|
||||
)
|
||||
|
||||
# Demonstrate crew autonomy
|
||||
analysis_crew = Crew(
|
||||
agents=[analyst, researcher],
|
||||
tasks=[analysis_task, research_task],
|
||||
process=Process.sequential,
|
||||
verbose=True
|
||||
)
|
||||
return analysis_crew.kickoff(inputs=market_data) # Pass market_data as named inputs
|
||||
|
||||
@router(analyze_with_crew)
|
||||
def determine_next_steps(self):
|
||||
# Show flow control with conditional routing
|
||||
if self.state.confidence > 0.8:
|
||||
return "high_confidence"
|
||||
elif self.state.confidence > 0.5:
|
||||
return "medium_confidence"
|
||||
return "low_confidence"
|
||||
|
||||
@listen("high_confidence")
|
||||
def execute_strategy(self):
|
||||
# Demonstrate complex decision making
|
||||
strategy_crew = Crew(
|
||||
agents=[
|
||||
Agent(role="Strategy Expert",
|
||||
goal="Develop optimal market strategy")
|
||||
],
|
||||
tasks=[
|
||||
Task(description="Create detailed strategy based on analysis",
|
||||
expected_output="Step-by-step action plan")
|
||||
]
|
||||
)
|
||||
return strategy_crew.kickoff()
|
||||
|
||||
@listen("medium_confidence", "low_confidence")
|
||||
def request_additional_analysis(self):
|
||||
self.state.recommendations.append("Gather more data")
|
||||
return "Additional analysis required"
|
||||
```
|
||||
|
||||
This example demonstrates how to:
|
||||
1. Use Python code for basic data operations
|
||||
2. Create and execute Crews as steps in your workflow
|
||||
3. Use Flow decorators to manage the sequence of operations
|
||||
4. Implement conditional branching based on Crew results
|
||||
|
||||
## Connecting Your Crew to a Model
|
||||
|
||||
CrewAI supports using various LLMs through a variety of connection options. By default your agents will use the OpenAI API when querying the model. However, there are several other ways to allow your agents to connect to models. For example, you can configure your agents to use a local model via the Ollama tool.
|
||||
@@ -465,13 +313,9 @@ Please refer to the [Connect CrewAI to LLMs](https://docs.crewai.com/how-to/LLM-
|
||||
|
||||
## How CrewAI Compares
|
||||
|
||||
**CrewAI's Advantage**: CrewAI combines autonomous agent intelligence with precise workflow control through its unique Crews and Flows architecture. The framework excels at both high-level orchestration and low-level customization, enabling complex, production-grade systems with granular control.
|
||||
**CrewAI's Advantage**: CrewAI is built with production in mind. It offers the flexibility of Autogen's conversational agents and the structured process approach of ChatDev, but without the rigidity. CrewAI's processes are designed to be dynamic and adaptable, fitting seamlessly into both development and production workflows.
|
||||
|
||||
- **LangGraph**: While LangGraph provides a foundation for building agent workflows, its approach requires significant boilerplate code and complex state management patterns. The framework's tight coupling with LangChain can limit flexibility when implementing custom agent behaviors or integrating with external systems.
|
||||
|
||||
*P.S. CrewAI demonstrates significant performance advantages over LangGraph, executing 5.76x faster in certain cases like this QA task example ([see comparison](https://github.com/crewAIInc/crewAI-examples/tree/main/Notebooks/CrewAI%20Flows%20%26%20Langgraph/QA%20Agent)) while achieving higher evaluation scores with faster completion times in certain coding tasks, like in this example ([detailed analysis](https://github.com/crewAIInc/crewAI-examples/blob/main/Notebooks/CrewAI%20Flows%20%26%20Langgraph/Coding%20Assistant/coding_assistant_eval.ipynb)).*
|
||||
|
||||
- **Autogen**: While Autogen excels at creating conversational agents capable of working together, it lacks an inherent concept of process. In Autogen, orchestrating agents' interactions requires additional programming, which can become complex and cumbersome as the scale of tasks grows.
|
||||
- **Autogen**: While Autogen does good in creating conversational agents capable of working together, it lacks an inherent concept of process. In Autogen, orchestrating agents' interactions requires additional programming, which can become complex and cumbersome as the scale of tasks grows.
|
||||
|
||||
- **ChatDev**: ChatDev introduced the idea of processes into the realm of AI agents, but its implementation is quite rigid. Customizations in ChatDev are limited and not geared towards production environments, which can hinder scalability and flexibility in real-world applications.
|
||||
|
||||
@@ -507,13 +351,13 @@ pre-commit install
|
||||
### Running Tests
|
||||
|
||||
```bash
|
||||
uv run pytest .
|
||||
uvx pytest
|
||||
```
|
||||
|
||||
### Running static type checks
|
||||
|
||||
```bash
|
||||
uvx mypy src
|
||||
uvx mypy
|
||||
```
|
||||
|
||||
### Packaging
|
||||
@@ -532,7 +376,7 @@ pip install dist/*.tar.gz
|
||||
|
||||
CrewAI uses anonymous telemetry to collect usage data with the main purpose of helping us improve the library by focusing our efforts on the most used features, integrations and tools.
|
||||
|
||||
It's pivotal to understand that **NO data is collected** concerning prompts, task descriptions, agents' backstories or goals, usage of tools, API calls, responses, any data processed by the agents, or secrets and environment variables, with the exception of the conditions mentioned. When the `share_crew` feature is enabled, detailed data including task descriptions, agents' backstories or goals, and other specific attributes are collected to provide deeper insights while respecting user privacy. Users can disable telemetry by setting the environment variable OTEL_SDK_DISABLED to true.
|
||||
It's pivotal to understand that **NO data is collected** concerning prompts, task descriptions, agents' backstories or goals, usage of tools, API calls, responses, any data processed by the agents, or secrets and environment variables, with the exception of the conditions mentioned. When the `share_crew` feature is enabled, detailed data including task descriptions, agents' backstories or goals, and other specific attributes are collected to provide deeper insights while respecting user privacy. We don't offer a way to disable it now, but we will in the future.
|
||||
|
||||
Data collected includes:
|
||||
|
||||
@@ -555,7 +399,7 @@ Data collected includes:
|
||||
- Roles of agents in a crew
|
||||
- Understand high level use cases so we can build better tools, integrations and examples about it
|
||||
- Tools names available
|
||||
- Understand out of the publicly available tools, which ones are being used the most so we can improve them
|
||||
- Understand out of the publically available tools, which ones are being used the most so we can improve them
|
||||
|
||||
Users can opt-in to Further Telemetry, sharing the complete telemetry data by setting the `share_crew` attribute to `True` on their Crews. Enabling `share_crew` results in the collection of detailed crew and task execution data, including `goal`, `backstory`, `context`, and `output` of tasks. This enables a deeper insight into usage patterns while respecting the user's choice to share.
|
||||
|
||||
@@ -596,8 +440,5 @@ A: CrewAI uses anonymous telemetry to collect usage data for improvement purpose
|
||||
### Q: Where can I find examples of CrewAI in action?
|
||||
A: You can find various real-life examples in the [CrewAI-examples repository](https://github.com/crewAIInc/crewAI-examples), including trip planners, stock analysis tools, and more.
|
||||
|
||||
### Q: What is the difference between Crews and Flows?
|
||||
A: Crews and Flows serve different but complementary purposes in CrewAI. Crews are teams of AI agents working together to accomplish specific tasks through role-based collaboration, delivering accurate and predictable results. Flows, on the other hand, are event-driven workflows that can orchestrate both Crews and regular Python code, allowing you to build complex automation pipelines with secure state management and conditional execution paths.
|
||||
|
||||
### Q: How can I contribute to CrewAI?
|
||||
A: Contributions are welcome! You can fork the repository, create a new branch for your feature, add your improvement, and send a pull request. Check the Contribution section in the README for more details.
|
||||
|
||||
@@ -1,345 +1,159 @@
|
||||
---
|
||||
title: Agents
|
||||
description: Detailed guide on creating and managing agents within the CrewAI framework.
|
||||
description: What are CrewAI Agents and how to use them.
|
||||
icon: robot
|
||||
---
|
||||
|
||||
## Overview of an Agent
|
||||
## What is an agent?
|
||||
|
||||
In the CrewAI framework, an `Agent` is an autonomous unit that can:
|
||||
- Perform specific tasks
|
||||
- Make decisions based on its role and goal
|
||||
- Use tools to accomplish objectives
|
||||
- Communicate and collaborate with other agents
|
||||
- Maintain memory of interactions
|
||||
- Delegate tasks when allowed
|
||||
An agent is an **autonomous unit** programmed to:
|
||||
<ul>
|
||||
<li class='leading-3'>Perform tasks</li>
|
||||
<li class='leading-3'>Make decisions</li>
|
||||
<li class='leading-3'>Communicate with other agents</li>
|
||||
</ul>
|
||||
|
||||
<Tip>
|
||||
Think of an agent as a specialized team member with specific skills, expertise, and responsibilities. For example, a `Researcher` agent might excel at gathering and analyzing information, while a `Writer` agent might be better at creating content.
|
||||
Think of an agent as a member of a team, with specific skills and a particular job to do. Agents can have different roles like `Researcher`, `Writer`, or `Customer Support`, each contributing to the overall goal of the crew.
|
||||
</Tip>
|
||||
|
||||
## Agent Attributes
|
||||
## Agent attributes
|
||||
|
||||
| Attribute | Parameter | Type | Description |
|
||||
| :-------------------------------------- | :----------------------- | :---------------------------- | :------------------------------------------------------------------------------------------------------------------- |
|
||||
| **Role** | `role` | `str` | Defines the agent's function and expertise within the crew. |
|
||||
| **Goal** | `goal` | `str` | The individual objective that guides the agent's decision-making. |
|
||||
| **Backstory** | `backstory` | `str` | Provides context and personality to the agent, enriching interactions. |
|
||||
| **LLM** _(optional)_ | `llm` | `Union[str, LLM, Any]` | Language model that powers the agent. Defaults to the model specified in `OPENAI_MODEL_NAME` or "gpt-4". |
|
||||
| **Tools** _(optional)_ | `tools` | `List[BaseTool]` | Capabilities or functions available to the agent. Defaults to an empty list. |
|
||||
| **Function Calling LLM** _(optional)_ | `function_calling_llm` | `Optional[Any]` | Language model for tool calling, overrides crew's LLM if specified. |
|
||||
| **Max Iterations** _(optional)_ | `max_iter` | `int` | Maximum iterations before the agent must provide its best answer. Default is 20. |
|
||||
| **Max RPM** _(optional)_ | `max_rpm` | `Optional[int]` | Maximum requests per minute to avoid rate limits. |
|
||||
| **Max Execution Time** _(optional)_ | `max_execution_time` | `Optional[int]` | Maximum time (in seconds) for task execution. |
|
||||
| **Memory** _(optional)_ | `memory` | `bool` | Whether the agent should maintain memory of interactions. Default is True. |
|
||||
| **Verbose** _(optional)_ | `verbose` | `bool` | Enable detailed execution logs for debugging. Default is False. |
|
||||
| **Allow Delegation** _(optional)_ | `allow_delegation` | `bool` | Allow the agent to delegate tasks to other agents. Default is False. |
|
||||
| **Step Callback** _(optional)_ | `step_callback` | `Optional[Any]` | Function called after each agent step, overrides crew callback. |
|
||||
| **Cache** _(optional)_ | `cache` | `bool` | Enable caching for tool usage. Default is True. |
|
||||
| **System Template** _(optional)_ | `system_template` | `Optional[str]` | Custom system prompt template for the agent. |
|
||||
| **Prompt Template** _(optional)_ | `prompt_template` | `Optional[str]` | Custom prompt template for the agent. |
|
||||
| **Response Template** _(optional)_ | `response_template` | `Optional[str]` | Custom response template for the agent. |
|
||||
| **Allow Code Execution** _(optional)_ | `allow_code_execution` | `Optional[bool]` | Enable code execution for the agent. Default is False. |
|
||||
| **Max Retry Limit** _(optional)_ | `max_retry_limit` | `int` | Maximum number of retries when an error occurs. Default is 2. |
|
||||
| **Respect Context Window** _(optional)_ | `respect_context_window` | `bool` | Keep messages under context window size by summarizing. Default is True. |
|
||||
| **Code Execution Mode** _(optional)_ | `code_execution_mode` | `Literal["safe", "unsafe"]` | Mode for code execution: 'safe' (using Docker) or 'unsafe' (direct). Default is 'safe'. |
|
||||
| **Embedder** _(optional)_ | `embedder` | `Optional[Dict[str, Any]]` | Configuration for the embedder used by the agent. |
|
||||
| **Knowledge Sources** _(optional)_ | `knowledge_sources` | `Optional[List[BaseKnowledgeSource]]` | Knowledge sources available to the agent. |
|
||||
| **Use System Prompt** _(optional)_ | `use_system_prompt` | `Optional[bool]` | Whether to use system prompt (for o1 model support). Default is True. |
|
||||
| Attribute | Parameter | Description |
|
||||
| :------------------------- | :--------- | :--------------------------------------------------------------------------------------------------------------------------------------------------------------------------------------------------------------------------------------------- |
|
||||
| **Role** | `role` | Defines the agent's function within the crew. It determines the kind of tasks the agent is best suited for. |
|
||||
| **Goal** | `goal` | The individual objective that the agent aims to achieve. It guides the agent's decision-making process. |
|
||||
| **Backstory** | `backstory`| Provides context to the agent's role and goal, enriching the interaction and collaboration dynamics. |
|
||||
| **LLM** *(optional)* | `llm` | Represents the language model that will run the agent. It dynamically fetches the model name from the `OPENAI_MODEL_NAME` environment variable, defaulting to "gpt-4" if not specified. |
|
||||
| **Tools** *(optional)* | `tools` | Set of capabilities or functions that the agent can use to perform tasks. Expected to be instances of custom classes compatible with the agent's execution environment. Tools are initialized with a default value of an empty list. |
|
||||
| **Function Calling LLM** *(optional)* | `function_calling_llm` | Specifies the language model that will handle the tool calling for this agent, overriding the crew function calling LLM if passed. Default is `None`. |
|
||||
| **Max Iter** *(optional)* | `max_iter` | Max Iter is the maximum number of iterations the agent can perform before being forced to give its best answer. Default is `25`. |
|
||||
| **Max RPM** *(optional)* | `max_rpm` | Max RPM is the maximum number of requests per minute the agent can perform to avoid rate limits. It's optional and can be left unspecified, with a default value of `None`. |
|
||||
| **Max Execution Time** *(optional)* | `max_execution_time` | Max Execution Time is the maximum execution time for an agent to execute a task. It's optional and can be left unspecified, with a default value of `None`, meaning no max execution time. |
|
||||
| **Verbose** *(optional)* | `verbose` | Setting this to `True` configures the internal logger to provide detailed execution logs, aiding in debugging and monitoring. Default is `False`. |
|
||||
| **Allow Delegation** *(optional)* | `allow_delegation` | Agents can delegate tasks or questions to one another, ensuring that each task is handled by the most suitable agent. Default is `False`.
|
||||
| **Step Callback** *(optional)* | `step_callback` | A function that is called after each step of the agent. This can be used to log the agent's actions or to perform other operations. It will overwrite the crew `step_callback`. |
|
||||
| **Cache** *(optional)* | `cache` | Indicates if the agent should use a cache for tool usage. Default is `True`. |
|
||||
| **System Template** *(optional)* | `system_template` | Specifies the system format for the agent. Default is `None`. |
|
||||
| **Prompt Template** *(optional)* | `prompt_template` | Specifies the prompt format for the agent. Default is `None`. |
|
||||
| **Response Template** *(optional)* | `response_template` | Specifies the response format for the agent. Default is `None`. |
|
||||
| **Allow Code Execution** *(optional)* | `allow_code_execution` | Enable code execution for the agent. Default is `False`. |
|
||||
| **Max Retry Limit** *(optional)* | `max_retry_limit` | Maximum number of retries for an agent to execute a task when an error occurs. Default is `2`.
|
||||
| **Use System Prompt** *(optional)* | `use_system_prompt` | Adds the ability to not use system prompt (to support o1 models). Default is `True`. |
|
||||
| **Respect Context Window** *(optional)* | `respect_context_window` | Summary strategy to avoid overflowing the context window. Default is `True`. |
|
||||
|
||||
## Creating Agents
|
||||
|
||||
There are two ways to create agents in CrewAI: using **YAML configuration (recommended)** or defining them **directly in code**.
|
||||
|
||||
### YAML Configuration (Recommended)
|
||||
|
||||
Using YAML configuration provides a cleaner, more maintainable way to define agents. We strongly recommend using this approach in your CrewAI projects.
|
||||
|
||||
After creating your CrewAI project as outlined in the [Installation](/installation) section, navigate to the `src/latest_ai_development/config/agents.yaml` file and modify the template to match your requirements.
|
||||
## Creating an agent
|
||||
|
||||
<Note>
|
||||
Variables in your YAML files (like `{topic}`) will be replaced with values from your inputs when running the crew:
|
||||
```python Code
|
||||
crew.kickoff(inputs={'topic': 'AI Agents'})
|
||||
```
|
||||
**Agent interaction**: Agents can interact with each other using CrewAI's built-in delegation and communication mechanisms. This allows for dynamic task management and problem-solving within the crew.
|
||||
</Note>
|
||||
|
||||
Here's an example of how to configure agents using YAML:
|
||||
To create an agent, you would typically initialize an instance of the `Agent` class with the desired properties. Here's a conceptual example including all attributes:
|
||||
|
||||
```yaml agents.yaml
|
||||
# src/latest_ai_development/config/agents.yaml
|
||||
researcher:
|
||||
role: >
|
||||
{topic} Senior Data Researcher
|
||||
goal: >
|
||||
Uncover cutting-edge developments in {topic}
|
||||
backstory: >
|
||||
You're a seasoned researcher with a knack for uncovering the latest
|
||||
developments in {topic}. Known for your ability to find the most relevant
|
||||
information and present it in a clear and concise manner.
|
||||
|
||||
reporting_analyst:
|
||||
role: >
|
||||
{topic} Reporting Analyst
|
||||
goal: >
|
||||
Create detailed reports based on {topic} data analysis and research findings
|
||||
backstory: >
|
||||
You're a meticulous analyst with a keen eye for detail. You're known for
|
||||
your ability to turn complex data into clear and concise reports, making
|
||||
it easy for others to understand and act on the information you provide.
|
||||
```
|
||||
|
||||
To use this YAML configuration in your code, create a crew class that inherits from `CrewBase`:
|
||||
|
||||
```python Code
|
||||
# src/latest_ai_development/crew.py
|
||||
from crewai import Agent, Crew, Process
|
||||
from crewai.project import CrewBase, agent, crew
|
||||
from crewai_tools import SerperDevTool
|
||||
|
||||
@CrewBase
|
||||
class LatestAiDevelopmentCrew():
|
||||
"""LatestAiDevelopment crew"""
|
||||
|
||||
agents_config = "config/agents.yaml"
|
||||
|
||||
@agent
|
||||
def researcher(self) -> Agent:
|
||||
return Agent(
|
||||
config=self.agents_config['researcher'],
|
||||
verbose=True,
|
||||
tools=[SerperDevTool()]
|
||||
)
|
||||
|
||||
@agent
|
||||
def reporting_analyst(self) -> Agent:
|
||||
return Agent(
|
||||
config=self.agents_config['reporting_analyst'],
|
||||
verbose=True
|
||||
)
|
||||
```
|
||||
|
||||
<Note>
|
||||
The names you use in your YAML files (`agents.yaml`) should match the method names in your Python code.
|
||||
</Note>
|
||||
|
||||
### Direct Code Definition
|
||||
|
||||
You can create agents directly in code by instantiating the `Agent` class. Here's a comprehensive example showing all available parameters:
|
||||
|
||||
```python Code
|
||||
```python Code example
|
||||
from crewai import Agent
|
||||
from crewai_tools import SerperDevTool
|
||||
|
||||
# Create an agent with all available parameters
|
||||
agent = Agent(
|
||||
role="Senior Data Scientist",
|
||||
goal="Analyze and interpret complex datasets to provide actionable insights",
|
||||
backstory="With over 10 years of experience in data science and machine learning, "
|
||||
"you excel at finding patterns in complex datasets.",
|
||||
llm="gpt-4", # Default: OPENAI_MODEL_NAME or "gpt-4"
|
||||
function_calling_llm=None, # Optional: Separate LLM for tool calling
|
||||
memory=True, # Default: True
|
||||
verbose=False, # Default: False
|
||||
allow_delegation=False, # Default: False
|
||||
max_iter=20, # Default: 20 iterations
|
||||
max_rpm=None, # Optional: Rate limit for API calls
|
||||
max_execution_time=None, # Optional: Maximum execution time in seconds
|
||||
max_retry_limit=2, # Default: 2 retries on error
|
||||
allow_code_execution=False, # Default: False
|
||||
code_execution_mode="safe", # Default: "safe" (options: "safe", "unsafe")
|
||||
respect_context_window=True, # Default: True
|
||||
use_system_prompt=True, # Default: True
|
||||
tools=[SerperDevTool()], # Optional: List of tools
|
||||
knowledge_sources=None, # Optional: List of knowledge sources
|
||||
embedder=None, # Optional: Custom embedder configuration
|
||||
system_template=None, # Optional: Custom system prompt template
|
||||
prompt_template=None, # Optional: Custom prompt template
|
||||
response_template=None, # Optional: Custom response template
|
||||
step_callback=None, # Optional: Callback function for monitoring
|
||||
role='Data Analyst',
|
||||
goal='Extract actionable insights',
|
||||
backstory="""You're a data analyst at a large company.
|
||||
You're responsible for analyzing data and providing insights
|
||||
to the business.
|
||||
You're currently working on a project to analyze the
|
||||
performance of our marketing campaigns.""",
|
||||
tools=[my_tool1, my_tool2], # Optional, defaults to an empty list
|
||||
llm=my_llm, # Optional
|
||||
function_calling_llm=my_llm, # Optional
|
||||
max_iter=15, # Optional
|
||||
max_rpm=None, # Optional
|
||||
max_execution_time=None, # Optional
|
||||
verbose=True, # Optional
|
||||
allow_delegation=False, # Optional
|
||||
step_callback=my_intermediate_step_callback, # Optional
|
||||
cache=True, # Optional
|
||||
system_template=my_system_template, # Optional
|
||||
prompt_template=my_prompt_template, # Optional
|
||||
response_template=my_response_template, # Optional
|
||||
config=my_config, # Optional
|
||||
crew=my_crew, # Optional
|
||||
tools_handler=my_tools_handler, # Optional
|
||||
cache_handler=my_cache_handler, # Optional
|
||||
callbacks=[callback1, callback2], # Optional
|
||||
allow_code_execution=True, # Optional
|
||||
max_retry_limit=2, # Optional
|
||||
use_system_prompt=True, # Optional
|
||||
respect_context_window=True, # Optional
|
||||
)
|
||||
```
|
||||
|
||||
Let's break down some key parameter combinations for common use cases:
|
||||
## Setting prompt templates
|
||||
|
||||
#### Basic Research Agent
|
||||
```python Code
|
||||
research_agent = Agent(
|
||||
role="Research Analyst",
|
||||
goal="Find and summarize information about specific topics",
|
||||
backstory="You are an experienced researcher with attention to detail",
|
||||
tools=[SerperDevTool()],
|
||||
verbose=True # Enable logging for debugging
|
||||
)
|
||||
```
|
||||
Prompt templates are used to format the prompt for the agent. You can use to update the system, regular and response templates for the agent. Here's an example of how to set prompt templates:
|
||||
|
||||
#### Code Development Agent
|
||||
```python Code
|
||||
dev_agent = Agent(
|
||||
role="Senior Python Developer",
|
||||
goal="Write and debug Python code",
|
||||
backstory="Expert Python developer with 10 years of experience",
|
||||
allow_code_execution=True,
|
||||
code_execution_mode="safe", # Uses Docker for safety
|
||||
max_execution_time=300, # 5-minute timeout
|
||||
max_retry_limit=3 # More retries for complex code tasks
|
||||
)
|
||||
```
|
||||
|
||||
#### Long-Running Analysis Agent
|
||||
```python Code
|
||||
analysis_agent = Agent(
|
||||
role="Data Analyst",
|
||||
goal="Perform deep analysis of large datasets",
|
||||
backstory="Specialized in big data analysis and pattern recognition",
|
||||
memory=True,
|
||||
respect_context_window=True,
|
||||
max_rpm=10, # Limit API calls
|
||||
function_calling_llm="gpt-4o-mini" # Cheaper model for tool calls
|
||||
)
|
||||
```
|
||||
|
||||
#### Custom Template Agent
|
||||
```python Code
|
||||
custom_agent = Agent(
|
||||
role="Customer Service Representative",
|
||||
goal="Assist customers with their inquiries",
|
||||
backstory="Experienced in customer support with a focus on satisfaction",
|
||||
system_template="""<|start_header_id|>system<|end_header_id|>
|
||||
```python Code example
|
||||
agent = Agent(
|
||||
role="{topic} specialist",
|
||||
goal="Figure {goal} out",
|
||||
backstory="I am the master of {role}",
|
||||
system_template="""<|start_header_id|>system<|end_header_id|>
|
||||
{{ .System }}<|eot_id|>""",
|
||||
prompt_template="""<|start_header_id|>user<|end_header_id|>
|
||||
prompt_template="""<|start_header_id|>user<|end_header_id|>
|
||||
{{ .Prompt }}<|eot_id|>""",
|
||||
response_template="""<|start_header_id|>assistant<|end_header_id|>
|
||||
response_template="""<|start_header_id|>assistant<|end_header_id|>
|
||||
{{ .Response }}<|eot_id|>""",
|
||||
)
|
||||
```
|
||||
|
||||
### Parameter Details
|
||||
## Bring your third-party agents
|
||||
|
||||
#### Critical Parameters
|
||||
- `role`, `goal`, and `backstory` are required and shape the agent's behavior
|
||||
- `llm` determines the language model used (default: OpenAI's GPT-4)
|
||||
Extend your third-party agents like LlamaIndex, Langchain, Autogen or fully custom agents using the the CrewAI's `BaseAgent` class.
|
||||
|
||||
#### Memory and Context
|
||||
- `memory`: Enable to maintain conversation history
|
||||
- `respect_context_window`: Prevents token limit issues
|
||||
- `knowledge_sources`: Add domain-specific knowledge bases
|
||||
|
||||
#### Execution Control
|
||||
- `max_iter`: Maximum attempts before giving best answer
|
||||
- `max_execution_time`: Timeout in seconds
|
||||
- `max_rpm`: Rate limiting for API calls
|
||||
- `max_retry_limit`: Retries on error
|
||||
|
||||
#### Code Execution
|
||||
- `allow_code_execution`: Must be True to run code
|
||||
- `code_execution_mode`:
|
||||
- `"safe"`: Uses Docker (recommended for production)
|
||||
- `"unsafe"`: Direct execution (use only in trusted environments)
|
||||
|
||||
#### Templates
|
||||
- `system_template`: Defines agent's core behavior
|
||||
- `prompt_template`: Structures input format
|
||||
- `response_template`: Formats agent responses
|
||||
|
||||
<Note>
|
||||
When using custom templates, you can use variables like `{role}`, `{goal}`, and `{input}` in your templates. These will be automatically populated during execution.
|
||||
<Note>
|
||||
**BaseAgent** includes attributes and methods required to integrate with your crews to run and delegate tasks to other agents within your own crew.
|
||||
</Note>
|
||||
|
||||
## Agent Tools
|
||||
CrewAI is a universal multi-agent framework that allows for all agents to work together to automate tasks and solve problems.
|
||||
|
||||
Agents can be equipped with various tools to enhance their capabilities. CrewAI supports tools from:
|
||||
- [CrewAI Toolkit](https://github.com/joaomdmoura/crewai-tools)
|
||||
- [LangChain Tools](https://python.langchain.com/docs/integrations/tools)
|
||||
```python Code example
|
||||
from crewai import Agent, Task, Crew
|
||||
from custom_agent import CustomAgent # You need to build and extend your own agent logic with the CrewAI BaseAgent class then import it here.
|
||||
|
||||
Here's how to add tools to an agent:
|
||||
from langchain.agents import load_tools
|
||||
|
||||
```python Code
|
||||
from crewai import Agent
|
||||
from crewai_tools import SerperDevTool, WikipediaTools
|
||||
langchain_tools = load_tools(["google-serper"], llm=llm)
|
||||
|
||||
# Create tools
|
||||
search_tool = SerperDevTool()
|
||||
wiki_tool = WikipediaTools()
|
||||
|
||||
# Add tools to agent
|
||||
researcher = Agent(
|
||||
role="AI Technology Researcher",
|
||||
goal="Research the latest AI developments",
|
||||
tools=[search_tool, wiki_tool],
|
||||
verbose=True
|
||||
agent1 = CustomAgent(
|
||||
role="agent role",
|
||||
goal="who is {input}?",
|
||||
backstory="agent backstory",
|
||||
verbose=True,
|
||||
)
|
||||
|
||||
task1 = Task(
|
||||
expected_output="a short biography of {input}",
|
||||
description="a short biography of {input}",
|
||||
agent=agent1,
|
||||
)
|
||||
|
||||
agent2 = Agent(
|
||||
role="agent role",
|
||||
goal="summarize the short bio for {input} and if needed do more research",
|
||||
backstory="agent backstory",
|
||||
verbose=True,
|
||||
)
|
||||
|
||||
task2 = Task(
|
||||
description="a tldr summary of the short biography",
|
||||
expected_output="5 bullet point summary of the biography",
|
||||
agent=agent2,
|
||||
context=[task1],
|
||||
)
|
||||
|
||||
my_crew = Crew(agents=[agent1, agent2], tasks=[task1, task2])
|
||||
crew = my_crew.kickoff(inputs={"input": "Mark Twain"})
|
||||
```
|
||||
|
||||
## Agent Memory and Context
|
||||
## Conclusion
|
||||
|
||||
Agents can maintain memory of their interactions and use context from previous tasks. This is particularly useful for complex workflows where information needs to be retained across multiple tasks.
|
||||
|
||||
```python Code
|
||||
from crewai import Agent
|
||||
|
||||
analyst = Agent(
|
||||
role="Data Analyst",
|
||||
goal="Analyze and remember complex data patterns",
|
||||
memory=True, # Enable memory
|
||||
verbose=True
|
||||
)
|
||||
```
|
||||
|
||||
<Note>
|
||||
When `memory` is enabled, the agent will maintain context across multiple interactions, improving its ability to handle complex, multi-step tasks.
|
||||
</Note>
|
||||
|
||||
## Important Considerations and Best Practices
|
||||
|
||||
### Security and Code Execution
|
||||
- When using `allow_code_execution`, be cautious with user input and always validate it
|
||||
- Use `code_execution_mode: "safe"` (Docker) in production environments
|
||||
- Consider setting appropriate `max_execution_time` limits to prevent infinite loops
|
||||
|
||||
### Performance Optimization
|
||||
- Use `respect_context_window: true` to prevent token limit issues
|
||||
- Set appropriate `max_rpm` to avoid rate limiting
|
||||
- Enable `cache: true` to improve performance for repetitive tasks
|
||||
- Adjust `max_iter` and `max_retry_limit` based on task complexity
|
||||
|
||||
### Memory and Context Management
|
||||
- Use `memory: true` for tasks requiring historical context
|
||||
- Leverage `knowledge_sources` for domain-specific information
|
||||
- Configure `embedder_config` when using custom embedding models
|
||||
- Use custom templates (`system_template`, `prompt_template`, `response_template`) for fine-grained control over agent behavior
|
||||
|
||||
### Agent Collaboration
|
||||
- Enable `allow_delegation: true` when agents need to work together
|
||||
- Use `step_callback` to monitor and log agent interactions
|
||||
- Consider using different LLMs for different purposes:
|
||||
- Main `llm` for complex reasoning
|
||||
- `function_calling_llm` for efficient tool usage
|
||||
|
||||
### Model Compatibility
|
||||
- Set `use_system_prompt: false` for older models that don't support system messages
|
||||
- Ensure your chosen `llm` supports the features you need (like function calling)
|
||||
|
||||
## Troubleshooting Common Issues
|
||||
|
||||
1. **Rate Limiting**: If you're hitting API rate limits:
|
||||
- Implement appropriate `max_rpm`
|
||||
- Use caching for repetitive operations
|
||||
- Consider batching requests
|
||||
|
||||
2. **Context Window Errors**: If you're exceeding context limits:
|
||||
- Enable `respect_context_window`
|
||||
- Use more efficient prompts
|
||||
- Clear agent memory periodically
|
||||
|
||||
3. **Code Execution Issues**: If code execution fails:
|
||||
- Verify Docker is installed for safe mode
|
||||
- Check execution permissions
|
||||
- Review code sandbox settings
|
||||
|
||||
4. **Memory Issues**: If agent responses seem inconsistent:
|
||||
- Verify memory is enabled
|
||||
- Check knowledge source configuration
|
||||
- Review conversation history management
|
||||
|
||||
Remember that agents are most effective when configured according to their specific use case. Take time to understand your requirements and adjust these parameters accordingly.
|
||||
Agents are the building blocks of the CrewAI framework. By understanding how to define and interact with agents,
|
||||
you can create sophisticated AI systems that leverage the power of collaborative intelligence.
|
||||
@@ -6,13 +6,13 @@ icon: terminal
|
||||
|
||||
# CrewAI CLI Documentation
|
||||
|
||||
The CrewAI CLI provides a set of commands to interact with CrewAI, allowing you to create, train, run, and manage crews & flows.
|
||||
The CrewAI CLI provides a set of commands to interact with CrewAI, allowing you to create, train, run, and manage crews and pipelines.
|
||||
|
||||
## Installation
|
||||
|
||||
To use the CrewAI CLI, make sure you have CrewAI installed:
|
||||
|
||||
```shell Terminal
|
||||
```shell
|
||||
pip install crewai
|
||||
```
|
||||
|
||||
@@ -20,7 +20,7 @@ pip install crewai
|
||||
|
||||
The basic structure of a CrewAI CLI command is:
|
||||
|
||||
```shell Terminal
|
||||
```shell
|
||||
crewai [COMMAND] [OPTIONS] [ARGUMENTS]
|
||||
```
|
||||
|
||||
@@ -28,33 +28,34 @@ crewai [COMMAND] [OPTIONS] [ARGUMENTS]
|
||||
|
||||
### 1. Create
|
||||
|
||||
Create a new crew or flow.
|
||||
Create a new crew or pipeline.
|
||||
|
||||
```shell Terminal
|
||||
```shell
|
||||
crewai create [OPTIONS] TYPE NAME
|
||||
```
|
||||
|
||||
- `TYPE`: Choose between "crew" or "flow"
|
||||
- `NAME`: Name of the crew or flow
|
||||
- `TYPE`: Choose between "crew" or "pipeline"
|
||||
- `NAME`: Name of the crew or pipeline
|
||||
- `--router`: (Optional) Create a pipeline with router functionality
|
||||
|
||||
Example:
|
||||
```shell Terminal
|
||||
```shell
|
||||
crewai create crew my_new_crew
|
||||
crewai create flow my_new_flow
|
||||
crewai create pipeline my_new_pipeline --router
|
||||
```
|
||||
|
||||
### 2. Version
|
||||
|
||||
Show the installed version of CrewAI.
|
||||
|
||||
```shell Terminal
|
||||
```shell
|
||||
crewai version [OPTIONS]
|
||||
```
|
||||
|
||||
- `--tools`: (Optional) Show the installed version of CrewAI tools
|
||||
|
||||
Example:
|
||||
```shell Terminal
|
||||
```shell
|
||||
crewai version
|
||||
crewai version --tools
|
||||
```
|
||||
@@ -63,7 +64,7 @@ crewai version --tools
|
||||
|
||||
Train the crew for a specified number of iterations.
|
||||
|
||||
```shell Terminal
|
||||
```shell
|
||||
crewai train [OPTIONS]
|
||||
```
|
||||
|
||||
@@ -71,7 +72,7 @@ crewai train [OPTIONS]
|
||||
- `-f, --filename TEXT`: Path to a custom file for training (default: "trained_agents_data.pkl")
|
||||
|
||||
Example:
|
||||
```shell Terminal
|
||||
```shell
|
||||
crewai train -n 10 -f my_training_data.pkl
|
||||
```
|
||||
|
||||
@@ -79,14 +80,14 @@ crewai train -n 10 -f my_training_data.pkl
|
||||
|
||||
Replay the crew execution from a specific task.
|
||||
|
||||
```shell Terminal
|
||||
```shell
|
||||
crewai replay [OPTIONS]
|
||||
```
|
||||
|
||||
- `-t, --task_id TEXT`: Replay the crew from this task ID, including all subsequent tasks
|
||||
|
||||
Example:
|
||||
```shell Terminal
|
||||
```shell
|
||||
crewai replay -t task_123456
|
||||
```
|
||||
|
||||
@@ -94,7 +95,7 @@ crewai replay -t task_123456
|
||||
|
||||
Retrieve your latest crew.kickoff() task outputs.
|
||||
|
||||
```shell Terminal
|
||||
```shell
|
||||
crewai log-tasks-outputs
|
||||
```
|
||||
|
||||
@@ -102,7 +103,7 @@ crewai log-tasks-outputs
|
||||
|
||||
Reset the crew memories (long, short, entity, latest_crew_kickoff_outputs).
|
||||
|
||||
```shell Terminal
|
||||
```shell
|
||||
crewai reset-memories [OPTIONS]
|
||||
```
|
||||
|
||||
@@ -113,7 +114,7 @@ crewai reset-memories [OPTIONS]
|
||||
- `-a, --all`: Reset ALL memories
|
||||
|
||||
Example:
|
||||
```shell Terminal
|
||||
```shell
|
||||
crewai reset-memories --long --short
|
||||
crewai reset-memories --all
|
||||
```
|
||||
@@ -122,7 +123,7 @@ crewai reset-memories --all
|
||||
|
||||
Test the crew and evaluate the results.
|
||||
|
||||
```shell Terminal
|
||||
```shell
|
||||
crewai test [OPTIONS]
|
||||
```
|
||||
|
||||
@@ -130,82 +131,18 @@ crewai test [OPTIONS]
|
||||
- `-m, --model TEXT`: LLM Model to run the tests on the Crew (default: "gpt-4o-mini")
|
||||
|
||||
Example:
|
||||
```shell Terminal
|
||||
```shell
|
||||
crewai test -n 5 -m gpt-3.5-turbo
|
||||
```
|
||||
|
||||
### 8. Run
|
||||
|
||||
Run the crew or flow.
|
||||
Run the crew.
|
||||
|
||||
```shell Terminal
|
||||
```shell
|
||||
crewai run
|
||||
```
|
||||
|
||||
<Note>
|
||||
Starting from version 0.103.0, the `crewai run` command can be used to run both standard crews and flows. For flows, it automatically detects the type from pyproject.toml and runs the appropriate command. This is now the recommended way to run both crews and flows.
|
||||
</Note>
|
||||
|
||||
<Note>
|
||||
Make sure to run these commands from the directory where your CrewAI project is set up.
|
||||
Some commands may require additional configuration or setup within your project structure.
|
||||
</Note>
|
||||
|
||||
### 9. Chat
|
||||
|
||||
Starting in version `0.98.0`, when you run the `crewai chat` command, you start an interactive session with your crew. The AI assistant will guide you by asking for necessary inputs to execute the crew. Once all inputs are provided, the crew will execute its tasks.
|
||||
|
||||
After receiving the results, you can continue interacting with the assistant for further instructions or questions.
|
||||
|
||||
```shell Terminal
|
||||
crewai chat
|
||||
```
|
||||
<Note>
|
||||
Ensure you execute these commands from your CrewAI project's root directory.
|
||||
</Note>
|
||||
<Note>
|
||||
IMPORTANT: Set the `chat_llm` property in your `crew.py` file to enable this command.
|
||||
|
||||
```python
|
||||
@crew
|
||||
def crew(self) -> Crew:
|
||||
return Crew(
|
||||
agents=self.agents,
|
||||
tasks=self.tasks,
|
||||
process=Process.sequential,
|
||||
verbose=True,
|
||||
chat_llm="gpt-4o", # LLM for chat orchestration
|
||||
)
|
||||
```
|
||||
</Note>
|
||||
|
||||
### 10. API Keys
|
||||
|
||||
When running ```crewai create crew``` command, the CLI will first show you the top 5 most common LLM providers and ask you to select one.
|
||||
|
||||
Once you've selected an LLM provider, you will be prompted for API keys.
|
||||
|
||||
#### Initial API key providers
|
||||
|
||||
The CLI will initially prompt for API keys for the following services:
|
||||
|
||||
* OpenAI
|
||||
* Groq
|
||||
* Anthropic
|
||||
* Google Gemini
|
||||
* SambaNova
|
||||
|
||||
When you select a provider, the CLI will prompt you to enter your API key.
|
||||
|
||||
#### Other Options
|
||||
|
||||
If you select option 6, you will be able to select from a list of LiteLLM supported providers.
|
||||
|
||||
When you select a provider, the CLI will prompt you to enter the Key name and the API key.
|
||||
|
||||
See the following link for each provider's key name:
|
||||
|
||||
* [LiteLLM Providers](https://docs.litellm.ai/docs/providers)
|
||||
|
||||
|
||||
|
||||
|
||||
@@ -22,16 +22,16 @@ A crew in crewAI represents a collaborative group of agents working together to
|
||||
| **Max RPM** _(optional)_ | `max_rpm` | Maximum requests per minute the crew adheres to during execution. Defaults to `None`. |
|
||||
| **Language** _(optional)_ | `language` | Language used for the crew, defaults to English. |
|
||||
| **Language File** _(optional)_ | `language_file` | Path to the language file to be used for the crew. |
|
||||
| **Memory** _(optional)_ | `memory` | Utilized for storing execution memories (short-term, long-term, entity memory). |
|
||||
| **Memory Config** _(optional)_ | `memory_config` | Configuration for the memory provider to be used by the crew. |
|
||||
| **Cache** _(optional)_ | `cache` | Specifies whether to use a cache for storing the results of tools' execution. Defaults to `True`. |
|
||||
| **Embedder** _(optional)_ | `embedder` | Configuration for the embedder to be used by the crew. Mostly used by memory for now. Default is `{"provider": "openai"}`. |
|
||||
| **Full Output** _(optional)_ | `full_output` | Whether the crew should return the full output with all tasks outputs or just the final output. Defaults to `False`. |
|
||||
| **Memory** _(optional)_ | `memory` | Utilized for storing execution memories (short-term, long-term, entity memory). Defaults to `False`. |
|
||||
| **Cache** _(optional)_ | `cache` | Specifies whether to use a cache for storing the results of tools' execution. Defaults to `True`. |
|
||||
| **Embedder** _(optional)_ | `embedder` | Configuration for the embedder to be used by the crew. Mostly used by memory for now. Default is `{"provider": "openai"}`. |
|
||||
| **Full Output** _(optional)_ | `full_output` | Whether the crew should return the full output with all tasks outputs or just the final output. Defaults to `False`. |
|
||||
| **Step Callback** _(optional)_ | `step_callback` | A function that is called after each step of every agent. This can be used to log the agent's actions or to perform other operations; it won't override the agent-specific `step_callback`. |
|
||||
| **Task Callback** _(optional)_ | `task_callback` | A function that is called after the completion of each task. Useful for monitoring or additional operations post-task execution. |
|
||||
| **Share Crew** _(optional)_ | `share_crew` | Whether you want to share the complete crew information and execution with the crewAI team to make the library better, and allow us to train models. |
|
||||
| **Output Log File** _(optional)_ | `output_log_file` | Set to True to save logs as logs.txt in the current directory or provide a file path. Logs will be in JSON format if the filename ends in .json, otherwise .txt. Defautls to `None`. |
|
||||
| **Output Log File** _(optional)_ | `output_log_file` | Whether you want to have a file with the complete crew output and execution. You can set it using True and it will default to the folder you are currently in and it will be called logs.txt or passing a string with the full path and name of the file. |
|
||||
| **Manager Agent** _(optional)_ | `manager_agent` | `manager` sets a custom agent that will be used as a manager. |
|
||||
| **Manager Callbacks** _(optional)_ | `manager_callbacks` | `manager_callbacks` takes a list of callback handlers to be executed by the manager agent when a hierarchical process is used. |
|
||||
| **Prompt File** _(optional)_ | `prompt_file` | Path to the prompt JSON file to be used for the crew. |
|
||||
| **Planning** *(optional)* | `planning` | Adds planning ability to the Crew. When activated before each Crew iteration, all Crew data is sent to an AgentPlanner that will plan the tasks and this plan will be added to each task description. |
|
||||
| **Planning LLM** *(optional)* | `planning_llm` | The language model used by the AgentPlanner in a planning process. |
|
||||
@@ -40,155 +40,6 @@ A crew in crewAI represents a collaborative group of agents working together to
|
||||
**Crew Max RPM**: The `max_rpm` attribute sets the maximum number of requests per minute the crew can perform to avoid rate limits and will override individual agents' `max_rpm` settings if you set it.
|
||||
</Tip>
|
||||
|
||||
## Creating Crews
|
||||
|
||||
There are two ways to create crews in CrewAI: using **YAML configuration (recommended)** or defining them **directly in code**.
|
||||
|
||||
### YAML Configuration (Recommended)
|
||||
|
||||
Using YAML configuration provides a cleaner, more maintainable way to define crews and is consistent with how agents and tasks are defined in CrewAI projects.
|
||||
|
||||
After creating your CrewAI project as outlined in the [Installation](/installation) section, you can define your crew in a class that inherits from `CrewBase` and uses decorators to define agents, tasks, and the crew itself.
|
||||
|
||||
#### Example Crew Class with Decorators
|
||||
|
||||
```python code
|
||||
from crewai import Agent, Crew, Task, Process
|
||||
from crewai.project import CrewBase, agent, task, crew, before_kickoff, after_kickoff
|
||||
|
||||
|
||||
@CrewBase
|
||||
class YourCrewName:
|
||||
"""Description of your crew"""
|
||||
|
||||
# Paths to your YAML configuration files
|
||||
# To see an example agent and task defined in YAML, checkout the following:
|
||||
# - Task: https://docs.crewai.com/concepts/tasks#yaml-configuration-recommended
|
||||
# - Agents: https://docs.crewai.com/concepts/agents#yaml-configuration-recommended
|
||||
agents_config = 'config/agents.yaml'
|
||||
tasks_config = 'config/tasks.yaml'
|
||||
|
||||
@before_kickoff
|
||||
def prepare_inputs(self, inputs):
|
||||
# Modify inputs before the crew starts
|
||||
inputs['additional_data'] = "Some extra information"
|
||||
return inputs
|
||||
|
||||
@after_kickoff
|
||||
def process_output(self, output):
|
||||
# Modify output after the crew finishes
|
||||
output.raw += "\nProcessed after kickoff."
|
||||
return output
|
||||
|
||||
@agent
|
||||
def agent_one(self) -> Agent:
|
||||
return Agent(
|
||||
config=self.agents_config['agent_one'],
|
||||
verbose=True
|
||||
)
|
||||
|
||||
@agent
|
||||
def agent_two(self) -> Agent:
|
||||
return Agent(
|
||||
config=self.agents_config['agent_two'],
|
||||
verbose=True
|
||||
)
|
||||
|
||||
@task
|
||||
def task_one(self) -> Task:
|
||||
return Task(
|
||||
config=self.tasks_config['task_one']
|
||||
)
|
||||
|
||||
@task
|
||||
def task_two(self) -> Task:
|
||||
return Task(
|
||||
config=self.tasks_config['task_two']
|
||||
)
|
||||
|
||||
@crew
|
||||
def crew(self) -> Crew:
|
||||
return Crew(
|
||||
agents=self.agents, # Automatically collected by the @agent decorator
|
||||
tasks=self.tasks, # Automatically collected by the @task decorator.
|
||||
process=Process.sequential,
|
||||
verbose=True,
|
||||
)
|
||||
```
|
||||
|
||||
<Note>
|
||||
Tasks will be executed in the order they are defined.
|
||||
</Note>
|
||||
|
||||
The `CrewBase` class, along with these decorators, automates the collection of agents and tasks, reducing the need for manual management.
|
||||
|
||||
#### Decorators overview from `annotations.py`
|
||||
|
||||
CrewAI provides several decorators in the `annotations.py` file that are used to mark methods within your crew class for special handling:
|
||||
|
||||
- `@CrewBase`: Marks the class as a crew base class.
|
||||
- `@agent`: Denotes a method that returns an `Agent` object.
|
||||
- `@task`: Denotes a method that returns a `Task` object.
|
||||
- `@crew`: Denotes the method that returns the `Crew` object.
|
||||
- `@before_kickoff`: (Optional) Marks a method to be executed before the crew starts.
|
||||
- `@after_kickoff`: (Optional) Marks a method to be executed after the crew finishes.
|
||||
|
||||
These decorators help in organizing your crew's structure and automatically collecting agents and tasks without manually listing them.
|
||||
|
||||
### Direct Code Definition (Alternative)
|
||||
|
||||
Alternatively, you can define the crew directly in code without using YAML configuration files.
|
||||
|
||||
```python code
|
||||
from crewai import Agent, Crew, Task, Process
|
||||
from crewai_tools import YourCustomTool
|
||||
|
||||
class YourCrewName:
|
||||
def agent_one(self) -> Agent:
|
||||
return Agent(
|
||||
role="Data Analyst",
|
||||
goal="Analyze data trends in the market",
|
||||
backstory="An experienced data analyst with a background in economics",
|
||||
verbose=True,
|
||||
tools=[YourCustomTool()]
|
||||
)
|
||||
|
||||
def agent_two(self) -> Agent:
|
||||
return Agent(
|
||||
role="Market Researcher",
|
||||
goal="Gather information on market dynamics",
|
||||
backstory="A diligent researcher with a keen eye for detail",
|
||||
verbose=True
|
||||
)
|
||||
|
||||
def task_one(self) -> Task:
|
||||
return Task(
|
||||
description="Collect recent market data and identify trends.",
|
||||
expected_output="A report summarizing key trends in the market.",
|
||||
agent=self.agent_one()
|
||||
)
|
||||
|
||||
def task_two(self) -> Task:
|
||||
return Task(
|
||||
description="Research factors affecting market dynamics.",
|
||||
expected_output="An analysis of factors influencing the market.",
|
||||
agent=self.agent_two()
|
||||
)
|
||||
|
||||
def crew(self) -> Crew:
|
||||
return Crew(
|
||||
agents=[self.agent_one(), self.agent_two()],
|
||||
tasks=[self.task_one(), self.task_two()],
|
||||
process=Process.sequential,
|
||||
verbose=True
|
||||
)
|
||||
```
|
||||
|
||||
In this example:
|
||||
|
||||
- Agents and tasks are defined directly within the class without decorators.
|
||||
- We manually create and manage the list of agents and tasks.
|
||||
- This approach provides more control but can be less maintainable for larger projects.
|
||||
|
||||
## Crew Output
|
||||
|
||||
@@ -240,23 +91,6 @@ print(f"Tasks Output: {crew_output.tasks_output}")
|
||||
print(f"Token Usage: {crew_output.token_usage}")
|
||||
```
|
||||
|
||||
## Accessing Crew Logs
|
||||
|
||||
You can see real time log of the crew execution, by setting `output_log_file` as a `True(Boolean)` or a `file_name(str)`. Supports logging of events as both `file_name.txt` and `file_name.json`.
|
||||
In case of `True(Boolean)` will save as `logs.txt`.
|
||||
|
||||
In case of `output_log_file` is set as `False(Booelan)` or `None`, the logs will not be populated.
|
||||
|
||||
```python Code
|
||||
# Save crew logs
|
||||
crew = Crew(output_log_file = True) # Logs will be saved as logs.txt
|
||||
crew = Crew(output_log_file = file_name) # Logs will be saved as file_name.txt
|
||||
crew = Crew(output_log_file = file_name.txt) # Logs will be saved as file_name.txt
|
||||
crew = Crew(output_log_file = file_name.json) # Logs will be saved as file_name.json
|
||||
```
|
||||
|
||||
|
||||
|
||||
## Memory Utilization
|
||||
|
||||
Crews can utilize memory (short-term, long-term, and entity memory) to enhance their execution and learning over time. This feature allows crews to store and recall execution memories, aiding in decision-making and task execution strategies.
|
||||
@@ -296,9 +130,9 @@ print(result)
|
||||
Once your crew is assembled, initiate the workflow with the appropriate kickoff method. CrewAI provides several methods for better control over the kickoff process: `kickoff()`, `kickoff_for_each()`, `kickoff_async()`, and `kickoff_for_each_async()`.
|
||||
|
||||
- `kickoff()`: Starts the execution process according to the defined process flow.
|
||||
- `kickoff_for_each()`: Executes tasks sequentially for each provided input event or item in the collection.
|
||||
- `kickoff_for_each()`: Executes tasks for each agent individually.
|
||||
- `kickoff_async()`: Initiates the workflow asynchronously.
|
||||
- `kickoff_for_each_async()`: Executes tasks concurrently for each provided input event or item, leveraging asynchronous processing.
|
||||
- `kickoff_for_each_async()`: Executes tasks for each agent individually in an asynchronous manner.
|
||||
|
||||
```python Code
|
||||
# Start the crew's task execution
|
||||
@@ -353,4 +187,4 @@ Then, to replay from a specific task, use:
|
||||
crewai replay -t <task_id>
|
||||
```
|
||||
|
||||
These commands let you replay from your latest kickoff tasks, still retaining context from previously executed tasks.
|
||||
These commands let you replay from your latest kickoff tasks, still retaining context from previously executed tasks.
|
||||
@@ -1,350 +0,0 @@
|
||||
---
|
||||
title: 'Event Listeners'
|
||||
description: 'Tap into CrewAI events to build custom integrations and monitoring'
|
||||
---
|
||||
|
||||
# Event Listeners
|
||||
|
||||
CrewAI provides a powerful event system that allows you to listen for and react to various events that occur during the execution of your Crew. This feature enables you to build custom integrations, monitoring solutions, logging systems, or any other functionality that needs to be triggered based on CrewAI's internal events.
|
||||
|
||||
## How It Works
|
||||
|
||||
CrewAI uses an event bus architecture to emit events throughout the execution lifecycle. The event system is built on the following components:
|
||||
|
||||
1. **CrewAIEventsBus**: A singleton event bus that manages event registration and emission
|
||||
2. **CrewEvent**: Base class for all events in the system
|
||||
3. **BaseEventListener**: Abstract base class for creating custom event listeners
|
||||
|
||||
When specific actions occur in CrewAI (like a Crew starting execution, an Agent completing a task, or a tool being used), the system emits corresponding events. You can register handlers for these events to execute custom code when they occur.
|
||||
|
||||
## Creating a Custom Event Listener
|
||||
|
||||
To create a custom event listener, you need to:
|
||||
|
||||
1. Create a class that inherits from `BaseEventListener`
|
||||
2. Implement the `setup_listeners` method
|
||||
3. Register handlers for the events you're interested in
|
||||
4. Create an instance of your listener in the appropriate file
|
||||
|
||||
Here's a simple example of a custom event listener class:
|
||||
|
||||
```python
|
||||
from crewai.utilities.events import (
|
||||
CrewKickoffStartedEvent,
|
||||
CrewKickoffCompletedEvent,
|
||||
AgentExecutionCompletedEvent,
|
||||
)
|
||||
from crewai.utilities.events.base_event_listener import BaseEventListener
|
||||
|
||||
class MyCustomListener(BaseEventListener):
|
||||
def __init__(self):
|
||||
super().__init__()
|
||||
|
||||
def setup_listeners(self, crewai_event_bus):
|
||||
@crewai_event_bus.on(CrewKickoffStartedEvent)
|
||||
def on_crew_started(source, event):
|
||||
print(f"Crew '{event.crew_name}' has started execution!")
|
||||
|
||||
@crewai_event_bus.on(CrewKickoffCompletedEvent)
|
||||
def on_crew_completed(source, event):
|
||||
print(f"Crew '{event.crew_name}' has completed execution!")
|
||||
print(f"Output: {event.output}")
|
||||
|
||||
@crewai_event_bus.on(AgentExecutionCompletedEvent)
|
||||
def on_agent_execution_completed(source, event):
|
||||
print(f"Agent '{event.agent.role}' completed task")
|
||||
print(f"Output: {event.output}")
|
||||
```
|
||||
|
||||
## Properly Registering Your Listener
|
||||
|
||||
Simply defining your listener class isn't enough. You need to create an instance of it and ensure it's imported in your application. This ensures that:
|
||||
|
||||
1. The event handlers are registered with the event bus
|
||||
2. The listener instance remains in memory (not garbage collected)
|
||||
3. The listener is active when events are emitted
|
||||
|
||||
### Option 1: Import and Instantiate in Your Crew or Flow Implementation
|
||||
|
||||
The most important thing is to create an instance of your listener in the file where your Crew or Flow is defined and executed:
|
||||
|
||||
#### For Crew-based Applications
|
||||
|
||||
Create and import your listener at the top of your Crew implementation file:
|
||||
|
||||
```python
|
||||
# In your crew.py file
|
||||
from crewai import Agent, Crew, Task
|
||||
from my_listeners import MyCustomListener
|
||||
|
||||
# Create an instance of your listener
|
||||
my_listener = MyCustomListener()
|
||||
|
||||
class MyCustomCrew:
|
||||
# Your crew implementation...
|
||||
|
||||
def crew(self):
|
||||
return Crew(
|
||||
agents=[...],
|
||||
tasks=[...],
|
||||
# ...
|
||||
)
|
||||
```
|
||||
|
||||
#### For Flow-based Applications
|
||||
|
||||
Create and import your listener at the top of your Flow implementation file:
|
||||
|
||||
```python
|
||||
# In your main.py or flow.py file
|
||||
from crewai.flow import Flow, listen, start
|
||||
from my_listeners import MyCustomListener
|
||||
|
||||
# Create an instance of your listener
|
||||
my_listener = MyCustomListener()
|
||||
|
||||
class MyCustomFlow(Flow):
|
||||
# Your flow implementation...
|
||||
|
||||
@start()
|
||||
def first_step(self):
|
||||
# ...
|
||||
```
|
||||
|
||||
This ensures that your listener is loaded and active when your Crew or Flow is executed.
|
||||
|
||||
### Option 2: Create a Package for Your Listeners
|
||||
|
||||
For a more structured approach, especially if you have multiple listeners:
|
||||
|
||||
1. Create a package for your listeners:
|
||||
|
||||
```
|
||||
my_project/
|
||||
├── listeners/
|
||||
│ ├── __init__.py
|
||||
│ ├── my_custom_listener.py
|
||||
│ └── another_listener.py
|
||||
```
|
||||
|
||||
2. In `my_custom_listener.py`, define your listener class and create an instance:
|
||||
|
||||
```python
|
||||
# my_custom_listener.py
|
||||
from crewai.utilities.events.base_event_listener import BaseEventListener
|
||||
# ... import events ...
|
||||
|
||||
class MyCustomListener(BaseEventListener):
|
||||
# ... implementation ...
|
||||
|
||||
# Create an instance of your listener
|
||||
my_custom_listener = MyCustomListener()
|
||||
```
|
||||
|
||||
3. In `__init__.py`, import the listener instances to ensure they're loaded:
|
||||
|
||||
```python
|
||||
# __init__.py
|
||||
from .my_custom_listener import my_custom_listener
|
||||
from .another_listener import another_listener
|
||||
|
||||
# Optionally export them if you need to access them elsewhere
|
||||
__all__ = ['my_custom_listener', 'another_listener']
|
||||
```
|
||||
|
||||
4. Import your listeners package in your Crew or Flow file:
|
||||
|
||||
```python
|
||||
# In your crew.py or flow.py file
|
||||
import my_project.listeners # This loads all your listeners
|
||||
|
||||
class MyCustomCrew:
|
||||
# Your crew implementation...
|
||||
```
|
||||
|
||||
This is exactly how CrewAI's built-in `agentops_listener` is registered. In the CrewAI codebase, you'll find:
|
||||
|
||||
```python
|
||||
# src/crewai/utilities/events/third_party/__init__.py
|
||||
from .agentops_listener import agentops_listener
|
||||
```
|
||||
|
||||
This ensures the `agentops_listener` is loaded when the `crewai.utilities.events` package is imported.
|
||||
|
||||
## Available Event Types
|
||||
|
||||
CrewAI provides a wide range of events that you can listen for:
|
||||
|
||||
### Crew Events
|
||||
|
||||
- **CrewKickoffStartedEvent**: Emitted when a Crew starts execution
|
||||
- **CrewKickoffCompletedEvent**: Emitted when a Crew completes execution
|
||||
- **CrewKickoffFailedEvent**: Emitted when a Crew fails to complete execution
|
||||
- **CrewTestStartedEvent**: Emitted when a Crew starts testing
|
||||
- **CrewTestCompletedEvent**: Emitted when a Crew completes testing
|
||||
- **CrewTestFailedEvent**: Emitted when a Crew fails to complete testing
|
||||
- **CrewTrainStartedEvent**: Emitted when a Crew starts training
|
||||
- **CrewTrainCompletedEvent**: Emitted when a Crew completes training
|
||||
- **CrewTrainFailedEvent**: Emitted when a Crew fails to complete training
|
||||
|
||||
### Agent Events
|
||||
|
||||
- **AgentExecutionStartedEvent**: Emitted when an Agent starts executing a task
|
||||
- **AgentExecutionCompletedEvent**: Emitted when an Agent completes executing a task
|
||||
- **AgentExecutionErrorEvent**: Emitted when an Agent encounters an error during execution
|
||||
|
||||
### Task Events
|
||||
|
||||
- **TaskStartedEvent**: Emitted when a Task starts execution
|
||||
- **TaskCompletedEvent**: Emitted when a Task completes execution
|
||||
- **TaskFailedEvent**: Emitted when a Task fails to complete execution
|
||||
- **TaskEvaluationEvent**: Emitted when a Task is evaluated
|
||||
|
||||
### Tool Usage Events
|
||||
|
||||
- **ToolUsageStartedEvent**: Emitted when a tool execution is started
|
||||
- **ToolUsageFinishedEvent**: Emitted when a tool execution is completed
|
||||
- **ToolUsageErrorEvent**: Emitted when a tool execution encounters an error
|
||||
- **ToolValidateInputErrorEvent**: Emitted when a tool input validation encounters an error
|
||||
- **ToolExecutionErrorEvent**: Emitted when a tool execution encounters an error
|
||||
- **ToolSelectionErrorEvent**: Emitted when there's an error selecting a tool
|
||||
|
||||
### Flow Events
|
||||
|
||||
- **FlowCreatedEvent**: Emitted when a Flow is created
|
||||
- **FlowStartedEvent**: Emitted when a Flow starts execution
|
||||
- **FlowFinishedEvent**: Emitted when a Flow completes execution
|
||||
- **FlowPlotEvent**: Emitted when a Flow is plotted
|
||||
- **MethodExecutionStartedEvent**: Emitted when a Flow method starts execution
|
||||
- **MethodExecutionFinishedEvent**: Emitted when a Flow method completes execution
|
||||
- **MethodExecutionFailedEvent**: Emitted when a Flow method fails to complete execution
|
||||
|
||||
### LLM Events
|
||||
|
||||
- **LLMCallStartedEvent**: Emitted when an LLM call starts
|
||||
- **LLMCallCompletedEvent**: Emitted when an LLM call completes
|
||||
- **LLMCallFailedEvent**: Emitted when an LLM call fails
|
||||
- **LLMStreamChunkEvent**: Emitted for each chunk received during streaming LLM responses
|
||||
|
||||
## Event Handler Structure
|
||||
|
||||
Each event handler receives two parameters:
|
||||
|
||||
1. **source**: The object that emitted the event
|
||||
2. **event**: The event instance, containing event-specific data
|
||||
|
||||
The structure of the event object depends on the event type, but all events inherit from `CrewEvent` and include:
|
||||
|
||||
- **timestamp**: The time when the event was emitted
|
||||
- **type**: A string identifier for the event type
|
||||
|
||||
Additional fields vary by event type. For example, `CrewKickoffCompletedEvent` includes `crew_name` and `output` fields.
|
||||
|
||||
## Real-World Example: Integration with AgentOps
|
||||
|
||||
CrewAI includes an example of a third-party integration with [AgentOps](https://github.com/AgentOps-AI/agentops), a monitoring and observability platform for AI agents. Here's how it's implemented:
|
||||
|
||||
```python
|
||||
from typing import Optional
|
||||
|
||||
from crewai.utilities.events import (
|
||||
CrewKickoffCompletedEvent,
|
||||
ToolUsageErrorEvent,
|
||||
ToolUsageStartedEvent,
|
||||
)
|
||||
from crewai.utilities.events.base_event_listener import BaseEventListener
|
||||
from crewai.utilities.events.crew_events import CrewKickoffStartedEvent
|
||||
from crewai.utilities.events.task_events import TaskEvaluationEvent
|
||||
|
||||
try:
|
||||
import agentops
|
||||
AGENTOPS_INSTALLED = True
|
||||
except ImportError:
|
||||
AGENTOPS_INSTALLED = False
|
||||
|
||||
class AgentOpsListener(BaseEventListener):
|
||||
tool_event: Optional["agentops.ToolEvent"] = None
|
||||
session: Optional["agentops.Session"] = None
|
||||
|
||||
def __init__(self):
|
||||
super().__init__()
|
||||
|
||||
def setup_listeners(self, crewai_event_bus):
|
||||
if not AGENTOPS_INSTALLED:
|
||||
return
|
||||
|
||||
@crewai_event_bus.on(CrewKickoffStartedEvent)
|
||||
def on_crew_kickoff_started(source, event: CrewKickoffStartedEvent):
|
||||
self.session = agentops.init()
|
||||
for agent in source.agents:
|
||||
if self.session:
|
||||
self.session.create_agent(
|
||||
name=agent.role,
|
||||
agent_id=str(agent.id),
|
||||
)
|
||||
|
||||
@crewai_event_bus.on(CrewKickoffCompletedEvent)
|
||||
def on_crew_kickoff_completed(source, event: CrewKickoffCompletedEvent):
|
||||
if self.session:
|
||||
self.session.end_session(
|
||||
end_state="Success",
|
||||
end_state_reason="Finished Execution",
|
||||
)
|
||||
|
||||
@crewai_event_bus.on(ToolUsageStartedEvent)
|
||||
def on_tool_usage_started(source, event: ToolUsageStartedEvent):
|
||||
self.tool_event = agentops.ToolEvent(name=event.tool_name)
|
||||
if self.session:
|
||||
self.session.record(self.tool_event)
|
||||
|
||||
@crewai_event_bus.on(ToolUsageErrorEvent)
|
||||
def on_tool_usage_error(source, event: ToolUsageErrorEvent):
|
||||
agentops.ErrorEvent(exception=event.error, trigger_event=self.tool_event)
|
||||
```
|
||||
|
||||
This listener initializes an AgentOps session when a Crew starts, registers agents with AgentOps, tracks tool usage, and ends the session when the Crew completes.
|
||||
|
||||
The AgentOps listener is registered in CrewAI's event system through the import in `src/crewai/utilities/events/third_party/__init__.py`:
|
||||
|
||||
```python
|
||||
from .agentops_listener import agentops_listener
|
||||
```
|
||||
|
||||
This ensures the `agentops_listener` is loaded when the `crewai.utilities.events` package is imported.
|
||||
|
||||
## Advanced Usage: Scoped Handlers
|
||||
|
||||
For temporary event handling (useful for testing or specific operations), you can use the `scoped_handlers` context manager:
|
||||
|
||||
```python
|
||||
from crewai.utilities.events import crewai_event_bus, CrewKickoffStartedEvent
|
||||
|
||||
with crewai_event_bus.scoped_handlers():
|
||||
@crewai_event_bus.on(CrewKickoffStartedEvent)
|
||||
def temp_handler(source, event):
|
||||
print("This handler only exists within this context")
|
||||
|
||||
# Do something that emits events
|
||||
|
||||
# Outside the context, the temporary handler is removed
|
||||
```
|
||||
|
||||
## Use Cases
|
||||
|
||||
Event listeners can be used for a variety of purposes:
|
||||
|
||||
1. **Logging and Monitoring**: Track the execution of your Crew and log important events
|
||||
2. **Analytics**: Collect data about your Crew's performance and behavior
|
||||
3. **Debugging**: Set up temporary listeners to debug specific issues
|
||||
4. **Integration**: Connect CrewAI with external systems like monitoring platforms, databases, or notification services
|
||||
5. **Custom Behavior**: Trigger custom actions based on specific events
|
||||
|
||||
## Best Practices
|
||||
|
||||
1. **Keep Handlers Light**: Event handlers should be lightweight and avoid blocking operations
|
||||
2. **Error Handling**: Include proper error handling in your event handlers to prevent exceptions from affecting the main execution
|
||||
3. **Cleanup**: If your listener allocates resources, ensure they're properly cleaned up
|
||||
4. **Selective Listening**: Only listen for events you actually need to handle
|
||||
5. **Testing**: Test your event listeners in isolation to ensure they behave as expected
|
||||
|
||||
By leveraging CrewAI's event system, you can extend its functionality and integrate it seamlessly with your existing infrastructure.
|
||||
@@ -23,9 +23,9 @@ Flows allow you to create structured, event-driven workflows. They provide a sea
|
||||
Let's create a simple Flow where you will use OpenAI to generate a random city in one task and then use that city to generate a fun fact in another task.
|
||||
|
||||
```python Code
|
||||
import asyncio
|
||||
|
||||
from crewai.flow.flow import Flow, listen, start
|
||||
from dotenv import load_dotenv
|
||||
from litellm import completion
|
||||
|
||||
|
||||
@@ -35,8 +35,6 @@ class ExampleFlow(Flow):
|
||||
@start()
|
||||
def generate_city(self):
|
||||
print("Starting flow")
|
||||
# Each flow state automatically gets a unique ID
|
||||
print(f"Flow State ID: {self.state['id']}")
|
||||
|
||||
response = completion(
|
||||
model=self.model,
|
||||
@@ -49,8 +47,6 @@ class ExampleFlow(Flow):
|
||||
)
|
||||
|
||||
random_city = response["choices"][0]["message"]["content"]
|
||||
# Store the city in our state
|
||||
self.state["city"] = random_city
|
||||
print(f"Random City: {random_city}")
|
||||
|
||||
return random_city
|
||||
@@ -68,31 +64,21 @@ class ExampleFlow(Flow):
|
||||
)
|
||||
|
||||
fun_fact = response["choices"][0]["message"]["content"]
|
||||
# Store the fun fact in our state
|
||||
self.state["fun_fact"] = fun_fact
|
||||
return fun_fact
|
||||
|
||||
|
||||
async def main():
|
||||
flow = ExampleFlow()
|
||||
result = await flow.kickoff()
|
||||
|
||||
flow = ExampleFlow()
|
||||
result = flow.kickoff()
|
||||
print(f"Generated fun fact: {result}")
|
||||
|
||||
print(f"Generated fun fact: {result}")
|
||||
asyncio.run(main())
|
||||
```
|
||||
|
||||
In the above example, we have created a simple Flow that generates a random city using OpenAI and then generates a fun fact about that city. The Flow consists of two tasks: `generate_city` and `generate_fun_fact`. The `generate_city` task is the starting point of the Flow, and the `generate_fun_fact` task listens for the output of the `generate_city` task.
|
||||
|
||||
Each Flow instance automatically receives a unique identifier (UUID) in its state, which helps track and manage flow executions. The state can also store additional data (like the generated city and fun fact) that persists throughout the flow's execution.
|
||||
|
||||
When you run the Flow, it will:
|
||||
1. Generate a unique ID for the flow state
|
||||
2. Generate a random city and store it in the state
|
||||
3. Generate a fun fact about that city and store it in the state
|
||||
4. Print the results to the console
|
||||
|
||||
The state's unique ID and stored data can be useful for tracking flow executions and maintaining context between tasks.
|
||||
|
||||
**Note:** Ensure you have set up your `.env` file to store your `OPENAI_API_KEY`. This key is necessary for authenticating requests to the OpenAI API.
|
||||
When you run the Flow, it will generate a random city and then generate a fun fact about that city. The output will be printed to the console.
|
||||
|
||||
### @start()
|
||||
|
||||
@@ -133,6 +119,7 @@ Here's how you can access the final output:
|
||||
|
||||
<CodeGroup>
|
||||
```python Code
|
||||
import asyncio
|
||||
from crewai.flow.flow import Flow, listen, start
|
||||
|
||||
class OutputExampleFlow(Flow):
|
||||
@@ -144,24 +131,26 @@ class OutputExampleFlow(Flow):
|
||||
def second_method(self, first_output):
|
||||
return f"Second method received: {first_output}"
|
||||
|
||||
async def main():
|
||||
flow = OutputExampleFlow()
|
||||
final_output = await flow.kickoff()
|
||||
print("---- Final Output ----")
|
||||
print(final_output)
|
||||
|
||||
flow = OutputExampleFlow()
|
||||
final_output = flow.kickoff()
|
||||
|
||||
print("---- Final Output ----")
|
||||
print(final_output)
|
||||
asyncio.run(main())
|
||||
```
|
||||
|
||||
```text Output
|
||||
``` text Output
|
||||
---- Final Output ----
|
||||
Second method received: Output from first_method
|
||||
```
|
||||
|
||||
</CodeGroup>
|
||||
|
||||
In this example, the `second_method` is the last method to complete, so its output will be the final output of the Flow.
|
||||
In this example, the `second_method` is the last method to complete, so its output will be the final output of the Flow.
|
||||
The `kickoff()` method will return the final output, which is then printed to the console.
|
||||
|
||||
|
||||
#### Accessing and Updating State
|
||||
|
||||
In addition to retrieving the final output, you can also access and update the state within your Flow. The state can be used to store and share data between different methods in the Flow. After the Flow has run, you can access the state to retrieve any information that was added or updated during the execution.
|
||||
@@ -171,6 +160,7 @@ Here's an example of how to update and access the state:
|
||||
<CodeGroup>
|
||||
|
||||
```python Code
|
||||
import asyncio
|
||||
from crewai.flow.flow import Flow, listen, start
|
||||
from pydantic import BaseModel
|
||||
|
||||
@@ -191,68 +181,71 @@ class StateExampleFlow(Flow[ExampleState]):
|
||||
self.state.counter += 1
|
||||
return self.state.message
|
||||
|
||||
flow = StateExampleFlow()
|
||||
final_output = flow.kickoff()
|
||||
print(f"Final Output: {final_output}")
|
||||
print("Final State:")
|
||||
print(flow.state)
|
||||
async def main():
|
||||
flow = StateExampleFlow()
|
||||
final_output = await flow.kickoff()
|
||||
print(f"Final Output: {final_output}")
|
||||
print("Final State:")
|
||||
print(flow.state)
|
||||
|
||||
asyncio.run(main())
|
||||
```
|
||||
|
||||
```text Output
|
||||
``` text Output
|
||||
Final Output: Hello from first_method - updated by second_method
|
||||
Final State:
|
||||
counter=2 message='Hello from first_method - updated by second_method'
|
||||
```
|
||||
|
||||
</CodeGroup>
|
||||
|
||||
In this example, the state is updated by both `first_method` and `second_method`.
|
||||
In this example, the state is updated by both `first_method` and `second_method`.
|
||||
After the Flow has run, you can access the final state to see the updates made by these methods.
|
||||
|
||||
By ensuring that the final method's output is returned and providing access to the state, CrewAI Flows make it easy to integrate the results of your AI workflows into larger applications or systems,
|
||||
By ensuring that the final method's output is returned and providing access to the state, CrewAI Flows make it easy to integrate the results of your AI workflows into larger applications or systems,
|
||||
while also maintaining and accessing the state throughout the Flow's execution.
|
||||
|
||||
## Flow State Management
|
||||
|
||||
Managing state effectively is crucial for building reliable and maintainable AI workflows. CrewAI Flows provides robust mechanisms for both unstructured and structured state management,
|
||||
Managing state effectively is crucial for building reliable and maintainable AI workflows. CrewAI Flows provides robust mechanisms for both unstructured and structured state management,
|
||||
allowing developers to choose the approach that best fits their application's needs.
|
||||
|
||||
### Unstructured State Management
|
||||
|
||||
In unstructured state management, all state is stored in the `state` attribute of the `Flow` class.
|
||||
In unstructured state management, all state is stored in the `state` attribute of the `Flow` class.
|
||||
This approach offers flexibility, enabling developers to add or modify state attributes on the fly without defining a strict schema.
|
||||
Even with unstructured states, CrewAI Flows automatically generates and maintains a unique identifier (UUID) for each state instance.
|
||||
|
||||
```python Code
|
||||
import asyncio
|
||||
|
||||
from crewai.flow.flow import Flow, listen, start
|
||||
|
||||
class UnstructuredExampleFlow(Flow):
|
||||
class UntructuredExampleFlow(Flow):
|
||||
|
||||
@start()
|
||||
def first_method(self):
|
||||
# The state automatically includes an 'id' field
|
||||
print(f"State ID: {self.state['id']}")
|
||||
self.state['counter'] = 0
|
||||
self.state['message'] = "Hello from structured flow"
|
||||
self.state.message = "Hello from structured flow"
|
||||
self.state.counter = 0
|
||||
|
||||
@listen(first_method)
|
||||
def second_method(self):
|
||||
self.state['counter'] += 1
|
||||
self.state['message'] += " - updated"
|
||||
self.state.counter += 1
|
||||
self.state.message += " - updated"
|
||||
|
||||
@listen(second_method)
|
||||
def third_method(self):
|
||||
self.state['counter'] += 1
|
||||
self.state['message'] += " - updated again"
|
||||
self.state.counter += 1
|
||||
self.state.message += " - updated again"
|
||||
|
||||
print(f"State after third_method: {self.state}")
|
||||
|
||||
|
||||
flow = UnstructuredExampleFlow()
|
||||
flow.kickoff()
|
||||
```
|
||||
async def main():
|
||||
flow = UntructuredExampleFlow()
|
||||
await flow.kickoff()
|
||||
|
||||
**Note:** The `id` field is automatically generated and preserved throughout the flow's execution. You don't need to manage or set it manually, and it will be maintained even when updating the state with new data.
|
||||
|
||||
asyncio.run(main())
|
||||
```
|
||||
|
||||
**Key Points:**
|
||||
|
||||
@@ -261,18 +254,17 @@ flow.kickoff()
|
||||
|
||||
### Structured State Management
|
||||
|
||||
Structured state management leverages predefined schemas to ensure consistency and type safety across the workflow.
|
||||
Structured state management leverages predefined schemas to ensure consistency and type safety across the workflow.
|
||||
By using models like Pydantic's `BaseModel`, developers can define the exact shape of the state, enabling better validation and auto-completion in development environments.
|
||||
|
||||
Each state in CrewAI Flows automatically receives a unique identifier (UUID) to help track and manage state instances. This ID is automatically generated and managed by the Flow system.
|
||||
|
||||
```python Code
|
||||
import asyncio
|
||||
|
||||
from crewai.flow.flow import Flow, listen, start
|
||||
from pydantic import BaseModel
|
||||
|
||||
|
||||
class ExampleState(BaseModel):
|
||||
# Note: 'id' field is automatically added to all states
|
||||
counter: int = 0
|
||||
message: str = ""
|
||||
|
||||
@@ -281,8 +273,6 @@ class StructuredExampleFlow(Flow[ExampleState]):
|
||||
|
||||
@start()
|
||||
def first_method(self):
|
||||
# Access the auto-generated ID if needed
|
||||
print(f"State ID: {self.state.id}")
|
||||
self.state.message = "Hello from structured flow"
|
||||
|
||||
@listen(first_method)
|
||||
@@ -298,8 +288,12 @@ class StructuredExampleFlow(Flow[ExampleState]):
|
||||
print(f"State after third_method: {self.state}")
|
||||
|
||||
|
||||
flow = StructuredExampleFlow()
|
||||
flow.kickoff()
|
||||
async def main():
|
||||
flow = StructuredExampleFlow()
|
||||
await flow.kickoff()
|
||||
|
||||
|
||||
asyncio.run(main())
|
||||
```
|
||||
|
||||
**Key Points:**
|
||||
@@ -323,91 +317,6 @@ flow.kickoff()
|
||||
|
||||
By providing both unstructured and structured state management options, CrewAI Flows empowers developers to build AI workflows that are both flexible and robust, catering to a wide range of application requirements.
|
||||
|
||||
## Flow Persistence
|
||||
|
||||
The @persist decorator enables automatic state persistence in CrewAI Flows, allowing you to maintain flow state across restarts or different workflow executions. This decorator can be applied at either the class level or method level, providing flexibility in how you manage state persistence.
|
||||
|
||||
### Class-Level Persistence
|
||||
|
||||
When applied at the class level, the @persist decorator automatically persists all flow method states:
|
||||
|
||||
```python
|
||||
@persist # Using SQLiteFlowPersistence by default
|
||||
class MyFlow(Flow[MyState]):
|
||||
@start()
|
||||
def initialize_flow(self):
|
||||
# This method will automatically have its state persisted
|
||||
self.state.counter = 1
|
||||
print("Initialized flow. State ID:", self.state.id)
|
||||
|
||||
@listen(initialize_flow)
|
||||
def next_step(self):
|
||||
# The state (including self.state.id) is automatically reloaded
|
||||
self.state.counter += 1
|
||||
print("Flow state is persisted. Counter:", self.state.counter)
|
||||
```
|
||||
|
||||
### Method-Level Persistence
|
||||
|
||||
For more granular control, you can apply @persist to specific methods:
|
||||
|
||||
```python
|
||||
class AnotherFlow(Flow[dict]):
|
||||
@persist # Persists only this method's state
|
||||
@start()
|
||||
def begin(self):
|
||||
if "runs" not in self.state:
|
||||
self.state["runs"] = 0
|
||||
self.state["runs"] += 1
|
||||
print("Method-level persisted runs:", self.state["runs"])
|
||||
```
|
||||
|
||||
### How It Works
|
||||
|
||||
1. **Unique State Identification**
|
||||
- Each flow state automatically receives a unique UUID
|
||||
- The ID is preserved across state updates and method calls
|
||||
- Supports both structured (Pydantic BaseModel) and unstructured (dictionary) states
|
||||
|
||||
2. **Default SQLite Backend**
|
||||
- SQLiteFlowPersistence is the default storage backend
|
||||
- States are automatically saved to a local SQLite database
|
||||
- Robust error handling ensures clear messages if database operations fail
|
||||
|
||||
3. **Error Handling**
|
||||
- Comprehensive error messages for database operations
|
||||
- Automatic state validation during save and load
|
||||
- Clear feedback when persistence operations encounter issues
|
||||
|
||||
### Important Considerations
|
||||
|
||||
- **State Types**: Both structured (Pydantic BaseModel) and unstructured (dictionary) states are supported
|
||||
- **Automatic ID**: The `id` field is automatically added if not present
|
||||
- **State Recovery**: Failed or restarted flows can automatically reload their previous state
|
||||
- **Custom Implementation**: You can provide your own FlowPersistence implementation for specialized storage needs
|
||||
|
||||
### Technical Advantages
|
||||
|
||||
1. **Precise Control Through Low-Level Access**
|
||||
- Direct access to persistence operations for advanced use cases
|
||||
- Fine-grained control via method-level persistence decorators
|
||||
- Built-in state inspection and debugging capabilities
|
||||
- Full visibility into state changes and persistence operations
|
||||
|
||||
2. **Enhanced Reliability**
|
||||
- Automatic state recovery after system failures or restarts
|
||||
- Transaction-based state updates for data integrity
|
||||
- Comprehensive error handling with clear error messages
|
||||
- Robust validation during state save and load operations
|
||||
|
||||
3. **Extensible Architecture**
|
||||
- Customizable persistence backend through FlowPersistence interface
|
||||
- Support for specialized storage solutions beyond SQLite
|
||||
- Compatible with both structured (Pydantic) and unstructured (dict) states
|
||||
- Seamless integration with existing CrewAI flow patterns
|
||||
|
||||
The persistence system's architecture emphasizes technical precision and customization options, allowing developers to maintain full control over state management while benefiting from built-in reliability features.
|
||||
|
||||
## Flow Control
|
||||
|
||||
### Conditional Logic: `or`
|
||||
@@ -417,6 +326,7 @@ The `or_` function in Flows allows you to listen to multiple methods and trigger
|
||||
<CodeGroup>
|
||||
|
||||
```python Code
|
||||
import asyncio
|
||||
from crewai.flow.flow import Flow, listen, or_, start
|
||||
|
||||
class OrExampleFlow(Flow):
|
||||
@@ -434,19 +344,22 @@ class OrExampleFlow(Flow):
|
||||
print(f"Logger: {result}")
|
||||
|
||||
|
||||
async def main():
|
||||
flow = OrExampleFlow()
|
||||
await flow.kickoff()
|
||||
|
||||
flow = OrExampleFlow()
|
||||
flow.kickoff()
|
||||
|
||||
asyncio.run(main())
|
||||
```
|
||||
|
||||
```text Output
|
||||
``` text Output
|
||||
Logger: Hello from the start method
|
||||
Logger: Hello from the second method
|
||||
```
|
||||
|
||||
</CodeGroup>
|
||||
|
||||
When you run this Flow, the `logger` method will be triggered by the output of either the `start_method` or the `second_method`.
|
||||
When you run this Flow, the `logger` method will be triggered by the output of either the `start_method` or the `second_method`.
|
||||
The `or_` function is used to listen to multiple methods and trigger the listener method when any of the specified methods emit an output.
|
||||
|
||||
### Conditional Logic: `and`
|
||||
@@ -456,6 +369,7 @@ The `and_` function in Flows allows you to listen to multiple methods and trigge
|
||||
<CodeGroup>
|
||||
|
||||
```python Code
|
||||
import asyncio
|
||||
from crewai.flow.flow import Flow, and_, listen, start
|
||||
|
||||
class AndExampleFlow(Flow):
|
||||
@@ -473,28 +387,34 @@ class AndExampleFlow(Flow):
|
||||
print("---- Logger ----")
|
||||
print(self.state)
|
||||
|
||||
flow = AndExampleFlow()
|
||||
flow.kickoff()
|
||||
|
||||
async def main():
|
||||
flow = AndExampleFlow()
|
||||
await flow.kickoff()
|
||||
|
||||
|
||||
asyncio.run(main())
|
||||
```
|
||||
|
||||
```text Output
|
||||
``` text Output
|
||||
---- Logger ----
|
||||
{'greeting': 'Hello from the start method', 'joke': 'What do computers eat? Microchips.'}
|
||||
```
|
||||
|
||||
</CodeGroup>
|
||||
|
||||
When you run this Flow, the `logger` method will be triggered only when both the `start_method` and the `second_method` emit an output.
|
||||
When you run this Flow, the `logger` method will be triggered only when both the `start_method` and the `second_method` emit an output.
|
||||
The `and_` function is used to listen to multiple methods and trigger the listener method only when all the specified methods emit an output.
|
||||
|
||||
### Router
|
||||
|
||||
The `@router()` decorator in Flows allows you to define conditional routing logic based on the output of a method.
|
||||
The `@router()` decorator in Flows allows you to define conditional routing logic based on the output of a method.
|
||||
You can specify different routes based on the output of the method, allowing you to control the flow of execution dynamically.
|
||||
|
||||
<CodeGroup>
|
||||
|
||||
```python Code
|
||||
import asyncio
|
||||
import random
|
||||
from crewai.flow.flow import Flow, listen, router, start
|
||||
from pydantic import BaseModel
|
||||
@@ -526,11 +446,15 @@ class RouterFlow(Flow[ExampleState]):
|
||||
print("Fourth method running")
|
||||
|
||||
|
||||
flow = RouterFlow()
|
||||
flow.kickoff()
|
||||
async def main():
|
||||
flow = RouterFlow()
|
||||
await flow.kickoff()
|
||||
|
||||
|
||||
asyncio.run(main())
|
||||
```
|
||||
|
||||
```text Output
|
||||
``` text Output
|
||||
Starting the structured flow
|
||||
Third method running
|
||||
Fourth method running
|
||||
@@ -538,16 +462,16 @@ Fourth method running
|
||||
|
||||
</CodeGroup>
|
||||
|
||||
In the above example, the `start_method` generates a random boolean value and sets it in the state.
|
||||
The `second_method` uses the `@router()` decorator to define conditional routing logic based on the value of the boolean.
|
||||
If the boolean is `True`, the method returns `"success"`, and if it is `False`, the method returns `"failed"`.
|
||||
The `third_method` and `fourth_method` listen to the output of the `second_method` and execute based on the returned value.
|
||||
|
||||
When you run this Flow, the output will change based on the random boolean value generated by the `start_method`.
|
||||
|
||||
## Adding Crews to Flows
|
||||
|
||||
Creating a flow with multiple crews in CrewAI is straightforward.
|
||||
Creating a flow with multiple crews in CrewAI is straightforward.
|
||||
|
||||
You can generate a new CrewAI project that includes all the scaffolding needed to create a flow with multiple crews by running the following command:
|
||||
|
||||
@@ -561,21 +485,22 @@ This command will generate a new CrewAI project with the necessary folder struct
|
||||
|
||||
After running the `crewai create flow name_of_flow` command, you will see a folder structure similar to the following:
|
||||
|
||||
| Directory/File | Description |
|
||||
| :--------------------- | :----------------------------------------------------------------- |
|
||||
| `name_of_flow/` | Root directory for the flow. |
|
||||
| ├── `crews/` | Contains directories for specific crews. |
|
||||
| │ └── `poem_crew/` | Directory for the "poem_crew" with its configurations and scripts. |
|
||||
| │ ├── `config/` | Configuration files directory for the "poem_crew". |
|
||||
| │ │ ├── `agents.yaml` | YAML file defining the agents for "poem_crew". |
|
||||
| │ │ └── `tasks.yaml` | YAML file defining the tasks for "poem_crew". |
|
||||
| │ ├── `poem_crew.py` | Script for "poem_crew" functionality. |
|
||||
| ├── `tools/` | Directory for additional tools used in the flow. |
|
||||
| │ └── `custom_tool.py` | Custom tool implementation. |
|
||||
| ├── `main.py` | Main script for running the flow. |
|
||||
| ├── `README.md` | Project description and instructions. |
|
||||
| ├── `pyproject.toml` | Configuration file for project dependencies and settings. |
|
||||
| └── `.gitignore` | Specifies files and directories to ignore in version control. |
|
||||
| Directory/File | Description |
|
||||
|:---------------------------------|:------------------------------------------------------------------|
|
||||
| `name_of_flow/` | Root directory for the flow. |
|
||||
| ├── `crews/` | Contains directories for specific crews. |
|
||||
| │ └── `poem_crew/` | Directory for the "poem_crew" with its configurations and scripts.|
|
||||
| │ ├── `config/` | Configuration files directory for the "poem_crew". |
|
||||
| │ │ ├── `agents.yaml` | YAML file defining the agents for "poem_crew". |
|
||||
| │ │ └── `tasks.yaml` | YAML file defining the tasks for "poem_crew". |
|
||||
| │ ├── `poem_crew.py` | Script for "poem_crew" functionality. |
|
||||
| ├── `tools/` | Directory for additional tools used in the flow. |
|
||||
| │ └── `custom_tool.py` | Custom tool implementation. |
|
||||
| ├── `main.py` | Main script for running the flow. |
|
||||
| ├── `README.md` | Project description and instructions. |
|
||||
| ├── `pyproject.toml` | Configuration file for project dependencies and settings. |
|
||||
| └── `.gitignore` | Specifies files and directories to ignore in version control. |
|
||||
|
||||
|
||||
### Building Your Crews
|
||||
|
||||
@@ -595,6 +520,7 @@ Here's an example of how you can connect the `poem_crew` in the `main.py` file:
|
||||
|
||||
```python Code
|
||||
#!/usr/bin/env python
|
||||
import asyncio
|
||||
from random import randint
|
||||
|
||||
from pydantic import BaseModel
|
||||
@@ -610,12 +536,14 @@ class PoemFlow(Flow[PoemState]):
|
||||
@start()
|
||||
def generate_sentence_count(self):
|
||||
print("Generating sentence count")
|
||||
# Generate a number between 1 and 5
|
||||
self.state.sentence_count = randint(1, 5)
|
||||
|
||||
@listen(generate_sentence_count)
|
||||
def generate_poem(self):
|
||||
print("Generating poem")
|
||||
result = PoemCrew().crew().kickoff(inputs={"sentence_count": self.state.sentence_count})
|
||||
poem_crew = PoemCrew().crew()
|
||||
result = poem_crew.kickoff(inputs={"sentence_count": self.state.sentence_count})
|
||||
|
||||
print("Poem generated", result.raw)
|
||||
self.state.poem = result.raw
|
||||
@@ -626,17 +554,18 @@ class PoemFlow(Flow[PoemState]):
|
||||
with open("poem.txt", "w") as f:
|
||||
f.write(self.state.poem)
|
||||
|
||||
def kickoff():
|
||||
async def run():
|
||||
"""
|
||||
Run the flow.
|
||||
"""
|
||||
poem_flow = PoemFlow()
|
||||
poem_flow.kickoff()
|
||||
await poem_flow.kickoff()
|
||||
|
||||
|
||||
def plot():
|
||||
poem_flow = PoemFlow()
|
||||
poem_flow.plot()
|
||||
def main():
|
||||
asyncio.run(run())
|
||||
|
||||
if __name__ == "__main__":
|
||||
kickoff()
|
||||
main()
|
||||
```
|
||||
|
||||
In this example, the `PoemFlow` class defines a flow that generates a sentence count, uses the `PoemCrew` to generate a poem, and then saves the poem to a file. The flow is kicked off by calling the `kickoff()` method.
|
||||
@@ -658,13 +587,13 @@ source .venv/bin/activate
|
||||
After activating the virtual environment, you can run the flow by executing one of the following commands:
|
||||
|
||||
```bash
|
||||
crewai flow kickoff
|
||||
crewai flow run
|
||||
```
|
||||
|
||||
or
|
||||
|
||||
```bash
|
||||
uv run kickoff
|
||||
uv run run_flow
|
||||
```
|
||||
|
||||
The flow will execute, and you should see the output in the console.
|
||||
@@ -728,44 +657,13 @@ By exploring these examples, you can gain insights into how to leverage CrewAI F
|
||||
|
||||
Also, check out our YouTube video on how to use flows in CrewAI below!
|
||||
|
||||
<iframe
|
||||
width="560"
|
||||
height="315"
|
||||
src="https://www.youtube.com/embed/MTb5my6VOT8"
|
||||
title="YouTube video player"
|
||||
frameborder="0"
|
||||
allow="accelerometer; autoplay; clipboard-write; encrypted-media; gyroscope; picture-in-picture; web-share"
|
||||
referrerpolicy="strict-origin-when-cross-origin"
|
||||
allowfullscreen
|
||||
></iframe>
|
||||
|
||||
## Running Flows
|
||||
|
||||
There are two ways to run a flow:
|
||||
|
||||
### Using the Flow API
|
||||
|
||||
You can run a flow programmatically by creating an instance of your flow class and calling the `kickoff()` method:
|
||||
|
||||
```python
|
||||
flow = ExampleFlow()
|
||||
result = flow.kickoff()
|
||||
```
|
||||
|
||||
### Using the CLI
|
||||
|
||||
Starting from version 0.103.0, you can run flows using the `crewai run` command:
|
||||
|
||||
```shell
|
||||
crewai run
|
||||
```
|
||||
|
||||
This command automatically detects if your project is a flow (based on the `type = "flow"` setting in your pyproject.toml) and runs it accordingly. This is the recommended way to run flows from the command line.
|
||||
|
||||
For backward compatibility, you can also use:
|
||||
|
||||
```shell
|
||||
crewai flow kickoff
|
||||
```
|
||||
|
||||
However, the `crewai run` command is now the preferred method as it works for both crews and flows.
|
||||
<iframe
|
||||
width="560"
|
||||
height="315"
|
||||
src="https://www.youtube.com/embed/MTb5my6VOT8"
|
||||
title="YouTube video player"
|
||||
frameborder="0"
|
||||
allow="accelerometer; autoplay; clipboard-write; encrypted-media; gyroscope; picture-in-picture; web-share"
|
||||
referrerpolicy="strict-origin-when-cross-origin"
|
||||
allowfullscreen
|
||||
></iframe>
|
||||
@@ -1,624 +0,0 @@
|
||||
---
|
||||
title: Knowledge
|
||||
description: What is knowledge in CrewAI and how to use it.
|
||||
icon: book
|
||||
---
|
||||
|
||||
## What is Knowledge?
|
||||
|
||||
Knowledge in CrewAI is a powerful system that allows AI agents to access and utilize external information sources during their tasks.
|
||||
Think of it as giving your agents a reference library they can consult while working.
|
||||
|
||||
<Info>
|
||||
Key benefits of using Knowledge:
|
||||
- Enhance agents with domain-specific information
|
||||
- Support decisions with real-world data
|
||||
- Maintain context across conversations
|
||||
- Ground responses in factual information
|
||||
</Info>
|
||||
|
||||
## Supported Knowledge Sources
|
||||
|
||||
CrewAI supports various types of knowledge sources out of the box:
|
||||
|
||||
<CardGroup cols={2}>
|
||||
<Card title="Text Sources" icon="text">
|
||||
- Raw strings
|
||||
- Text files (.txt)
|
||||
- PDF documents
|
||||
</Card>
|
||||
<Card title="Structured Data" icon="table">
|
||||
- CSV files
|
||||
- Excel spreadsheets
|
||||
- JSON documents
|
||||
</Card>
|
||||
</CardGroup>
|
||||
|
||||
## Supported Knowledge Parameters
|
||||
|
||||
| Parameter | Type | Required | Description |
|
||||
| :--------------------------- | :---------------------------------- | :------- | :---------------------------------------------------------------------------------------------------------------------------------------------------- |
|
||||
| `sources` | **List[BaseKnowledgeSource]** | Yes | List of knowledge sources that provide content to be stored and queried. Can include PDF, CSV, Excel, JSON, text files, or string content. |
|
||||
| `collection_name` | **str** | No | Name of the collection where the knowledge will be stored. Used to identify different sets of knowledge. Defaults to "knowledge" if not provided. |
|
||||
| `storage` | **Optional[KnowledgeStorage]** | No | Custom storage configuration for managing how the knowledge is stored and retrieved. If not provided, a default storage will be created. |
|
||||
|
||||
## Quickstart Example
|
||||
|
||||
<Tip>
|
||||
For file-Based Knowledge Sources, make sure to place your files in a `knowledge` directory at the root of your project.
|
||||
Also, use relative paths from the `knowledge` directory when creating the source.
|
||||
</Tip>
|
||||
|
||||
Here's an example using string-based knowledge:
|
||||
|
||||
```python Code
|
||||
from crewai import Agent, Task, Crew, Process, LLM
|
||||
from crewai.knowledge.source.string_knowledge_source import StringKnowledgeSource
|
||||
|
||||
# Create a knowledge source
|
||||
content = "Users name is John. He is 30 years old and lives in San Francisco."
|
||||
string_source = StringKnowledgeSource(
|
||||
content=content,
|
||||
)
|
||||
|
||||
# Create an LLM with a temperature of 0 to ensure deterministic outputs
|
||||
llm = LLM(model="gpt-4o-mini", temperature=0)
|
||||
|
||||
# Create an agent with the knowledge store
|
||||
agent = Agent(
|
||||
role="About User",
|
||||
goal="You know everything about the user.",
|
||||
backstory="""You are a master at understanding people and their preferences.""",
|
||||
verbose=True,
|
||||
allow_delegation=False,
|
||||
llm=llm,
|
||||
)
|
||||
task = Task(
|
||||
description="Answer the following questions about the user: {question}",
|
||||
expected_output="An answer to the question.",
|
||||
agent=agent,
|
||||
)
|
||||
|
||||
crew = Crew(
|
||||
agents=[agent],
|
||||
tasks=[task],
|
||||
verbose=True,
|
||||
process=Process.sequential,
|
||||
knowledge_sources=[string_source], # Enable knowledge by adding the sources here. You can also add more sources to the sources list.
|
||||
)
|
||||
|
||||
result = crew.kickoff(inputs={"question": "What city does John live in and how old is he?"})
|
||||
```
|
||||
|
||||
|
||||
Here's another example with the `CrewDoclingSource`. The CrewDoclingSource is actually quite versatile and can handle multiple file formats including MD, PDF, DOCX, HTML, and more.
|
||||
|
||||
<Note>
|
||||
You need to install `docling` for the following example to work: `uv add docling`
|
||||
</Note>
|
||||
|
||||
|
||||
|
||||
```python Code
|
||||
from crewai import LLM, Agent, Crew, Process, Task
|
||||
from crewai.knowledge.source.crew_docling_source import CrewDoclingSource
|
||||
|
||||
# Create a knowledge source
|
||||
content_source = CrewDoclingSource(
|
||||
file_paths=[
|
||||
"https://lilianweng.github.io/posts/2024-11-28-reward-hacking",
|
||||
"https://lilianweng.github.io/posts/2024-07-07-hallucination",
|
||||
],
|
||||
)
|
||||
|
||||
# Create an LLM with a temperature of 0 to ensure deterministic outputs
|
||||
llm = LLM(model="gpt-4o-mini", temperature=0)
|
||||
|
||||
# Create an agent with the knowledge store
|
||||
agent = Agent(
|
||||
role="About papers",
|
||||
goal="You know everything about the papers.",
|
||||
backstory="""You are a master at understanding papers and their content.""",
|
||||
verbose=True,
|
||||
allow_delegation=False,
|
||||
llm=llm,
|
||||
)
|
||||
task = Task(
|
||||
description="Answer the following questions about the papers: {question}",
|
||||
expected_output="An answer to the question.",
|
||||
agent=agent,
|
||||
)
|
||||
|
||||
crew = Crew(
|
||||
agents=[agent],
|
||||
tasks=[task],
|
||||
verbose=True,
|
||||
process=Process.sequential,
|
||||
knowledge_sources=[
|
||||
content_source
|
||||
], # Enable knowledge by adding the sources here. You can also add more sources to the sources list.
|
||||
)
|
||||
|
||||
result = crew.kickoff(
|
||||
inputs={
|
||||
"question": "What is the reward hacking paper about? Be sure to provide sources."
|
||||
}
|
||||
)
|
||||
```
|
||||
|
||||
## More Examples
|
||||
|
||||
Here are examples of how to use different types of knowledge sources:
|
||||
|
||||
### Text File Knowledge Source
|
||||
```python
|
||||
from crewai.knowledge.source.text_file_knowledge_source import TextFileKnowledgeSource
|
||||
|
||||
# Create a text file knowledge source
|
||||
text_source = TextFileKnowledgeSource(
|
||||
file_paths=["document.txt", "another.txt"]
|
||||
)
|
||||
|
||||
# Create crew with text file source on agents or crew level
|
||||
agent = Agent(
|
||||
...
|
||||
knowledge_sources=[text_source]
|
||||
)
|
||||
|
||||
crew = Crew(
|
||||
...
|
||||
knowledge_sources=[text_source]
|
||||
)
|
||||
```
|
||||
|
||||
### PDF Knowledge Source
|
||||
```python
|
||||
from crewai.knowledge.source.pdf_knowledge_source import PDFKnowledgeSource
|
||||
|
||||
# Create a PDF knowledge source
|
||||
pdf_source = PDFKnowledgeSource(
|
||||
file_paths=["document.pdf", "another.pdf"]
|
||||
)
|
||||
|
||||
# Create crew with PDF knowledge source on agents or crew level
|
||||
agent = Agent(
|
||||
...
|
||||
knowledge_sources=[pdf_source]
|
||||
)
|
||||
|
||||
crew = Crew(
|
||||
...
|
||||
knowledge_sources=[pdf_source]
|
||||
)
|
||||
```
|
||||
|
||||
### CSV Knowledge Source
|
||||
```python
|
||||
from crewai.knowledge.source.csv_knowledge_source import CSVKnowledgeSource
|
||||
|
||||
# Create a CSV knowledge source
|
||||
csv_source = CSVKnowledgeSource(
|
||||
file_paths=["data.csv"]
|
||||
)
|
||||
|
||||
# Create crew with CSV knowledge source or on agent level
|
||||
agent = Agent(
|
||||
...
|
||||
knowledge_sources=[csv_source]
|
||||
)
|
||||
|
||||
crew = Crew(
|
||||
...
|
||||
knowledge_sources=[csv_source]
|
||||
)
|
||||
```
|
||||
|
||||
### Excel Knowledge Source
|
||||
```python
|
||||
from crewai.knowledge.source.excel_knowledge_source import ExcelKnowledgeSource
|
||||
|
||||
# Create an Excel knowledge source
|
||||
excel_source = ExcelKnowledgeSource(
|
||||
file_paths=["spreadsheet.xlsx"]
|
||||
)
|
||||
|
||||
# Create crew with Excel knowledge source on agents or crew level
|
||||
agent = Agent(
|
||||
...
|
||||
knowledge_sources=[excel_source]
|
||||
)
|
||||
|
||||
crew = Crew(
|
||||
...
|
||||
knowledge_sources=[excel_source]
|
||||
)
|
||||
```
|
||||
|
||||
### JSON Knowledge Source
|
||||
```python
|
||||
from crewai.knowledge.source.json_knowledge_source import JSONKnowledgeSource
|
||||
|
||||
# Create a JSON knowledge source
|
||||
json_source = JSONKnowledgeSource(
|
||||
file_paths=["data.json"]
|
||||
)
|
||||
|
||||
# Create crew with JSON knowledge source on agents or crew level
|
||||
agent = Agent(
|
||||
...
|
||||
knowledge_sources=[json_source]
|
||||
)
|
||||
|
||||
crew = Crew(
|
||||
...
|
||||
knowledge_sources=[json_source]
|
||||
)
|
||||
```
|
||||
|
||||
## Knowledge Configuration
|
||||
|
||||
### Chunking Configuration
|
||||
|
||||
Knowledge sources automatically chunk content for better processing.
|
||||
You can configure chunking behavior in your knowledge sources:
|
||||
|
||||
```python
|
||||
from crewai.knowledge.source.string_knowledge_source import StringKnowledgeSource
|
||||
|
||||
source = StringKnowledgeSource(
|
||||
content="Your content here",
|
||||
chunk_size=4000, # Maximum size of each chunk (default: 4000)
|
||||
chunk_overlap=200 # Overlap between chunks (default: 200)
|
||||
)
|
||||
```
|
||||
|
||||
The chunking configuration helps in:
|
||||
- Breaking down large documents into manageable pieces
|
||||
- Maintaining context through chunk overlap
|
||||
- Optimizing retrieval accuracy
|
||||
|
||||
### Embeddings Configuration
|
||||
|
||||
You can also configure the embedder for the knowledge store.
|
||||
This is useful if you want to use a different embedder for the knowledge store than the one used for the agents.
|
||||
The `embedder` parameter supports various embedding model providers that include:
|
||||
- `openai`: OpenAI's embedding models
|
||||
- `google`: Google's text embedding models
|
||||
- `azure`: Azure OpenAI embeddings
|
||||
- `ollama`: Local embeddings with Ollama
|
||||
- `vertexai`: Google Cloud VertexAI embeddings
|
||||
- `cohere`: Cohere's embedding models
|
||||
- `voyageai`: VoyageAI's embedding models
|
||||
- `bedrock`: AWS Bedrock embeddings
|
||||
- `huggingface`: Hugging Face models
|
||||
- `watson`: IBM Watson embeddings
|
||||
|
||||
Here's an example of how to configure the embedder for the knowledge store using Google's `text-embedding-004` model:
|
||||
<CodeGroup>
|
||||
```python Example
|
||||
from crewai import Agent, Task, Crew, Process, LLM
|
||||
from crewai.knowledge.source.string_knowledge_source import StringKnowledgeSource
|
||||
import os
|
||||
|
||||
# Get the GEMINI API key
|
||||
GEMINI_API_KEY = os.environ.get("GEMINI_API_KEY")
|
||||
|
||||
# Create a knowledge source
|
||||
content = "Users name is John. He is 30 years old and lives in San Francisco."
|
||||
string_source = StringKnowledgeSource(
|
||||
content=content,
|
||||
)
|
||||
|
||||
# Create an LLM with a temperature of 0 to ensure deterministic outputs
|
||||
gemini_llm = LLM(
|
||||
model="gemini/gemini-1.5-pro-002",
|
||||
api_key=GEMINI_API_KEY,
|
||||
temperature=0,
|
||||
)
|
||||
|
||||
# Create an agent with the knowledge store
|
||||
agent = Agent(
|
||||
role="About User",
|
||||
goal="You know everything about the user.",
|
||||
backstory="""You are a master at understanding people and their preferences.""",
|
||||
verbose=True,
|
||||
allow_delegation=False,
|
||||
llm=gemini_llm,
|
||||
embedder={
|
||||
"provider": "google",
|
||||
"config": {
|
||||
"model": "models/text-embedding-004",
|
||||
"api_key": GEMINI_API_KEY,
|
||||
}
|
||||
}
|
||||
)
|
||||
|
||||
task = Task(
|
||||
description="Answer the following questions about the user: {question}",
|
||||
expected_output="An answer to the question.",
|
||||
agent=agent,
|
||||
)
|
||||
|
||||
crew = Crew(
|
||||
agents=[agent],
|
||||
tasks=[task],
|
||||
verbose=True,
|
||||
process=Process.sequential,
|
||||
knowledge_sources=[string_source],
|
||||
embedder={
|
||||
"provider": "google",
|
||||
"config": {
|
||||
"model": "models/text-embedding-004",
|
||||
"api_key": GEMINI_API_KEY,
|
||||
}
|
||||
}
|
||||
)
|
||||
|
||||
result = crew.kickoff(inputs={"question": "What city does John live in and how old is he?"})
|
||||
```
|
||||
```text Output
|
||||
# Agent: About User
|
||||
## Task: Answer the following questions about the user: What city does John live in and how old is he?
|
||||
|
||||
# Agent: About User
|
||||
## Final Answer:
|
||||
John is 30 years old and lives in San Francisco.
|
||||
```
|
||||
</CodeGroup>
|
||||
## Clearing Knowledge
|
||||
|
||||
If you need to clear the knowledge stored in CrewAI, you can use the `crewai reset-memories` command with the `--knowledge` option.
|
||||
|
||||
```bash Command
|
||||
crewai reset-memories --knowledge
|
||||
```
|
||||
|
||||
This is useful when you've updated your knowledge sources and want to ensure that the agents are using the most recent information.
|
||||
|
||||
## Agent-Specific Knowledge
|
||||
|
||||
While knowledge can be provided at the crew level using `crew.knowledge_sources`, individual agents can also have their own knowledge sources using the `knowledge_sources` parameter:
|
||||
|
||||
```python Code
|
||||
from crewai import Agent, Task, Crew
|
||||
from crewai.knowledge.source.string_knowledge_source import StringKnowledgeSource
|
||||
|
||||
# Create agent-specific knowledge about a product
|
||||
product_specs = StringKnowledgeSource(
|
||||
content="""The XPS 13 laptop features:
|
||||
- 13.4-inch 4K display
|
||||
- Intel Core i7 processor
|
||||
- 16GB RAM
|
||||
- 512GB SSD storage
|
||||
- 12-hour battery life""",
|
||||
metadata={"category": "product_specs"}
|
||||
)
|
||||
|
||||
# Create a support agent with product knowledge
|
||||
support_agent = Agent(
|
||||
role="Technical Support Specialist",
|
||||
goal="Provide accurate product information and support.",
|
||||
backstory="You are an expert on our laptop products and specifications.",
|
||||
knowledge_sources=[product_specs] # Agent-specific knowledge
|
||||
)
|
||||
|
||||
# Create a task that requires product knowledge
|
||||
support_task = Task(
|
||||
description="Answer this customer question: {question}",
|
||||
agent=support_agent
|
||||
)
|
||||
|
||||
# Create and run the crew
|
||||
crew = Crew(
|
||||
agents=[support_agent],
|
||||
tasks=[support_task]
|
||||
)
|
||||
|
||||
# Get answer about the laptop's specifications
|
||||
result = crew.kickoff(
|
||||
inputs={"question": "What is the storage capacity of the XPS 13?"}
|
||||
)
|
||||
```
|
||||
|
||||
<Info>
|
||||
Benefits of agent-specific knowledge:
|
||||
- Give agents specialized information for their roles
|
||||
- Maintain separation of concerns between agents
|
||||
- Combine with crew-level knowledge for layered information access
|
||||
</Info>
|
||||
|
||||
## Custom Knowledge Sources
|
||||
|
||||
CrewAI allows you to create custom knowledge sources for any type of data by extending the `BaseKnowledgeSource` class. Let's create a practical example that fetches and processes space news articles.
|
||||
|
||||
#### Space News Knowledge Source Example
|
||||
|
||||
<CodeGroup>
|
||||
|
||||
```python Code
|
||||
from crewai import Agent, Task, Crew, Process, LLM
|
||||
from crewai.knowledge.source.base_knowledge_source import BaseKnowledgeSource
|
||||
import requests
|
||||
from datetime import datetime
|
||||
from typing import Dict, Any
|
||||
from pydantic import BaseModel, Field
|
||||
|
||||
class SpaceNewsKnowledgeSource(BaseKnowledgeSource):
|
||||
"""Knowledge source that fetches data from Space News API."""
|
||||
|
||||
api_endpoint: str = Field(description="API endpoint URL")
|
||||
limit: int = Field(default=10, description="Number of articles to fetch")
|
||||
|
||||
def load_content(self) -> Dict[Any, str]:
|
||||
"""Fetch and format space news articles."""
|
||||
try:
|
||||
response = requests.get(
|
||||
f"{self.api_endpoint}?limit={self.limit}"
|
||||
)
|
||||
response.raise_for_status()
|
||||
|
||||
data = response.json()
|
||||
articles = data.get('results', [])
|
||||
|
||||
formatted_data = self._format_articles(articles)
|
||||
return {self.api_endpoint: formatted_data}
|
||||
except Exception as e:
|
||||
raise ValueError(f"Failed to fetch space news: {str(e)}")
|
||||
|
||||
def _format_articles(self, articles: list) -> str:
|
||||
"""Format articles into readable text."""
|
||||
formatted = "Space News Articles:\n\n"
|
||||
for article in articles:
|
||||
formatted += f"""
|
||||
Title: {article['title']}
|
||||
Published: {article['published_at']}
|
||||
Summary: {article['summary']}
|
||||
News Site: {article['news_site']}
|
||||
URL: {article['url']}
|
||||
-------------------"""
|
||||
return formatted
|
||||
|
||||
def add(self) -> None:
|
||||
"""Process and store the articles."""
|
||||
content = self.load_content()
|
||||
for _, text in content.items():
|
||||
chunks = self._chunk_text(text)
|
||||
self.chunks.extend(chunks)
|
||||
|
||||
self._save_documents()
|
||||
|
||||
# Create knowledge source
|
||||
recent_news = SpaceNewsKnowledgeSource(
|
||||
api_endpoint="https://api.spaceflightnewsapi.net/v4/articles",
|
||||
limit=10,
|
||||
)
|
||||
|
||||
# Create specialized agent
|
||||
space_analyst = Agent(
|
||||
role="Space News Analyst",
|
||||
goal="Answer questions about space news accurately and comprehensively",
|
||||
backstory="""You are a space industry analyst with expertise in space exploration,
|
||||
satellite technology, and space industry trends. You excel at answering questions
|
||||
about space news and providing detailed, accurate information.""",
|
||||
knowledge_sources=[recent_news],
|
||||
llm=LLM(model="gpt-4", temperature=0.0)
|
||||
)
|
||||
|
||||
# Create task that handles user questions
|
||||
analysis_task = Task(
|
||||
description="Answer this question about space news: {user_question}",
|
||||
expected_output="A detailed answer based on the recent space news articles",
|
||||
agent=space_analyst
|
||||
)
|
||||
|
||||
# Create and run the crew
|
||||
crew = Crew(
|
||||
agents=[space_analyst],
|
||||
tasks=[analysis_task],
|
||||
verbose=True,
|
||||
process=Process.sequential
|
||||
)
|
||||
|
||||
# Example usage
|
||||
result = crew.kickoff(
|
||||
inputs={"user_question": "What are the latest developments in space exploration?"}
|
||||
)
|
||||
```
|
||||
|
||||
```output Output
|
||||
# Agent: Space News Analyst
|
||||
## Task: Answer this question about space news: What are the latest developments in space exploration?
|
||||
|
||||
|
||||
# Agent: Space News Analyst
|
||||
## Final Answer:
|
||||
The latest developments in space exploration, based on recent space news articles, include the following:
|
||||
|
||||
1. SpaceX has received the final regulatory approvals to proceed with the second integrated Starship/Super Heavy launch, scheduled for as soon as the morning of Nov. 17, 2023. This is a significant step in SpaceX's ambitious plans for space exploration and colonization. [Source: SpaceNews](https://spacenews.com/starship-cleared-for-nov-17-launch/)
|
||||
|
||||
2. SpaceX has also informed the US Federal Communications Commission (FCC) that it plans to begin launching its first next-generation Starlink Gen2 satellites. This represents a major upgrade to the Starlink satellite internet service, which aims to provide high-speed internet access worldwide. [Source: Teslarati](https://www.teslarati.com/spacex-first-starlink-gen2-satellite-launch-2022/)
|
||||
|
||||
3. AI startup Synthetaic has raised $15 million in Series B funding. The company uses artificial intelligence to analyze data from space and air sensors, which could have significant applications in space exploration and satellite technology. [Source: SpaceNews](https://spacenews.com/ai-startup-synthetaic-raises-15-million-in-series-b-funding/)
|
||||
|
||||
4. The Space Force has formally established a unit within the U.S. Indo-Pacific Command, marking a permanent presence in the Indo-Pacific region. This could have significant implications for space security and geopolitics. [Source: SpaceNews](https://spacenews.com/space-force-establishes-permanent-presence-in-indo-pacific-region/)
|
||||
|
||||
5. Slingshot Aerospace, a space tracking and data analytics company, is expanding its network of ground-based optical telescopes to increase coverage of low Earth orbit. This could improve our ability to track and analyze objects in low Earth orbit, including satellites and space debris. [Source: SpaceNews](https://spacenews.com/slingshots-space-tracking-network-to-extend-coverage-of-low-earth-orbit/)
|
||||
|
||||
6. The National Natural Science Foundation of China has outlined a five-year project for researchers to study the assembly of ultra-large spacecraft. This could lead to significant advancements in spacecraft technology and space exploration capabilities. [Source: SpaceNews](https://spacenews.com/china-researching-challenges-of-kilometer-scale-ultra-large-spacecraft/)
|
||||
|
||||
7. The Center for AEroSpace Autonomy Research (CAESAR) at Stanford University is focusing on spacecraft autonomy. The center held a kickoff event on May 22, 2024, to highlight the industry, academia, and government collaboration it seeks to foster. This could lead to significant advancements in autonomous spacecraft technology. [Source: SpaceNews](https://spacenews.com/stanford-center-focuses-on-spacecraft-autonomy/)
|
||||
```
|
||||
|
||||
</CodeGroup>
|
||||
#### Key Components Explained
|
||||
|
||||
1. **Custom Knowledge Source (`SpaceNewsKnowledgeSource`)**:
|
||||
|
||||
- Extends `BaseKnowledgeSource` for integration with CrewAI
|
||||
- Configurable API endpoint and article limit
|
||||
- Implements three key methods:
|
||||
- `load_content()`: Fetches articles from the API
|
||||
- `_format_articles()`: Structures the articles into readable text
|
||||
- `add()`: Processes and stores the content
|
||||
|
||||
2. **Agent Configuration**:
|
||||
|
||||
- Specialized role as a Space News Analyst
|
||||
- Uses the knowledge source to access space news
|
||||
|
||||
3. **Task Setup**:
|
||||
|
||||
- Takes a user question as input through `{user_question}`
|
||||
- Designed to provide detailed answers based on the knowledge source
|
||||
|
||||
4. **Crew Orchestration**:
|
||||
- Manages the workflow between agent and task
|
||||
- Handles input/output through the kickoff method
|
||||
|
||||
This example demonstrates how to:
|
||||
|
||||
- Create a custom knowledge source that fetches real-time data
|
||||
- Process and format external data for AI consumption
|
||||
- Use the knowledge source to answer specific user questions
|
||||
- Integrate everything seamlessly with CrewAI's agent system
|
||||
|
||||
#### About the Spaceflight News API
|
||||
|
||||
The example uses the [Spaceflight News API](https://api.spaceflightnewsapi.net/v4/docs/), which:
|
||||
|
||||
- Provides free access to space-related news articles
|
||||
- Requires no authentication
|
||||
- Returns structured data about space news
|
||||
- Supports pagination and filtering
|
||||
|
||||
You can customize the API query by modifying the endpoint URL:
|
||||
|
||||
```python
|
||||
# Fetch more articles
|
||||
recent_news = SpaceNewsKnowledgeSource(
|
||||
api_endpoint="https://api.spaceflightnewsapi.net/v4/articles",
|
||||
limit=20, # Increase the number of articles
|
||||
)
|
||||
|
||||
# Add search parameters
|
||||
recent_news = SpaceNewsKnowledgeSource(
|
||||
api_endpoint="https://api.spaceflightnewsapi.net/v4/articles?search=NASA", # Search for NASA news
|
||||
limit=10,
|
||||
)
|
||||
```
|
||||
|
||||
## Best Practices
|
||||
|
||||
<AccordionGroup>
|
||||
<Accordion title="Content Organization">
|
||||
- Keep chunk sizes appropriate for your content type
|
||||
- Consider content overlap for context preservation
|
||||
- Organize related information into separate knowledge sources
|
||||
</Accordion>
|
||||
|
||||
<Accordion title="Performance Tips">
|
||||
- Adjust chunk sizes based on content complexity
|
||||
- Configure appropriate embedding models
|
||||
- Consider using local embedding providers for faster processing
|
||||
</Accordion>
|
||||
</AccordionGroup>
|
||||
@@ -7,45 +7,32 @@ icon: link
|
||||
## Using LangChain Tools
|
||||
|
||||
<Info>
|
||||
CrewAI seamlessly integrates with LangChain's comprehensive [list of tools](https://python.langchain.com/docs/integrations/tools/), all of which can be used with CrewAI.
|
||||
CrewAI seamlessly integrates with LangChain’s comprehensive [list of tools](https://python.langchain.com/docs/integrations/tools/), all of which can be used with CrewAI.
|
||||
</Info>
|
||||
|
||||
```python Code
|
||||
import os
|
||||
from dotenv import load_dotenv
|
||||
from crewai import Agent, Task, Crew
|
||||
from crewai.tools import BaseTool
|
||||
from pydantic import Field
|
||||
from langchain_community.utilities import GoogleSerperAPIWrapper
|
||||
from crewai import Agent
|
||||
from langchain.agents import Tool
|
||||
from langchain.utilities import GoogleSerperAPIWrapper
|
||||
|
||||
# Set up your SERPER_API_KEY key in an .env file, eg:
|
||||
# SERPER_API_KEY=<your api key>
|
||||
load_dotenv()
|
||||
# Setup API keys
|
||||
os.environ["SERPER_API_KEY"] = "Your Key"
|
||||
|
||||
search = GoogleSerperAPIWrapper()
|
||||
|
||||
class SearchTool(BaseTool):
|
||||
name: str = "Search"
|
||||
description: str = "Useful for search-based queries. Use this to find current information about markets, companies, and trends."
|
||||
search: GoogleSerperAPIWrapper = Field(default_factory=GoogleSerperAPIWrapper)
|
||||
# Create and assign the search tool to an agent
|
||||
serper_tool = Tool(
|
||||
name="Intermediate Answer",
|
||||
func=search.run,
|
||||
description="Useful for search-based queries",
|
||||
)
|
||||
|
||||
def _run(self, query: str) -> str:
|
||||
"""Execute the search query and return results"""
|
||||
try:
|
||||
return self.search.run(query)
|
||||
except Exception as e:
|
||||
return f"Error performing search: {str(e)}"
|
||||
|
||||
# Create Agents
|
||||
researcher = Agent(
|
||||
role='Research Analyst',
|
||||
goal='Gather current market data and trends',
|
||||
backstory="""You are an expert research analyst with years of experience in
|
||||
gathering market intelligence. You're known for your ability to find
|
||||
relevant and up-to-date market information and present it in a clear,
|
||||
actionable format.""",
|
||||
tools=[SearchTool()],
|
||||
verbose=True
|
||||
agent = Agent(
|
||||
role='Research Analyst',
|
||||
goal='Provide up-to-date market analysis',
|
||||
backstory='An expert analyst with a keen eye for market trends.',
|
||||
tools=[serper_tool]
|
||||
)
|
||||
|
||||
# rest of the code ...
|
||||
@@ -53,6 +40,6 @@ researcher = Agent(
|
||||
|
||||
## Conclusion
|
||||
|
||||
Tools are pivotal in extending the capabilities of CrewAI agents, enabling them to undertake a broad spectrum of tasks and collaborate effectively.
|
||||
When building solutions with CrewAI, leverage both custom and existing tools to empower your agents and enhance the AI ecosystem. Consider utilizing error handling, caching mechanisms,
|
||||
and the flexibility of tool arguments to optimize your agents' performance and capabilities.
|
||||
@@ -1,712 +1,158 @@
|
||||
---
|
||||
title: 'LLMs'
|
||||
description: 'A comprehensive guide to configuring and using Large Language Models (LLMs) in your CrewAI projects'
|
||||
icon: 'microchip-ai'
|
||||
title: LLMs
|
||||
description: Learn how to configure and optimize LLMs for your CrewAI projects.
|
||||
icon: microchip-ai
|
||||
---
|
||||
|
||||
<Note>
|
||||
CrewAI integrates with multiple LLM providers through LiteLLM, giving you the flexibility to choose the right model for your specific use case. This guide will help you understand how to configure and use different LLM providers in your CrewAI projects.
|
||||
</Note>
|
||||
# Large Language Models (LLMs) in CrewAI
|
||||
|
||||
## What are LLMs?
|
||||
Large Language Models (LLMs) are the backbone of intelligent agents in the CrewAI framework. This guide will help you understand, configure, and optimize LLM usage for your CrewAI projects.
|
||||
|
||||
Large Language Models (LLMs) are the core intelligence behind CrewAI agents. They enable agents to understand context, make decisions, and generate human-like responses. Here's what you need to know:
|
||||
## Key Concepts
|
||||
|
||||
<CardGroup cols={2}>
|
||||
<Card title="LLM Basics" icon="brain">
|
||||
Large Language Models are AI systems trained on vast amounts of text data. They power the intelligence of your CrewAI agents, enabling them to understand and generate human-like text.
|
||||
</Card>
|
||||
<Card title="Context Window" icon="window">
|
||||
The context window determines how much text an LLM can process at once. Larger windows (e.g., 128K tokens) allow for more context but may be more expensive and slower.
|
||||
</Card>
|
||||
<Card title="Temperature" icon="temperature-three-quarters">
|
||||
Temperature (0.0 to 1.0) controls response randomness. Lower values (e.g., 0.2) produce more focused, deterministic outputs, while higher values (e.g., 0.8) increase creativity and variability.
|
||||
</Card>
|
||||
<Card title="Provider Selection" icon="server">
|
||||
Each LLM provider (e.g., OpenAI, Anthropic, Google) offers different models with varying capabilities, pricing, and features. Choose based on your needs for accuracy, speed, and cost.
|
||||
</Card>
|
||||
</CardGroup>
|
||||
- **LLM**: Large Language Model, the AI powering agent intelligence
|
||||
- **Agent**: A CrewAI entity that uses an LLM to perform tasks
|
||||
- **Provider**: A service that offers LLM capabilities (e.g., OpenAI, Anthropic, Ollama, [more providers](https://docs.litellm.ai/docs/providers))
|
||||
|
||||
## Setting Up Your LLM
|
||||
## Configuring LLMs for Agents
|
||||
|
||||
There are three ways to configure LLMs in CrewAI. Choose the method that best fits your workflow:
|
||||
CrewAI offers flexible options for setting up LLMs:
|
||||
|
||||
<Tabs>
|
||||
<Tab title="1. Environment Variables">
|
||||
The simplest way to get started. Set these variables in your environment:
|
||||
### 1. Default Configuration
|
||||
|
||||
```bash
|
||||
# Required: Your API key for authentication
|
||||
OPENAI_API_KEY=<your-api-key>
|
||||
By default, CrewAI uses the `gpt-4o-mini` model. It uses environment variables if no LLM is specified:
|
||||
- `OPENAI_MODEL_NAME` (defaults to "gpt-4o-mini" if not set)
|
||||
- `OPENAI_API_BASE`
|
||||
- `OPENAI_API_KEY`
|
||||
|
||||
# Optional: Default model selection
|
||||
OPENAI_MODEL_NAME=gpt-4o-mini # Default if not set
|
||||
### 2. String Identifier
|
||||
|
||||
# Optional: Organization ID (if applicable)
|
||||
OPENAI_ORGANIZATION_ID=<your-org-id>
|
||||
```
|
||||
```python Code
|
||||
agent = Agent(llm="gpt-4o", ...)
|
||||
```
|
||||
|
||||
<Warning>
|
||||
Never commit API keys to version control. Use environment files (.env) or your system's secret management.
|
||||
</Warning>
|
||||
</Tab>
|
||||
<Tab title="2. YAML Configuration">
|
||||
Create a YAML file to define your agent configurations. This method is great for version control and team collaboration:
|
||||
### 3. LLM Instance
|
||||
|
||||
```yaml
|
||||
researcher:
|
||||
role: Research Specialist
|
||||
goal: Conduct comprehensive research and analysis
|
||||
backstory: A dedicated research professional with years of experience
|
||||
verbose: true
|
||||
llm: openai/gpt-4o-mini # your model here
|
||||
# (see provider configuration examples below for more)
|
||||
```
|
||||
|
||||
<Info>
|
||||
The YAML configuration allows you to:
|
||||
- Version control your agent settings
|
||||
- Easily switch between different models
|
||||
- Share configurations across team members
|
||||
- Document model choices and their purposes
|
||||
</Info>
|
||||
</Tab>
|
||||
<Tab title="3. Direct Code">
|
||||
For maximum flexibility, configure LLMs directly in your Python code:
|
||||
|
||||
```python
|
||||
from crewai import LLM
|
||||
|
||||
# Basic configuration
|
||||
llm = LLM(model="gpt-4")
|
||||
|
||||
# Advanced configuration with detailed parameters
|
||||
llm = LLM(
|
||||
model="gpt-4o-mini",
|
||||
temperature=0.7, # Higher for more creative outputs
|
||||
timeout=120, # Seconds to wait for response
|
||||
max_tokens=4000, # Maximum length of response
|
||||
top_p=0.9, # Nucleus sampling parameter
|
||||
frequency_penalty=0.1, # Reduce repetition
|
||||
presence_penalty=0.1, # Encourage topic diversity
|
||||
response_format={"type": "json"}, # For structured outputs
|
||||
seed=42 # For reproducible results
|
||||
)
|
||||
```
|
||||
|
||||
<Info>
|
||||
Parameter explanations:
|
||||
- `temperature`: Controls randomness (0.0-1.0)
|
||||
- `timeout`: Maximum wait time for response
|
||||
- `max_tokens`: Limits response length
|
||||
- `top_p`: Alternative to temperature for sampling
|
||||
- `frequency_penalty`: Reduces word repetition
|
||||
- `presence_penalty`: Encourages new topics
|
||||
- `response_format`: Specifies output structure
|
||||
- `seed`: Ensures consistent outputs
|
||||
</Info>
|
||||
</Tab>
|
||||
</Tabs>
|
||||
|
||||
## Provider Configuration Examples
|
||||
|
||||
|
||||
CrewAI supports a multitude of LLM providers, each offering unique features, authentication methods, and model capabilities.
|
||||
In this section, you'll find detailed examples that help you select, configure, and optimize the LLM that best fits your project's needs.
|
||||
|
||||
<AccordionGroup>
|
||||
<Accordion title="OpenAI">
|
||||
Set the following environment variables in your `.env` file:
|
||||
|
||||
```toml Code
|
||||
# Required
|
||||
OPENAI_API_KEY=sk-...
|
||||
|
||||
# Optional
|
||||
OPENAI_API_BASE=<custom-base-url>
|
||||
OPENAI_ORGANIZATION=<your-org-id>
|
||||
```
|
||||
|
||||
Example usage in your CrewAI project:
|
||||
```python Code
|
||||
from crewai import LLM
|
||||
|
||||
llm = LLM(
|
||||
model="openai/gpt-4", # call model by provider/model_name
|
||||
temperature=0.8,
|
||||
max_tokens=150,
|
||||
top_p=0.9,
|
||||
frequency_penalty=0.1,
|
||||
presence_penalty=0.1,
|
||||
stop=["END"],
|
||||
seed=42
|
||||
)
|
||||
```
|
||||
|
||||
OpenAI is one of the leading providers of LLMs with a wide range of models and features.
|
||||
|
||||
| Model | Context Window | Best For |
|
||||
|---------------------|------------------|-----------------------------------------------|
|
||||
| GPT-4 | 8,192 tokens | High-accuracy tasks, complex reasoning |
|
||||
| GPT-4 Turbo | 128,000 tokens | Long-form content, document analysis |
|
||||
| GPT-4o & GPT-4o-mini | 128,000 tokens | Cost-effective large context processing |
|
||||
| o3-mini | 200,000 tokens | Fast reasoning, complex reasoning |
|
||||
| o1-mini | 128,000 tokens | Fast reasoning, complex reasoning |
|
||||
| o1-preview | 128,000 tokens | Fast reasoning, complex reasoning |
|
||||
| o1 | 200,000 tokens | Fast reasoning, complex reasoning |
|
||||
</Accordion>
|
||||
|
||||
<Accordion title="Anthropic">
|
||||
```toml Code
|
||||
ANTHROPIC_API_KEY=sk-ant-...
|
||||
```
|
||||
|
||||
Example usage in your CrewAI project:
|
||||
```python Code
|
||||
llm = LLM(
|
||||
model="anthropic/claude-3-sonnet-20240229-v1:0",
|
||||
temperature=0.7
|
||||
)
|
||||
```
|
||||
</Accordion>
|
||||
|
||||
<Accordion title="Google">
|
||||
Set the following environment variables in your `.env` file:
|
||||
|
||||
```toml Code
|
||||
# Option 1: Gemini accessed with an API key.
|
||||
# https://ai.google.dev/gemini-api/docs/api-key
|
||||
GEMINI_API_KEY=<your-api-key>
|
||||
|
||||
# Option 2: Vertex AI IAM credentials for Gemini, Anthropic, and Model Garden.
|
||||
# https://cloud.google.com/vertex-ai/generative-ai/docs/overview
|
||||
```
|
||||
|
||||
Get credentials from your Google Cloud Console and save it to a JSON file with the following code:
|
||||
```python Code
|
||||
import json
|
||||
|
||||
file_path = 'path/to/vertex_ai_service_account.json'
|
||||
|
||||
# Load the JSON file
|
||||
with open(file_path, 'r') as file:
|
||||
vertex_credentials = json.load(file)
|
||||
|
||||
# Convert the credentials to a JSON string
|
||||
vertex_credentials_json = json.dumps(vertex_credentials)
|
||||
```
|
||||
|
||||
Example usage in your CrewAI project:
|
||||
```python Code
|
||||
from crewai import LLM
|
||||
|
||||
llm = LLM(
|
||||
model="gemini/gemini-1.5-pro-latest",
|
||||
temperature=0.7,
|
||||
vertex_credentials=vertex_credentials_json
|
||||
)
|
||||
```
|
||||
Google offers a range of powerful models optimized for different use cases:
|
||||
|
||||
| Model | Context Window | Best For |
|
||||
|-----------------------|----------------|------------------------------------------------------------------|
|
||||
| gemini-2.0-flash-exp | 1M tokens | Higher quality at faster speed, multimodal model, good for most tasks |
|
||||
| gemini-1.5-flash | 1M tokens | Balanced multimodal model, good for most tasks |
|
||||
| gemini-1.5-flash-8B | 1M tokens | Fastest, most cost-efficient, good for high-frequency tasks |
|
||||
| gemini-1.5-pro | 2M tokens | Best performing, wide variety of reasoning tasks including logical reasoning, coding, and creative collaboration |
|
||||
</Accordion>
|
||||
|
||||
<Accordion title="Azure">
|
||||
```toml Code
|
||||
# Required
|
||||
AZURE_API_KEY=<your-api-key>
|
||||
AZURE_API_BASE=<your-resource-url>
|
||||
AZURE_API_VERSION=<api-version>
|
||||
|
||||
# Optional
|
||||
AZURE_AD_TOKEN=<your-azure-ad-token>
|
||||
AZURE_API_TYPE=<your-azure-api-type>
|
||||
```
|
||||
|
||||
Example usage in your CrewAI project:
|
||||
```python Code
|
||||
llm = LLM(
|
||||
model="azure/gpt-4",
|
||||
api_version="2023-05-15"
|
||||
)
|
||||
```
|
||||
</Accordion>
|
||||
|
||||
<Accordion title="AWS Bedrock">
|
||||
```toml Code
|
||||
AWS_ACCESS_KEY_ID=<your-access-key>
|
||||
AWS_SECRET_ACCESS_KEY=<your-secret-key>
|
||||
AWS_DEFAULT_REGION=<your-region>
|
||||
```
|
||||
|
||||
Example usage in your CrewAI project:
|
||||
```python Code
|
||||
llm = LLM(
|
||||
model="bedrock/anthropic.claude-3-sonnet-20240229-v1:0"
|
||||
)
|
||||
```
|
||||
</Accordion>
|
||||
|
||||
<Accordion title="Amazon SageMaker">
|
||||
```toml Code
|
||||
AWS_ACCESS_KEY_ID=<your-access-key>
|
||||
AWS_SECRET_ACCESS_KEY=<your-secret-key>
|
||||
AWS_DEFAULT_REGION=<your-region>
|
||||
```
|
||||
|
||||
Example usage in your CrewAI project:
|
||||
```python Code
|
||||
llm = LLM(
|
||||
model="sagemaker/<my-endpoint>"
|
||||
)
|
||||
```
|
||||
</Accordion>
|
||||
|
||||
<Accordion title="Mistral">
|
||||
Set the following environment variables in your `.env` file:
|
||||
```toml Code
|
||||
MISTRAL_API_KEY=<your-api-key>
|
||||
```
|
||||
|
||||
Example usage in your CrewAI project:
|
||||
```python Code
|
||||
llm = LLM(
|
||||
model="mistral/mistral-large-latest",
|
||||
temperature=0.7
|
||||
)
|
||||
```
|
||||
</Accordion>
|
||||
|
||||
<Accordion title="Nvidia NIM">
|
||||
Set the following environment variables in your `.env` file:
|
||||
```toml Code
|
||||
NVIDIA_API_KEY=<your-api-key>
|
||||
```
|
||||
|
||||
Example usage in your CrewAI project:
|
||||
```python Code
|
||||
llm = LLM(
|
||||
model="nvidia_nim/meta/llama3-70b-instruct",
|
||||
temperature=0.7
|
||||
)
|
||||
```
|
||||
|
||||
Nvidia NIM provides a comprehensive suite of models for various use cases, from general-purpose tasks to specialized applications.
|
||||
|
||||
| Model | Context Window | Best For |
|
||||
|-------------------------------------------------------------------------|----------------|-------------------------------------------------------------------|
|
||||
| nvidia/mistral-nemo-minitron-8b-8k-instruct | 8,192 tokens | State-of-the-art small language model delivering superior accuracy for chatbot, virtual assistants, and content generation. |
|
||||
| nvidia/nemotron-4-mini-hindi-4b-instruct | 4,096 tokens | A bilingual Hindi-English SLM for on-device inference, tailored specifically for Hindi Language. |
|
||||
| nvidia/llama-3.1-nemotron-70b-instruct | 128k tokens | Customized for enhanced helpfulness in responses |
|
||||
| nvidia/llama3-chatqa-1.5-8b | 128k tokens | Advanced LLM to generate high-quality, context-aware responses for chatbots and search engines. |
|
||||
| nvidia/llama3-chatqa-1.5-70b | 128k tokens | Advanced LLM to generate high-quality, context-aware responses for chatbots and search engines. |
|
||||
| nvidia/vila | 128k tokens | Multi-modal vision-language model that understands text/img/video and creates informative responses |
|
||||
| nvidia/neva-22 | 4,096 tokens | Multi-modal vision-language model that understands text/images and generates informative responses |
|
||||
| nvidia/nemotron-mini-4b-instruct | 8,192 tokens | General-purpose tasks |
|
||||
| nvidia/usdcode-llama3-70b-instruct | 128k tokens | State-of-the-art LLM that answers OpenUSD knowledge queries and generates USD-Python code. |
|
||||
| nvidia/nemotron-4-340b-instruct | 4,096 tokens | Creates diverse synthetic data that mimics the characteristics of real-world data. |
|
||||
| meta/codellama-70b | 100k tokens | LLM capable of generating code from natural language and vice versa. |
|
||||
| meta/llama2-70b | 4,096 tokens | Cutting-edge large language AI model capable of generating text and code in response to prompts. |
|
||||
| meta/llama3-8b-instruct | 8,192 tokens | Advanced state-of-the-art LLM with language understanding, superior reasoning, and text generation. |
|
||||
| meta/llama3-70b-instruct | 8,192 tokens | Powers complex conversations with superior contextual understanding, reasoning and text generation. |
|
||||
| meta/llama-3.1-8b-instruct | 128k tokens | Advanced state-of-the-art model with language understanding, superior reasoning, and text generation. |
|
||||
| meta/llama-3.1-70b-instruct | 128k tokens | Powers complex conversations with superior contextual understanding, reasoning and text generation. |
|
||||
| meta/llama-3.1-405b-instruct | 128k tokens | Advanced LLM for synthetic data generation, distillation, and inference for chatbots, coding, and domain-specific tasks. |
|
||||
| meta/llama-3.2-1b-instruct | 128k tokens | Advanced state-of-the-art small language model with language understanding, superior reasoning, and text generation. |
|
||||
| meta/llama-3.2-3b-instruct | 128k tokens | Advanced state-of-the-art small language model with language understanding, superior reasoning, and text generation. |
|
||||
| meta/llama-3.2-11b-vision-instruct | 128k tokens | Advanced state-of-the-art small language model with language understanding, superior reasoning, and text generation. |
|
||||
| meta/llama-3.2-90b-vision-instruct | 128k tokens | Advanced state-of-the-art small language model with language understanding, superior reasoning, and text generation. |
|
||||
| google/gemma-7b | 8,192 tokens | Cutting-edge text generation model text understanding, transformation, and code generation. |
|
||||
| google/gemma-2b | 8,192 tokens | Cutting-edge text generation model text understanding, transformation, and code generation. |
|
||||
| google/codegemma-7b | 8,192 tokens | Cutting-edge model built on Google's Gemma-7B specialized for code generation and code completion. |
|
||||
| google/codegemma-1.1-7b | 8,192 tokens | Advanced programming model for code generation, completion, reasoning, and instruction following. |
|
||||
| google/recurrentgemma-2b | 8,192 tokens | Novel recurrent architecture based language model for faster inference when generating long sequences. |
|
||||
| google/gemma-2-9b-it | 8,192 tokens | Cutting-edge text generation model text understanding, transformation, and code generation. |
|
||||
| google/gemma-2-27b-it | 8,192 tokens | Cutting-edge text generation model text understanding, transformation, and code generation. |
|
||||
| google/gemma-2-2b-it | 8,192 tokens | Cutting-edge text generation model text understanding, transformation, and code generation. |
|
||||
| google/deplot | 512 tokens | One-shot visual language understanding model that translates images of plots into tables. |
|
||||
| google/paligemma | 8,192 tokens | Vision language model adept at comprehending text and visual inputs to produce informative responses. |
|
||||
| mistralai/mistral-7b-instruct-v0.2 | 32k tokens | This LLM follows instructions, completes requests, and generates creative text. |
|
||||
| mistralai/mixtral-8x7b-instruct-v0.1 | 8,192 tokens | An MOE LLM that follows instructions, completes requests, and generates creative text. |
|
||||
| mistralai/mistral-large | 4,096 tokens | Creates diverse synthetic data that mimics the characteristics of real-world data. |
|
||||
| mistralai/mixtral-8x22b-instruct-v0.1 | 8,192 tokens | Creates diverse synthetic data that mimics the characteristics of real-world data. |
|
||||
| mistralai/mistral-7b-instruct-v0.3 | 32k tokens | This LLM follows instructions, completes requests, and generates creative text. |
|
||||
| nv-mistralai/mistral-nemo-12b-instruct | 128k tokens | Most advanced language model for reasoning, code, multilingual tasks; runs on a single GPU. |
|
||||
| mistralai/mamba-codestral-7b-v0.1 | 256k tokens | Model for writing and interacting with code across a wide range of programming languages and tasks. |
|
||||
| microsoft/phi-3-mini-128k-instruct | 128K tokens | Lightweight, state-of-the-art open LLM with strong math and logical reasoning skills. |
|
||||
| microsoft/phi-3-mini-4k-instruct | 4,096 tokens | Lightweight, state-of-the-art open LLM with strong math and logical reasoning skills. |
|
||||
| microsoft/phi-3-small-8k-instruct | 8,192 tokens | Lightweight, state-of-the-art open LLM with strong math and logical reasoning skills. |
|
||||
| microsoft/phi-3-small-128k-instruct | 128K tokens | Lightweight, state-of-the-art open LLM with strong math and logical reasoning skills. |
|
||||
| microsoft/phi-3-medium-4k-instruct | 4,096 tokens | Lightweight, state-of-the-art open LLM with strong math and logical reasoning skills. |
|
||||
| microsoft/phi-3-medium-128k-instruct | 128K tokens | Lightweight, state-of-the-art open LLM with strong math and logical reasoning skills. |
|
||||
| microsoft/phi-3.5-mini-instruct | 128K tokens | Lightweight multilingual LLM powering AI applications in latency bound, memory/compute constrained environments |
|
||||
| microsoft/phi-3.5-moe-instruct | 128K tokens | Advanced LLM based on Mixture of Experts architecure to deliver compute efficient content generation |
|
||||
| microsoft/kosmos-2 | 1,024 tokens | Groundbreaking multimodal model designed to understand and reason about visual elements in images. |
|
||||
| microsoft/phi-3-vision-128k-instruct | 128k tokens | Cutting-edge open multimodal model exceling in high-quality reasoning from images. |
|
||||
| microsoft/phi-3.5-vision-instruct | 128k tokens | Cutting-edge open multimodal model exceling in high-quality reasoning from images. |
|
||||
| databricks/dbrx-instruct | 12k tokens | A general-purpose LLM with state-of-the-art performance in language understanding, coding, and RAG. |
|
||||
| snowflake/arctic | 1,024 tokens | Delivers high efficiency inference for enterprise applications focused on SQL generation and coding. |
|
||||
| aisingapore/sea-lion-7b-instruct | 4,096 tokens | LLM to represent and serve the linguistic and cultural diversity of Southeast Asia |
|
||||
| ibm/granite-8b-code-instruct | 4,096 tokens | Software programming LLM for code generation, completion, explanation, and multi-turn conversion. |
|
||||
| ibm/granite-34b-code-instruct | 8,192 tokens | Software programming LLM for code generation, completion, explanation, and multi-turn conversion. |
|
||||
| ibm/granite-3.0-8b-instruct | 4,096 tokens | Advanced Small Language Model supporting RAG, summarization, classification, code, and agentic AI |
|
||||
| ibm/granite-3.0-3b-a800m-instruct | 4,096 tokens | Highly efficient Mixture of Experts model for RAG, summarization, entity extraction, and classification |
|
||||
| mediatek/breeze-7b-instruct | 4,096 tokens | Creates diverse synthetic data that mimics the characteristics of real-world data. |
|
||||
| upstage/solar-10.7b-instruct | 4,096 tokens | Excels in NLP tasks, particularly in instruction-following, reasoning, and mathematics. |
|
||||
| writer/palmyra-med-70b-32k | 32k tokens | Leading LLM for accurate, contextually relevant responses in the medical domain. |
|
||||
| writer/palmyra-med-70b | 32k tokens | Leading LLM for accurate, contextually relevant responses in the medical domain. |
|
||||
| writer/palmyra-fin-70b-32k | 32k tokens | Specialized LLM for financial analysis, reporting, and data processing |
|
||||
| 01-ai/yi-large | 32k tokens | Powerful model trained on English and Chinese for diverse tasks including chatbot and creative writing. |
|
||||
| deepseek-ai/deepseek-coder-6.7b-instruct | 2k tokens | Powerful coding model offering advanced capabilities in code generation, completion, and infilling |
|
||||
| rakuten/rakutenai-7b-instruct | 1,024 tokens | Advanced state-of-the-art LLM with language understanding, superior reasoning, and text generation. |
|
||||
| rakuten/rakutenai-7b-chat | 1,024 tokens | Advanced state-of-the-art LLM with language understanding, superior reasoning, and text generation. |
|
||||
| baichuan-inc/baichuan2-13b-chat | 4,096 tokens | Support Chinese and English chat, coding, math, instruction following, solving quizzes |
|
||||
</Accordion>
|
||||
|
||||
<Accordion title="Groq">
|
||||
Set the following environment variables in your `.env` file:
|
||||
|
||||
```toml Code
|
||||
GROQ_API_KEY=<your-api-key>
|
||||
```
|
||||
|
||||
Example usage in your CrewAI project:
|
||||
```python Code
|
||||
llm = LLM(
|
||||
model="groq/llama-3.2-90b-text-preview",
|
||||
temperature=0.7
|
||||
)
|
||||
```
|
||||
| Model | Context Window | Best For |
|
||||
|-------------------|------------------|--------------------------------------------|
|
||||
| Llama 3.1 70B/8B | 131,072 tokens | High-performance, large context tasks |
|
||||
| Llama 3.2 Series | 8,192 tokens | General-purpose tasks |
|
||||
| Mixtral 8x7B | 32,768 tokens | Balanced performance and context |
|
||||
</Accordion>
|
||||
|
||||
<Accordion title="IBM watsonx.ai">
|
||||
Set the following environment variables in your `.env` file:
|
||||
```toml Code
|
||||
# Required
|
||||
WATSONX_URL=<your-url>
|
||||
WATSONX_APIKEY=<your-apikey>
|
||||
WATSONX_PROJECT_ID=<your-project-id>
|
||||
|
||||
# Optional
|
||||
WATSONX_TOKEN=<your-token>
|
||||
WATSONX_DEPLOYMENT_SPACE_ID=<your-space-id>
|
||||
```
|
||||
|
||||
Example usage in your CrewAI project:
|
||||
```python Code
|
||||
llm = LLM(
|
||||
model="watsonx/meta-llama/llama-3-1-70b-instruct",
|
||||
base_url="https://api.watsonx.ai/v1"
|
||||
)
|
||||
```
|
||||
</Accordion>
|
||||
|
||||
<Accordion title="Ollama (Local LLMs)">
|
||||
1. Install Ollama: [ollama.ai](https://ollama.ai/)
|
||||
2. Run a model: `ollama run llama2`
|
||||
3. Configure:
|
||||
|
||||
```python Code
|
||||
llm = LLM(
|
||||
model="ollama/llama3:70b",
|
||||
base_url="http://localhost:11434"
|
||||
)
|
||||
```
|
||||
</Accordion>
|
||||
|
||||
<Accordion title="Fireworks AI">
|
||||
Set the following environment variables in your `.env` file:
|
||||
```toml Code
|
||||
FIREWORKS_API_KEY=<your-api-key>
|
||||
```
|
||||
|
||||
Example usage in your CrewAI project:
|
||||
```python Code
|
||||
llm = LLM(
|
||||
model="fireworks_ai/accounts/fireworks/models/llama-v3-70b-instruct",
|
||||
temperature=0.7
|
||||
)
|
||||
```
|
||||
</Accordion>
|
||||
|
||||
<Accordion title="Perplexity AI">
|
||||
Set the following environment variables in your `.env` file:
|
||||
```toml Code
|
||||
PERPLEXITY_API_KEY=<your-api-key>
|
||||
```
|
||||
|
||||
Example usage in your CrewAI project:
|
||||
```python Code
|
||||
llm = LLM(
|
||||
model="llama-3.1-sonar-large-128k-online",
|
||||
base_url="https://api.perplexity.ai/"
|
||||
)
|
||||
```
|
||||
</Accordion>
|
||||
|
||||
<Accordion title="Hugging Face">
|
||||
Set the following environment variables in your `.env` file:
|
||||
```toml Code
|
||||
HUGGINGFACE_API_KEY=<your-api-key>
|
||||
```
|
||||
|
||||
Example usage in your CrewAI project:
|
||||
```python Code
|
||||
llm = LLM(
|
||||
model="huggingface/meta-llama/Meta-Llama-3.1-8B-Instruct",
|
||||
base_url="your_api_endpoint"
|
||||
)
|
||||
```
|
||||
</Accordion>
|
||||
|
||||
<Accordion title="SambaNova">
|
||||
Set the following environment variables in your `.env` file:
|
||||
|
||||
```toml Code
|
||||
SAMBANOVA_API_KEY=<your-api-key>
|
||||
```
|
||||
|
||||
Example usage in your CrewAI project:
|
||||
```python Code
|
||||
llm = LLM(
|
||||
model="sambanova/Meta-Llama-3.1-8B-Instruct",
|
||||
temperature=0.7
|
||||
)
|
||||
```
|
||||
| Model | Context Window | Best For |
|
||||
|--------------------|------------------------|----------------------------------------------|
|
||||
| Llama 3.1 70B/8B | Up to 131,072 tokens | High-performance, large context tasks |
|
||||
| Llama 3.1 405B | 8,192 tokens | High-performance and output quality |
|
||||
| Llama 3.2 Series | 8,192 tokens | General-purpose, multimodal tasks |
|
||||
| Llama 3.3 70B | Up to 131,072 tokens | High-performance and output quality |
|
||||
| Qwen2 familly | 8,192 tokens | High-performance and output quality |
|
||||
</Accordion>
|
||||
|
||||
<Accordion title="Cerebras">
|
||||
Set the following environment variables in your `.env` file:
|
||||
```toml Code
|
||||
# Required
|
||||
CEREBRAS_API_KEY=<your-api-key>
|
||||
```
|
||||
|
||||
Example usage in your CrewAI project:
|
||||
```python Code
|
||||
llm = LLM(
|
||||
model="cerebras/llama3.1-70b",
|
||||
temperature=0.7,
|
||||
max_tokens=8192
|
||||
)
|
||||
```
|
||||
|
||||
<Info>
|
||||
Cerebras features:
|
||||
- Fast inference speeds
|
||||
- Competitive pricing
|
||||
- Good balance of speed and quality
|
||||
- Support for long context windows
|
||||
</Info>
|
||||
</Accordion>
|
||||
|
||||
<Accordion title="Open Router">
|
||||
Set the following environment variables in your `.env` file:
|
||||
```toml Code
|
||||
OPENROUTER_API_KEY=<your-api-key>
|
||||
```
|
||||
|
||||
Example usage in your CrewAI project:
|
||||
```python Code
|
||||
llm = LLM(
|
||||
model="openrouter/deepseek/deepseek-r1",
|
||||
base_url="https://openrouter.ai/api/v1",
|
||||
api_key=OPENROUTER_API_KEY
|
||||
)
|
||||
```
|
||||
|
||||
<Info>
|
||||
Open Router models:
|
||||
- openrouter/deepseek/deepseek-r1
|
||||
- openrouter/deepseek/deepseek-chat
|
||||
</Info>
|
||||
</Accordion>
|
||||
</AccordionGroup>
|
||||
|
||||
## Streaming Responses
|
||||
|
||||
CrewAI supports streaming responses from LLMs, allowing your application to receive and process outputs in real-time as they're generated.
|
||||
|
||||
<Tabs>
|
||||
<Tab title="Basic Setup">
|
||||
Enable streaming by setting the `stream` parameter to `True` when initializing your LLM:
|
||||
|
||||
```python
|
||||
from crewai import LLM
|
||||
|
||||
# Create an LLM with streaming enabled
|
||||
llm = LLM(
|
||||
model="openai/gpt-4o",
|
||||
stream=True # Enable streaming
|
||||
)
|
||||
```
|
||||
|
||||
When streaming is enabled, responses are delivered in chunks as they're generated, creating a more responsive user experience.
|
||||
</Tab>
|
||||
|
||||
<Tab title="Event Handling">
|
||||
CrewAI emits events for each chunk received during streaming:
|
||||
|
||||
```python
|
||||
from crewai import LLM
|
||||
from crewai.utilities.events import EventHandler, LLMStreamChunkEvent
|
||||
|
||||
class MyEventHandler(EventHandler):
|
||||
def on_llm_stream_chunk(self, event: LLMStreamChunkEvent):
|
||||
# Process each chunk as it arrives
|
||||
print(f"Received chunk: {event.chunk}")
|
||||
|
||||
# Register the event handler
|
||||
from crewai.utilities.events import crewai_event_bus
|
||||
crewai_event_bus.register_handler(MyEventHandler())
|
||||
```
|
||||
</Tab>
|
||||
</Tabs>
|
||||
|
||||
## Structured LLM Calls
|
||||
|
||||
CrewAI supports structured responses from LLM calls by allowing you to define a `response_format` using a Pydantic model. This enables the framework to automatically parse and validate the output, making it easier to integrate the response into your application without manual post-processing.
|
||||
|
||||
For example, you can define a Pydantic model to represent the expected response structure and pass it as the `response_format` when instantiating the LLM. The model will then be used to convert the LLM output into a structured Python object.
|
||||
List of [more providers](https://docs.litellm.ai/docs/providers).
|
||||
|
||||
```python Code
|
||||
from crewai import LLM
|
||||
|
||||
class Dog(BaseModel):
|
||||
name: str
|
||||
age: int
|
||||
breed: str
|
||||
|
||||
|
||||
llm = LLM(model="gpt-4o", response_format=Dog)
|
||||
|
||||
response = llm.call(
|
||||
"Analyze the following messages and return the name, age, and breed. "
|
||||
"Meet Kona! She is 3 years old and is a black german shepherd."
|
||||
)
|
||||
print(response)
|
||||
|
||||
# Output:
|
||||
# Dog(name='Kona', age=3, breed='black german shepherd')
|
||||
llm = LLM(model="gpt-4", temperature=0.7)
|
||||
agent = Agent(llm=llm, ...)
|
||||
```
|
||||
|
||||
## Advanced Features and Optimization
|
||||
### 4. Custom LLM Objects
|
||||
|
||||
Learn how to get the most out of your LLM configuration:
|
||||
Pass a custom LLM implementation or object from another library.
|
||||
|
||||
<AccordionGroup>
|
||||
<Accordion title="Context Window Management">
|
||||
CrewAI includes smart context management features:
|
||||
## Connecting to OpenAI-Compatible LLMs
|
||||
|
||||
```python
|
||||
from crewai import LLM
|
||||
You can connect to OpenAI-compatible LLMs using either environment variables or by setting specific attributes on the LLM class:
|
||||
|
||||
# CrewAI automatically handles:
|
||||
# 1. Token counting and tracking
|
||||
# 2. Content summarization when needed
|
||||
# 3. Task splitting for large contexts
|
||||
1. Using environment variables:
|
||||
|
||||
llm = LLM(
|
||||
model="gpt-4",
|
||||
max_tokens=4000, # Limit response length
|
||||
)
|
||||
```
|
||||
```python Code
|
||||
import os
|
||||
|
||||
<Info>
|
||||
Best practices for context management:
|
||||
1. Choose models with appropriate context windows
|
||||
2. Pre-process long inputs when possible
|
||||
3. Use chunking for large documents
|
||||
4. Monitor token usage to optimize costs
|
||||
</Info>
|
||||
</Accordion>
|
||||
os.environ["OPENAI_API_KEY"] = "your-api-key"
|
||||
os.environ["OPENAI_API_BASE"] = "https://api.your-provider.com/v1"
|
||||
```
|
||||
|
||||
<Accordion title="Performance Optimization">
|
||||
<Steps>
|
||||
<Step title="Token Usage Optimization">
|
||||
Choose the right context window for your task:
|
||||
- Small tasks (up to 4K tokens): Standard models
|
||||
- Medium tasks (between 4K-32K): Enhanced models
|
||||
- Large tasks (over 32K): Large context models
|
||||
|
||||
```python
|
||||
# Configure model with appropriate settings
|
||||
llm = LLM(
|
||||
model="openai/gpt-4-turbo-preview",
|
||||
temperature=0.7, # Adjust based on task
|
||||
max_tokens=4096, # Set based on output needs
|
||||
timeout=300 # Longer timeout for complex tasks
|
||||
)
|
||||
```
|
||||
<Tip>
|
||||
- Lower temperature (0.1 to 0.3) for factual responses
|
||||
- Higher temperature (0.7 to 0.9) for creative tasks
|
||||
</Tip>
|
||||
</Step>
|
||||
2. Using LLM class attributes:
|
||||
|
||||
<Step title="Best Practices">
|
||||
1. Monitor token usage
|
||||
2. Implement rate limiting
|
||||
3. Use caching when possible
|
||||
4. Set appropriate max_tokens limits
|
||||
</Step>
|
||||
</Steps>
|
||||
```python Code
|
||||
llm = LLM(
|
||||
model="custom-model-name",
|
||||
api_key="your-api-key",
|
||||
base_url="https://api.your-provider.com/v1"
|
||||
)
|
||||
agent = Agent(llm=llm, ...)
|
||||
```
|
||||
|
||||
<Info>
|
||||
Remember to regularly monitor your token usage and adjust your configuration as needed to optimize costs and performance.
|
||||
</Info>
|
||||
</Accordion>
|
||||
</AccordionGroup>
|
||||
## LLM Configuration Options
|
||||
|
||||
## Common Issues and Solutions
|
||||
When configuring an LLM for your agent, you have access to a wide range of parameters:
|
||||
|
||||
<Tabs>
|
||||
<Tab title="Authentication">
|
||||
<Warning>
|
||||
Most authentication issues can be resolved by checking API key format and environment variable names.
|
||||
</Warning>
|
||||
|
||||
```bash
|
||||
# OpenAI
|
||||
OPENAI_API_KEY=sk-...
|
||||
|
||||
# Anthropic
|
||||
ANTHROPIC_API_KEY=sk-ant-...
|
||||
```
|
||||
</Tab>
|
||||
<Tab title="Model Names">
|
||||
<Check>
|
||||
Always include the provider prefix in model names
|
||||
</Check>
|
||||
|
||||
```python
|
||||
# Correct
|
||||
llm = LLM(model="openai/gpt-4")
|
||||
|
||||
# Incorrect
|
||||
llm = LLM(model="gpt-4")
|
||||
```
|
||||
</Tab>
|
||||
<Tab title="Context Length">
|
||||
<Tip>
|
||||
Use larger context models for extensive tasks
|
||||
</Tip>
|
||||
|
||||
```
|
||||
| Parameter | Type | Description |
|
||||
|:------------------|:---------------:|:-------------------------------------------------------------------------------------------------|
|
||||
| **model** | `str` | Name of the model to use (e.g., "gpt-4", "gpt-3.5-turbo", "ollama/llama3.1"). For more options, visit the providers documentation. |
|
||||
| **timeout** | `float, int` | Maximum time (in seconds) to wait for a response. |
|
||||
| **temperature** | `float` | Controls randomness in output (0.0 to 1.0). |
|
||||
| **top_p** | `float` | Controls diversity of output (0.0 to 1.0). |
|
||||
| **n** | `int` | Number of completions to generate. |
|
||||
| **stop** | `str, List[str]` | Sequence(s) where generation should stop. |
|
||||
| **max_tokens** | `int` | Maximum number of tokens to generate. |
|
||||
| **presence_penalty** | `float` | Penalizes new tokens based on their presence in prior text. |
|
||||
| **frequency_penalty**| `float` | Penalizes new tokens based on their frequency in prior text. |
|
||||
| **logit_bias** | `Dict[int, float]`| Modifies likelihood of specified tokens appearing. |
|
||||
| **response_format** | `Dict[str, Any]` | Specifies the format of the response (e.g., JSON object). |
|
||||
| **seed** | `int` | Sets a random seed for deterministic results. |
|
||||
| **logprobs** | `bool` | Returns log probabilities of output tokens if enabled. |
|
||||
| **top_logprobs** | `int` | Number of most likely tokens for which to return log probabilities. |
|
||||
| **base_url** | `str` | The base URL for the API endpoint. |
|
||||
| **api_version** | `str` | Version of the API to use. |
|
||||
| **api_key** | `str` | Your API key for authentication. |
|
||||
|
||||
|
||||
Example:
|
||||
|
||||
```python Code
|
||||
llm = LLM(
|
||||
model="gpt-4",
|
||||
temperature=0.8,
|
||||
max_tokens=150,
|
||||
top_p=0.9,
|
||||
frequency_penalty=0.1,
|
||||
presence_penalty=0.1,
|
||||
stop=["END"],
|
||||
seed=42,
|
||||
base_url="https://api.openai.com/v1",
|
||||
api_key="your-api-key-here"
|
||||
)
|
||||
agent = Agent(llm=llm, ...)
|
||||
```
|
||||
## Using Ollama (Local LLMs)
|
||||
|
||||
crewAI supports using Ollama for running open-source models locally:
|
||||
|
||||
1. Install Ollama: [ollama.ai](https://ollama.ai/)
|
||||
2. Run a model: `ollama run llama2`
|
||||
3. Configure agent:
|
||||
|
||||
```python Code
|
||||
agent = Agent(
|
||||
llm=LLM(model="ollama/llama3.1", base_url="http://localhost:11434"),
|
||||
...
|
||||
)
|
||||
```
|
||||
|
||||
## Changing the Base API URL
|
||||
|
||||
You can change the base API URL for any LLM provider by setting the `base_url` parameter:
|
||||
|
||||
```python Code
|
||||
llm = LLM(
|
||||
model="custom-model-name",
|
||||
base_url="https://api.your-provider.com/v1",
|
||||
api_key="your-api-key"
|
||||
)
|
||||
agent = Agent(llm=llm, ...)
|
||||
```
|
||||
|
||||
This is particularly useful when working with OpenAI-compatible APIs or when you need to specify a different endpoint for your chosen provider.
|
||||
|
||||
## Best Practices
|
||||
|
||||
1. **Choose the right model**: Balance capability and cost.
|
||||
2. **Optimize prompts**: Clear, concise instructions improve output.
|
||||
3. **Manage tokens**: Monitor and limit token usage for efficiency.
|
||||
4. **Use appropriate temperature**: Lower for factual tasks, higher for creative ones.
|
||||
5. **Implement error handling**: Gracefully manage API errors and rate limits.
|
||||
|
||||
## Troubleshooting
|
||||
|
||||
- **API Errors**: Check your API key, network connection, and rate limits.
|
||||
- **Unexpected Outputs**: Refine your prompts and adjust temperature or top_p.
|
||||
- **Performance Issues**: Consider using a more powerful model or optimizing your queries.
|
||||
- **Timeout Errors**: Increase the `timeout` parameter or optimize your input.
|
||||
@@ -18,7 +18,6 @@ reason, and learn from past interactions.
|
||||
| **Long-Term Memory** | Preserves valuable insights and learnings from past executions, allowing agents to build and refine their knowledge over time. |
|
||||
| **Entity Memory** | Captures and organizes information about entities (people, places, concepts) encountered during tasks, facilitating deeper understanding and relationship mapping. Uses `RAG` for storing entity information. |
|
||||
| **Contextual Memory**| Maintains the context of interactions by combining `ShortTermMemory`, `LongTermMemory`, and `EntityMemory`, aiding in the coherence and relevance of agent responses over a sequence of tasks or a conversation. |
|
||||
| **User Memory** | Stores user-specific information and preferences, enhancing personalization and user experience. |
|
||||
|
||||
## How Memory Systems Empower Agents
|
||||
|
||||
@@ -35,7 +34,7 @@ By default, the memory system is disabled, and you can ensure it is active by se
|
||||
The memory will use OpenAI embeddings by default, but you can change it by setting `embedder` to a different model.
|
||||
It's also possible to initialize the memory instance with your own instance.
|
||||
|
||||
The 'embedder' only applies to **Short-Term Memory** which uses Chroma for RAG.
|
||||
The 'embedder' only applies to **Short-Term Memory** which uses Chroma for RAG using the EmbedChain package.
|
||||
The **Long-Term Memory** uses SQLite3 to store task results. Currently, there is no way to override these storage implementations.
|
||||
The data storage files are saved into a platform-specific location found using the appdirs package,
|
||||
and the name of the project can be overridden using the **CREWAI_STORAGE_DIR** environment variable.
|
||||
@@ -58,165 +57,41 @@ my_crew = Crew(
|
||||
### Example: Use Custom Memory Instances e.g FAISS as the VectorDB
|
||||
|
||||
```python Code
|
||||
from crewai import Crew, Process
|
||||
from crewai.memory import LongTermMemory, ShortTermMemory, EntityMemory
|
||||
from crewai.memory.storage import LTMSQLiteStorage, RAGStorage
|
||||
from typing import List, Optional
|
||||
from crewai import Crew, Agent, Task, Process
|
||||
|
||||
# Assemble your crew with memory capabilities
|
||||
my_crew: Crew = Crew(
|
||||
agents = [...],
|
||||
tasks = [...],
|
||||
process = Process.sequential,
|
||||
memory = True,
|
||||
# Long-term memory for persistent storage across sessions
|
||||
long_term_memory = LongTermMemory(
|
||||
my_crew = Crew(
|
||||
agents=[...],
|
||||
tasks=[...],
|
||||
process="Process.sequential",
|
||||
memory=True,
|
||||
long_term_memory=EnhanceLongTermMemory(
|
||||
storage=LTMSQLiteStorage(
|
||||
db_path="/my_crew1/long_term_memory_storage.db"
|
||||
db_path="/my_data_dir/my_crew1/long_term_memory_storage.db"
|
||||
)
|
||||
),
|
||||
# Short-term memory for current context using RAG
|
||||
short_term_memory = ShortTermMemory(
|
||||
storage = RAGStorage(
|
||||
embedder_config={
|
||||
"provider": "openai",
|
||||
"config": {
|
||||
"model": 'text-embedding-3-small'
|
||||
}
|
||||
},
|
||||
type="short_term",
|
||||
path="/my_crew1/"
|
||||
)
|
||||
short_term_memory=EnhanceShortTermMemory(
|
||||
storage=CustomRAGStorage(
|
||||
crew_name="my_crew",
|
||||
storage_type="short_term",
|
||||
data_dir="//my_data_dir",
|
||||
model=embedder["model"],
|
||||
dimension=embedder["dimension"],
|
||||
),
|
||||
),
|
||||
# Entity memory for tracking key information about entities
|
||||
entity_memory = EntityMemory(
|
||||
storage=RAGStorage(
|
||||
embedder_config={
|
||||
"provider": "openai",
|
||||
"config": {
|
||||
"model": 'text-embedding-3-small'
|
||||
}
|
||||
},
|
||||
type="short_term",
|
||||
path="/my_crew1/"
|
||||
)
|
||||
entity_memory=EnhanceEntityMemory(
|
||||
storage=CustomRAGStorage(
|
||||
crew_name="my_crew",
|
||||
storage_type="entities",
|
||||
data_dir="//my_data_dir",
|
||||
model=embedder["model"],
|
||||
dimension=embedder["dimension"],
|
||||
),
|
||||
),
|
||||
verbose=True,
|
||||
)
|
||||
```
|
||||
|
||||
## Security Considerations
|
||||
|
||||
When configuring memory storage:
|
||||
- Use environment variables for storage paths (e.g., `CREWAI_STORAGE_DIR`)
|
||||
- Never hardcode sensitive information like database credentials
|
||||
- Consider access permissions for storage directories
|
||||
- Use relative paths when possible to maintain portability
|
||||
|
||||
Example using environment variables:
|
||||
```python
|
||||
import os
|
||||
from crewai import Crew
|
||||
from crewai.memory import LongTermMemory
|
||||
from crewai.memory.storage import LTMSQLiteStorage
|
||||
|
||||
# Configure storage path using environment variable
|
||||
storage_path = os.getenv("CREWAI_STORAGE_DIR", "./storage")
|
||||
crew = Crew(
|
||||
memory=True,
|
||||
long_term_memory=LongTermMemory(
|
||||
storage=LTMSQLiteStorage(
|
||||
db_path="{storage_path}/memory.db".format(storage_path=storage_path)
|
||||
)
|
||||
)
|
||||
)
|
||||
```
|
||||
|
||||
## Configuration Examples
|
||||
|
||||
### Basic Memory Configuration
|
||||
```python
|
||||
from crewai import Crew
|
||||
from crewai.memory import LongTermMemory
|
||||
|
||||
# Simple memory configuration
|
||||
crew = Crew(memory=True) # Uses default storage locations
|
||||
```
|
||||
|
||||
### Custom Storage Configuration
|
||||
```python
|
||||
from crewai import Crew
|
||||
from crewai.memory import LongTermMemory
|
||||
from crewai.memory.storage import LTMSQLiteStorage
|
||||
|
||||
# Configure custom storage paths
|
||||
crew = Crew(
|
||||
memory=True,
|
||||
long_term_memory=LongTermMemory(
|
||||
storage=LTMSQLiteStorage(db_path="./memory.db")
|
||||
)
|
||||
)
|
||||
```
|
||||
|
||||
## Integrating Mem0 for Enhanced User Memory
|
||||
|
||||
[Mem0](https://mem0.ai/) is a self-improving memory layer for LLM applications, enabling personalized AI experiences.
|
||||
|
||||
To include user-specific memory you can get your API key [here](https://app.mem0.ai/dashboard/api-keys) and refer the [docs](https://docs.mem0.ai/platform/quickstart#4-1-create-memories) for adding user preferences.
|
||||
|
||||
|
||||
```python Code
|
||||
import os
|
||||
from crewai import Crew, Process
|
||||
from mem0 import MemoryClient
|
||||
|
||||
# Set environment variables for Mem0
|
||||
os.environ["MEM0_API_KEY"] = "m0-xx"
|
||||
|
||||
# Step 1: Record preferences based on past conversation or user input
|
||||
client = MemoryClient()
|
||||
messages = [
|
||||
{"role": "user", "content": "Hi there! I'm planning a vacation and could use some advice."},
|
||||
{"role": "assistant", "content": "Hello! I'd be happy to help with your vacation planning. What kind of destination do you prefer?"},
|
||||
{"role": "user", "content": "I am more of a beach person than a mountain person."},
|
||||
{"role": "assistant", "content": "That's interesting. Do you like hotels or Airbnb?"},
|
||||
{"role": "user", "content": "I like Airbnb more."},
|
||||
]
|
||||
client.add(messages, user_id="john")
|
||||
|
||||
# Step 2: Create a Crew with User Memory
|
||||
|
||||
crew = Crew(
|
||||
agents=[...],
|
||||
tasks=[...],
|
||||
verbose=True,
|
||||
process=Process.sequential,
|
||||
memory=True,
|
||||
memory_config={
|
||||
"provider": "mem0",
|
||||
"config": {"user_id": "john"},
|
||||
},
|
||||
)
|
||||
```
|
||||
|
||||
## Memory Configuration Options
|
||||
If you want to access a specific organization and project, you can set the `org_id` and `project_id` parameters in the memory configuration.
|
||||
|
||||
```python Code
|
||||
from crewai import Crew
|
||||
|
||||
crew = Crew(
|
||||
agents=[...],
|
||||
tasks=[...],
|
||||
verbose=True,
|
||||
memory=True,
|
||||
memory_config={
|
||||
"provider": "mem0",
|
||||
"config": {"user_id": "john", "org_id": "my_org_id", "project_id": "my_project_id"},
|
||||
},
|
||||
)
|
||||
```
|
||||
|
||||
## Additional Embedding Providers
|
||||
|
||||
@@ -238,63 +113,9 @@ my_crew = Crew(
|
||||
}
|
||||
)
|
||||
```
|
||||
Alternatively, you can directly pass the OpenAIEmbeddingFunction to the embedder parameter.
|
||||
|
||||
Example:
|
||||
```python Code
|
||||
from crewai import Crew, Agent, Task, Process
|
||||
from chromadb.utils.embedding_functions import OpenAIEmbeddingFunction
|
||||
|
||||
my_crew = Crew(
|
||||
agents=[...],
|
||||
tasks=[...],
|
||||
process=Process.sequential,
|
||||
memory=True,
|
||||
verbose=True,
|
||||
embedder={
|
||||
"provider": "openai",
|
||||
"config": {
|
||||
"model": 'text-embedding-3-small'
|
||||
}
|
||||
}
|
||||
)
|
||||
```
|
||||
|
||||
### Using Ollama embeddings
|
||||
|
||||
```python Code
|
||||
from crewai import Crew, Agent, Task, Process
|
||||
|
||||
my_crew = Crew(
|
||||
agents=[...],
|
||||
tasks=[...],
|
||||
process=Process.sequential,
|
||||
memory=True,
|
||||
verbose=True,
|
||||
embedder={
|
||||
"provider": "ollama",
|
||||
"config": {
|
||||
"model": "mxbai-embed-large"
|
||||
}
|
||||
}
|
||||
)
|
||||
```
|
||||
|
||||
### Using Google AI embeddings
|
||||
|
||||
#### Prerequisites
|
||||
Before using Google AI embeddings, ensure you have:
|
||||
- Access to the Gemini API
|
||||
- The necessary API keys and permissions
|
||||
|
||||
You will need to update your *pyproject.toml* dependencies:
|
||||
```YAML
|
||||
dependencies = [
|
||||
"google-generativeai>=0.8.4", #main version in January/2025 - crewai v.0.100.0 and crewai-tools 0.33.0
|
||||
"crewai[tools]>=0.100.0,<1.0.0"
|
||||
]
|
||||
```
|
||||
|
||||
```python Code
|
||||
from crewai import Crew, Agent, Task, Process
|
||||
|
||||
@@ -307,8 +128,9 @@ my_crew = Crew(
|
||||
embedder={
|
||||
"provider": "google",
|
||||
"config": {
|
||||
"api_key": "<YOUR_API_KEY>",
|
||||
"model": "<model_name>"
|
||||
"model": 'models/embedding-001',
|
||||
"task_type": "retrieval_document",
|
||||
"title": "Embeddings for Embedchain"
|
||||
}
|
||||
}
|
||||
)
|
||||
@@ -317,7 +139,6 @@ my_crew = Crew(
|
||||
### Using Azure OpenAI embeddings
|
||||
|
||||
```python Code
|
||||
from chromadb.utils.embedding_functions import OpenAIEmbeddingFunction
|
||||
from crewai import Crew, Agent, Task, Process
|
||||
|
||||
my_crew = Crew(
|
||||
@@ -327,21 +148,35 @@ my_crew = Crew(
|
||||
memory=True,
|
||||
verbose=True,
|
||||
embedder={
|
||||
"provider": "openai",
|
||||
"provider": "azure_openai",
|
||||
"config": {
|
||||
"api_key": "YOUR_API_KEY",
|
||||
"api_base": "YOUR_API_BASE_PATH",
|
||||
"api_version": "YOUR_API_VERSION",
|
||||
"model_name": 'text-embedding-3-small'
|
||||
"model": 'text-embedding-ada-002',
|
||||
"deployment_name": "your_embedding_model_deployment_name"
|
||||
}
|
||||
}
|
||||
)
|
||||
```
|
||||
|
||||
### Using GPT4ALL embeddings
|
||||
|
||||
```python Code
|
||||
from crewai import Crew, Agent, Task, Process
|
||||
|
||||
my_crew = Crew(
|
||||
agents=[...],
|
||||
tasks=[...],
|
||||
process=Process.sequential,
|
||||
memory=True,
|
||||
verbose=True,
|
||||
embedder={
|
||||
"provider": "gpt4all"
|
||||
}
|
||||
)
|
||||
```
|
||||
|
||||
### Using Vertex AI embeddings
|
||||
|
||||
```python Code
|
||||
from chromadb.utils.embedding_functions import GoogleVertexEmbeddingFunction
|
||||
from crewai import Crew, Agent, Task, Process
|
||||
|
||||
my_crew = Crew(
|
||||
@@ -353,10 +188,7 @@ my_crew = Crew(
|
||||
embedder={
|
||||
"provider": "vertexai",
|
||||
"config": {
|
||||
"project_id"="YOUR_PROJECT_ID",
|
||||
"region"="YOUR_REGION",
|
||||
"api_key"="YOUR_API_KEY",
|
||||
"model_name"="textembedding-gecko"
|
||||
"model": 'textembedding-gecko'
|
||||
}
|
||||
}
|
||||
)
|
||||
@@ -376,137 +208,14 @@ my_crew = Crew(
|
||||
embedder={
|
||||
"provider": "cohere",
|
||||
"config": {
|
||||
"api_key": "YOUR_API_KEY",
|
||||
"model": "<model_name>"
|
||||
}
|
||||
}
|
||||
)
|
||||
```
|
||||
### Using VoyageAI embeddings
|
||||
|
||||
```python Code
|
||||
from crewai import Crew, Agent, Task, Process
|
||||
|
||||
my_crew = Crew(
|
||||
agents=[...],
|
||||
tasks=[...],
|
||||
process=Process.sequential,
|
||||
memory=True,
|
||||
verbose=True,
|
||||
embedder={
|
||||
"provider": "voyageai",
|
||||
"config": {
|
||||
"api_key": "YOUR_API_KEY",
|
||||
"model": "<model_name>"
|
||||
}
|
||||
}
|
||||
)
|
||||
```
|
||||
### Using HuggingFace embeddings
|
||||
|
||||
```python Code
|
||||
from crewai import Crew, Agent, Task, Process
|
||||
|
||||
my_crew = Crew(
|
||||
agents=[...],
|
||||
tasks=[...],
|
||||
process=Process.sequential,
|
||||
memory=True,
|
||||
verbose=True,
|
||||
embedder={
|
||||
"provider": "huggingface",
|
||||
"config": {
|
||||
"api_url": "<api_url>",
|
||||
}
|
||||
}
|
||||
)
|
||||
```
|
||||
|
||||
### Using Watson embeddings
|
||||
|
||||
```python Code
|
||||
from crewai import Crew, Agent, Task, Process
|
||||
|
||||
# Note: Ensure you have installed and imported `ibm_watsonx_ai` for Watson embeddings to work.
|
||||
|
||||
my_crew = Crew(
|
||||
agents=[...],
|
||||
tasks=[...],
|
||||
process=Process.sequential,
|
||||
memory=True,
|
||||
verbose=True,
|
||||
embedder={
|
||||
"provider": "watson",
|
||||
"config": {
|
||||
"model": "<model_name>",
|
||||
"api_url": "<api_url>",
|
||||
"api_key": "<YOUR_API_KEY>",
|
||||
"project_id": "<YOUR_PROJECT_ID>",
|
||||
}
|
||||
}
|
||||
)
|
||||
```
|
||||
|
||||
### Using Amazon Bedrock embeddings
|
||||
|
||||
```python Code
|
||||
# Note: Ensure you have installed `boto3` for Bedrock embeddings to work.
|
||||
|
||||
import os
|
||||
import boto3
|
||||
from crewai import Crew, Agent, Task, Process
|
||||
|
||||
boto3_session = boto3.Session(
|
||||
region_name=os.environ.get("AWS_REGION_NAME"),
|
||||
aws_access_key_id=os.environ.get("AWS_ACCESS_KEY_ID"),
|
||||
aws_secret_access_key=os.environ.get("AWS_SECRET_ACCESS_KEY")
|
||||
)
|
||||
|
||||
my_crew = Crew(
|
||||
agents=[...],
|
||||
tasks=[...],
|
||||
process=Process.sequential,
|
||||
memory=True,
|
||||
embedder={
|
||||
"provider": "bedrock",
|
||||
"config":{
|
||||
"session": boto3_session,
|
||||
"model": "amazon.titan-embed-text-v2:0",
|
||||
"model": "embed-english-v3.0",
|
||||
"vector_dimension": 1024
|
||||
}
|
||||
}
|
||||
verbose=True
|
||||
)
|
||||
```
|
||||
|
||||
### Adding Custom Embedding Function
|
||||
|
||||
```python Code
|
||||
from crewai import Crew, Agent, Task, Process
|
||||
from chromadb import Documents, EmbeddingFunction, Embeddings
|
||||
|
||||
# Create a custom embedding function
|
||||
class CustomEmbedder(EmbeddingFunction):
|
||||
def __call__(self, input: Documents) -> Embeddings:
|
||||
# generate embeddings
|
||||
return [1, 2, 3] # this is a dummy embedding
|
||||
|
||||
my_crew = Crew(
|
||||
agents=[...],
|
||||
tasks=[...],
|
||||
process=Process.sequential,
|
||||
memory=True,
|
||||
verbose=True,
|
||||
embedder={
|
||||
"provider": "custom",
|
||||
"config": {
|
||||
"embedder": CustomEmbedder()
|
||||
}
|
||||
}
|
||||
)
|
||||
```
|
||||
|
||||
### Resetting Memory via cli
|
||||
### Resetting Memory
|
||||
|
||||
```shell
|
||||
crewai reset-memories [OPTIONS]
|
||||
@@ -520,46 +229,8 @@ crewai reset-memories [OPTIONS]
|
||||
| `-s`, `--short` | Reset SHORT TERM memory. | Flag (boolean) | False |
|
||||
| `-e`, `--entities` | Reset ENTITIES memory. | Flag (boolean) | False |
|
||||
| `-k`, `--kickoff-outputs` | Reset LATEST KICKOFF TASK OUTPUTS. | Flag (boolean) | False |
|
||||
| `-kn`, `--knowledge` | Reset KNOWLEDEGE storage | Flag (boolean) | False |
|
||||
| `-a`, `--all` | Reset ALL memories. | Flag (boolean) | False |
|
||||
|
||||
Note: To use the cli command you need to have your crew in a file called crew.py in the same directory.
|
||||
|
||||
|
||||
|
||||
|
||||
### Resetting Memory via crew object
|
||||
|
||||
```python
|
||||
|
||||
my_crew = Crew(
|
||||
agents=[...],
|
||||
tasks=[...],
|
||||
process=Process.sequential,
|
||||
memory=True,
|
||||
verbose=True,
|
||||
embedder={
|
||||
"provider": "custom",
|
||||
"config": {
|
||||
"embedder": CustomEmbedder()
|
||||
}
|
||||
}
|
||||
)
|
||||
|
||||
my_crew.reset_memories(command_type = 'all') # Resets all the memory
|
||||
```
|
||||
|
||||
#### Resetting Memory Options
|
||||
|
||||
| Command Type | Description |
|
||||
| :----------------- | :------------------------------- |
|
||||
| `long` | Reset LONG TERM memory. |
|
||||
| `short` | Reset SHORT TERM memory. |
|
||||
| `entities` | Reset ENTITIES memory. |
|
||||
| `kickoff_outputs` | Reset LATEST KICKOFF TASK OUTPUTS. |
|
||||
| `knowledge` | Reset KNOWLEDGE memory. |
|
||||
| `all` | Reset ALL memories. |
|
||||
|
||||
|
||||
## Benefits of Using CrewAI's Memory System
|
||||
|
||||
|
||||
@@ -31,7 +31,7 @@ From this point on, your crew will have planning enabled, and the tasks will be
|
||||
|
||||
#### Planning LLM
|
||||
|
||||
Now you can define the LLM that will be used to plan the tasks.
|
||||
Now you can define the LLM that will be used to plan the tasks. You can use any ChatOpenAI LLM model available.
|
||||
|
||||
When running the base case example, you will see something like the output below, which represents the output of the `AgentPlanner`
|
||||
responsible for creating the step-by-step logic to add to the Agents' tasks.
|
||||
@@ -39,6 +39,7 @@ responsible for creating the step-by-step logic to add to the Agents' tasks.
|
||||
<CodeGroup>
|
||||
```python Code
|
||||
from crewai import Crew, Agent, Task, Process
|
||||
from langchain_openai import ChatOpenAI
|
||||
|
||||
# Assemble your crew with planning capabilities and custom LLM
|
||||
my_crew = Crew(
|
||||
@@ -46,7 +47,7 @@ my_crew = Crew(
|
||||
tasks=self.tasks,
|
||||
process=Process.sequential,
|
||||
planning=True,
|
||||
planning_llm="gpt-4o"
|
||||
planning_llm=ChatOpenAI(model="gpt-4o")
|
||||
)
|
||||
|
||||
# Run the crew
|
||||
@@ -81,8 +82,8 @@ my_crew.kickoff()
|
||||
|
||||
3. **Collect Data:**
|
||||
|
||||
- Search for the latest papers, articles, and reports published in 2024 and early 2025.
|
||||
- Use keywords like "Large Language Models 2025", "AI LLM advancements", "AI ethics 2025", etc.
|
||||
- Search for the latest papers, articles, and reports published in 2023 and early 2024.
|
||||
- Use keywords like "Large Language Models 2024", "AI LLM advancements", "AI ethics 2024", etc.
|
||||
|
||||
4. **Analyze Findings:**
|
||||
|
||||
|
||||
@@ -23,7 +23,9 @@ Processes enable individual agents to operate as a cohesive unit, streamlining t
|
||||
To assign a process to a crew, specify the process type upon crew creation to set the execution strategy. For a hierarchical process, ensure to define `manager_llm` or `manager_agent` for the manager agent.
|
||||
|
||||
```python
|
||||
from crewai import Crew, Process
|
||||
from crewai import Crew
|
||||
from crewai.process import Process
|
||||
from langchain_openai import ChatOpenAI
|
||||
|
||||
# Example: Creating a crew with a sequential process
|
||||
crew = Crew(
|
||||
@@ -38,7 +40,7 @@ crew = Crew(
|
||||
agents=my_agents,
|
||||
tasks=my_tasks,
|
||||
process=Process.hierarchical,
|
||||
manager_llm="gpt-4o"
|
||||
manager_llm=ChatOpenAI(model="gpt-4")
|
||||
# or
|
||||
# manager_agent=my_manager_agent
|
||||
)
|
||||
|
||||
@@ -1,179 +1,48 @@
|
||||
---
|
||||
title: Tasks
|
||||
description: Detailed guide on managing and creating tasks within the CrewAI framework.
|
||||
description: Detailed guide on managing and creating tasks within the CrewAI framework, reflecting the latest codebase updates.
|
||||
icon: list-check
|
||||
---
|
||||
|
||||
## Overview of a Task
|
||||
|
||||
In the CrewAI framework, a `Task` is a specific assignment completed by an `Agent`.
|
||||
In the CrewAI framework, a `Task` is a specific assignment completed by an `Agent`.
|
||||
|
||||
They provide all necessary details for execution, such as a description, the agent responsible, required tools, and more, facilitating a wide range of action complexities.
|
||||
|
||||
Tasks provide all necessary details for execution, such as a description, the agent responsible, required tools, and more, facilitating a wide range of action complexities.
|
||||
|
||||
Tasks within CrewAI can be collaborative, requiring multiple agents to work together. This is managed through the task properties and orchestrated by the Crew's process, enhancing teamwork and efficiency.
|
||||
|
||||
### Task Execution Flow
|
||||
|
||||
Tasks can be executed in two ways:
|
||||
- **Sequential**: Tasks are executed in the order they are defined
|
||||
- **Hierarchical**: Tasks are assigned to agents based on their roles and expertise
|
||||
|
||||
The execution flow is defined when creating the crew:
|
||||
```python Code
|
||||
crew = Crew(
|
||||
agents=[agent1, agent2],
|
||||
tasks=[task1, task2],
|
||||
process=Process.sequential # or Process.hierarchical
|
||||
)
|
||||
```
|
||||
|
||||
## Task Attributes
|
||||
|
||||
| Attribute | Parameters | Type | Description |
|
||||
| :------------------------------- | :---------------- | :---------------------------- | :------------------------------------------------------------------------------------------------------------------- |
|
||||
| **Description** | `description` | `str` | A clear, concise statement of what the task entails. |
|
||||
| **Agent** | `agent` | `Optional[BaseAgent]` | The agent responsible for the task, assigned either directly or by the crew's process. |
|
||||
| **Expected Output** | `expected_output` | `str` | A detailed description of what the task's completion looks like. |
|
||||
| **Name** _(optional)_ | `name` | `Optional[str]` | A name identifier for the task. |
|
||||
| **Agent** _(optional)_ | `agent` | `Optional[BaseAgent]` | The agent responsible for executing the task. |
|
||||
| **Tools** _(optional)_ | `tools` | `List[BaseTool]` | The tools/resources the agent is limited to use for this task. |
|
||||
| **Context** _(optional)_ | `context` | `Optional[List["Task"]]` | Other tasks whose outputs will be used as context for this task. |
|
||||
| **Async Execution** _(optional)_ | `async_execution` | `Optional[bool]` | Whether the task should be executed asynchronously. Defaults to False. |
|
||||
| **Human Input** _(optional)_ | `human_input` | `Optional[bool]` | Whether the task should have a human review the final answer of the agent. Defaults to False. |
|
||||
| **Config** _(optional)_ | `config` | `Optional[Dict[str, Any]]` | Task-specific configuration parameters. |
|
||||
| **Output File** _(optional)_ | `output_file` | `Optional[str]` | File path for storing the task output. |
|
||||
| **Output JSON** _(optional)_ | `output_json` | `Optional[Type[BaseModel]]` | A Pydantic model to structure the JSON output. |
|
||||
| **Output Pydantic** _(optional)_ | `output_pydantic` | `Optional[Type[BaseModel]]` | A Pydantic model for task output. |
|
||||
| **Callback** _(optional)_ | `callback` | `Optional[Any]` | Function/object to be executed after task completion. |
|
||||
| **Tools** _(optional)_ | `tools` | `Optional[List[Any]]` | The functions or capabilities the agent can utilize to perform the task. Defaults to an empty list. |
|
||||
| **Async Execution** _(optional)_ | `async_execution` | `Optional[bool]` | If set, the task executes asynchronously, allowing progression without waiting for completion. Defaults to False. |
|
||||
| **Context** _(optional)_ | `context` | `Optional[List["Task"]]` | Specifies tasks whose outputs are used as context for this task. |
|
||||
| **Config** _(optional)_ | `config` | `Optional[Dict[str, Any]]` | Additional configuration details for the agent executing the task, allowing further customization. Defaults to None. |
|
||||
| **Output JSON** _(optional)_ | `output_json` | `Optional[Type[BaseModel]]` | Outputs a JSON object, requiring an OpenAI client. Only one output format can be set. |
|
||||
| **Output Pydantic** _(optional)_ | `output_pydantic` | `Optional[Type[BaseModel]]` | Outputs a Pydantic model object, requiring an OpenAI client. Only one output format can be set. |
|
||||
| **Output File** _(optional)_ | `output_file` | `Optional[str]` | Saves the task output to a file. If used with `Output JSON` or `Output Pydantic`, specifies how the output is saved. |
|
||||
| **Output** _(optional)_ | `output` | `Optional[TaskOutput]` | An instance of `TaskOutput`, containing the raw, JSON, and Pydantic output plus additional details. |
|
||||
| **Callback** _(optional)_ | `callback` | `Optional[Any]` | A callable that is executed with the task's output upon completion. |
|
||||
| **Human Input** _(optional)_ | `human_input` | `Optional[bool]` | Indicates if the task should involve human review at the end, useful for tasks needing human oversight. Defaults to False.|
|
||||
| **Converter Class** _(optional)_ | `converter_cls` | `Optional[Type[Converter]]` | A converter class used to export structured output. Defaults to None. |
|
||||
|
||||
## Creating Tasks
|
||||
## Creating a Task
|
||||
|
||||
There are two ways to create tasks in CrewAI: using **YAML configuration (recommended)** or defining them **directly in code**.
|
||||
Creating a task involves defining its scope, responsible agent, and any additional attributes for flexibility:
|
||||
|
||||
### YAML Configuration (Recommended)
|
||||
|
||||
Using YAML configuration provides a cleaner, more maintainable way to define tasks. We strongly recommend using this approach to define tasks in your CrewAI projects.
|
||||
|
||||
After creating your CrewAI project as outlined in the [Installation](/installation) section, navigate to the `src/latest_ai_development/config/tasks.yaml` file and modify the template to match your specific task requirements.
|
||||
|
||||
<Note>
|
||||
Variables in your YAML files (like `{topic}`) will be replaced with values from your inputs when running the crew:
|
||||
```python Code
|
||||
crew.kickoff(inputs={'topic': 'AI Agents'})
|
||||
```
|
||||
</Note>
|
||||
|
||||
Here's an example of how to configure tasks using YAML:
|
||||
|
||||
```yaml tasks.yaml
|
||||
research_task:
|
||||
description: >
|
||||
Conduct a thorough research about {topic}
|
||||
Make sure you find any interesting and relevant information given
|
||||
the current year is 2025.
|
||||
expected_output: >
|
||||
A list with 10 bullet points of the most relevant information about {topic}
|
||||
agent: researcher
|
||||
|
||||
reporting_task:
|
||||
description: >
|
||||
Review the context you got and expand each topic into a full section for a report.
|
||||
Make sure the report is detailed and contains any and all relevant information.
|
||||
expected_output: >
|
||||
A fully fledge reports with the mains topics, each with a full section of information.
|
||||
Formatted as markdown without '```'
|
||||
agent: reporting_analyst
|
||||
output_file: report.md
|
||||
```
|
||||
|
||||
To use this YAML configuration in your code, create a crew class that inherits from `CrewBase`:
|
||||
|
||||
```python crew.py
|
||||
# src/latest_ai_development/crew.py
|
||||
|
||||
from crewai import Agent, Crew, Process, Task
|
||||
from crewai.project import CrewBase, agent, crew, task
|
||||
from crewai_tools import SerperDevTool
|
||||
|
||||
@CrewBase
|
||||
class LatestAiDevelopmentCrew():
|
||||
"""LatestAiDevelopment crew"""
|
||||
|
||||
@agent
|
||||
def researcher(self) -> Agent:
|
||||
return Agent(
|
||||
config=self.agents_config['researcher'],
|
||||
verbose=True,
|
||||
tools=[SerperDevTool()]
|
||||
)
|
||||
|
||||
@agent
|
||||
def reporting_analyst(self) -> Agent:
|
||||
return Agent(
|
||||
config=self.agents_config['reporting_analyst'],
|
||||
verbose=True
|
||||
)
|
||||
|
||||
@task
|
||||
def research_task(self) -> Task:
|
||||
return Task(
|
||||
config=self.tasks_config['research_task']
|
||||
)
|
||||
|
||||
@task
|
||||
def reporting_task(self) -> Task:
|
||||
return Task(
|
||||
config=self.tasks_config['reporting_task']
|
||||
)
|
||||
|
||||
@crew
|
||||
def crew(self) -> Crew:
|
||||
return Crew(
|
||||
agents=[
|
||||
self.researcher(),
|
||||
self.reporting_analyst()
|
||||
],
|
||||
tasks=[
|
||||
self.research_task(),
|
||||
self.reporting_task()
|
||||
],
|
||||
process=Process.sequential
|
||||
)
|
||||
```
|
||||
|
||||
<Note>
|
||||
The names you use in your YAML files (`agents.yaml` and `tasks.yaml`) should match the method names in your Python code.
|
||||
</Note>
|
||||
|
||||
### Direct Code Definition (Alternative)
|
||||
|
||||
Alternatively, you can define tasks directly in your code without using YAML configuration:
|
||||
|
||||
```python task.py
|
||||
from crewai import Task
|
||||
|
||||
research_task = Task(
|
||||
description="""
|
||||
Conduct a thorough research about AI Agents.
|
||||
Make sure you find any interesting and relevant information given
|
||||
the current year is 2025.
|
||||
""",
|
||||
expected_output="""
|
||||
A list with 10 bullet points of the most relevant information about AI Agents
|
||||
""",
|
||||
agent=researcher
|
||||
)
|
||||
|
||||
reporting_task = Task(
|
||||
description="""
|
||||
Review the context you got and expand each topic into a full section for a report.
|
||||
Make sure the report is detailed and contains any and all relevant information.
|
||||
""",
|
||||
expected_output="""
|
||||
A fully fledge reports with the mains topics, each with a full section of information.
|
||||
Formatted as markdown without '```'
|
||||
""",
|
||||
agent=reporting_analyst,
|
||||
output_file="report.md"
|
||||
task = Task(
|
||||
description='Find and summarize the latest and most relevant news on AI',
|
||||
agent=sales_agent,
|
||||
expected_output='A bullet list summary of the top 5 most important AI news',
|
||||
)
|
||||
```
|
||||
|
||||
@@ -183,8 +52,6 @@ reporting_task = Task(
|
||||
|
||||
## Task Output
|
||||
|
||||
Understanding task outputs is crucial for building effective AI workflows. CrewAI provides a structured way to handle task results through the `TaskOutput` class, which supports multiple output formats and can be easily passed between tasks.
|
||||
|
||||
The output of a task in CrewAI framework is encapsulated within the `TaskOutput` class. This class provides a structured way to access results of a task, including various formats such as raw output, JSON, and Pydantic models.
|
||||
|
||||
By default, the `TaskOutput` will only include the `raw` output. A `TaskOutput` will only include the `pydantic` or `json_dict` output if the original `Task` object was configured with `output_pydantic` or `output_json`, respectively.
|
||||
@@ -245,326 +112,6 @@ if task_output.pydantic:
|
||||
print(f"Pydantic Output: {task_output.pydantic}")
|
||||
```
|
||||
|
||||
## Task Dependencies and Context
|
||||
|
||||
Tasks can depend on the output of other tasks using the `context` attribute. For example:
|
||||
|
||||
```python Code
|
||||
research_task = Task(
|
||||
description="Research the latest developments in AI",
|
||||
expected_output="A list of recent AI developments",
|
||||
agent=researcher
|
||||
)
|
||||
|
||||
analysis_task = Task(
|
||||
description="Analyze the research findings and identify key trends",
|
||||
expected_output="Analysis report of AI trends",
|
||||
agent=analyst,
|
||||
context=[research_task] # This task will wait for research_task to complete
|
||||
)
|
||||
```
|
||||
|
||||
## Task Guardrails
|
||||
|
||||
Task guardrails provide a way to validate and transform task outputs before they
|
||||
are passed to the next task. This feature helps ensure data quality and provides
|
||||
feedback to agents when their output doesn't meet specific criteria.
|
||||
|
||||
### Using Task Guardrails
|
||||
|
||||
To add a guardrail to a task, provide a validation function through the `guardrail` parameter:
|
||||
|
||||
```python Code
|
||||
from typing import Tuple, Union, Dict, Any
|
||||
|
||||
def validate_blog_content(result: str) -> Tuple[bool, Union[Dict[str, Any], str]]:
|
||||
"""Validate blog content meets requirements."""
|
||||
try:
|
||||
# Check word count
|
||||
word_count = len(result.split())
|
||||
if word_count > 200:
|
||||
return (False, {
|
||||
"error": "Blog content exceeds 200 words",
|
||||
"code": "WORD_COUNT_ERROR",
|
||||
"context": {"word_count": word_count}
|
||||
})
|
||||
|
||||
# Additional validation logic here
|
||||
return (True, result.strip())
|
||||
except Exception as e:
|
||||
return (False, {
|
||||
"error": "Unexpected error during validation",
|
||||
"code": "SYSTEM_ERROR"
|
||||
})
|
||||
|
||||
blog_task = Task(
|
||||
description="Write a blog post about AI",
|
||||
expected_output="A blog post under 200 words",
|
||||
agent=blog_agent,
|
||||
guardrail=validate_blog_content # Add the guardrail function
|
||||
)
|
||||
```
|
||||
|
||||
### Guardrail Function Requirements
|
||||
|
||||
1. **Function Signature**:
|
||||
- Must accept exactly one parameter (the task output)
|
||||
- Should return a tuple of `(bool, Any)`
|
||||
- Type hints are recommended but optional
|
||||
|
||||
2. **Return Values**:
|
||||
- Success: Return `(True, validated_result)`
|
||||
- Failure: Return `(False, error_details)`
|
||||
|
||||
### Error Handling Best Practices
|
||||
|
||||
1. **Structured Error Responses**:
|
||||
```python Code
|
||||
def validate_with_context(result: str) -> Tuple[bool, Union[Dict[str, Any], str]]:
|
||||
try:
|
||||
# Main validation logic
|
||||
validated_data = perform_validation(result)
|
||||
return (True, validated_data)
|
||||
except ValidationError as e:
|
||||
return (False, {
|
||||
"error": str(e),
|
||||
"code": "VALIDATION_ERROR",
|
||||
"context": {"input": result}
|
||||
})
|
||||
except Exception as e:
|
||||
return (False, {
|
||||
"error": "Unexpected error",
|
||||
"code": "SYSTEM_ERROR"
|
||||
})
|
||||
```
|
||||
|
||||
2. **Error Categories**:
|
||||
- Use specific error codes
|
||||
- Include relevant context
|
||||
- Provide actionable feedback
|
||||
|
||||
3. **Validation Chain**:
|
||||
```python Code
|
||||
from typing import Any, Dict, List, Tuple, Union
|
||||
|
||||
def complex_validation(result: str) -> Tuple[bool, Union[str, Dict[str, Any]]]:
|
||||
"""Chain multiple validation steps."""
|
||||
# Step 1: Basic validation
|
||||
if not result:
|
||||
return (False, {"error": "Empty result", "code": "EMPTY_INPUT"})
|
||||
|
||||
# Step 2: Content validation
|
||||
try:
|
||||
validated = validate_content(result)
|
||||
if not validated:
|
||||
return (False, {"error": "Invalid content", "code": "CONTENT_ERROR"})
|
||||
|
||||
# Step 3: Format validation
|
||||
formatted = format_output(validated)
|
||||
return (True, formatted)
|
||||
except Exception as e:
|
||||
return (False, {
|
||||
"error": str(e),
|
||||
"code": "VALIDATION_ERROR",
|
||||
"context": {"step": "content_validation"}
|
||||
})
|
||||
```
|
||||
|
||||
### Handling Guardrail Results
|
||||
|
||||
When a guardrail returns `(False, error)`:
|
||||
1. The error is sent back to the agent
|
||||
2. The agent attempts to fix the issue
|
||||
3. The process repeats until:
|
||||
- The guardrail returns `(True, result)`
|
||||
- Maximum retries are reached
|
||||
|
||||
Example with retry handling:
|
||||
```python Code
|
||||
from typing import Optional, Tuple, Union
|
||||
|
||||
def validate_json_output(result: str) -> Tuple[bool, Union[Dict[str, Any], str]]:
|
||||
"""Validate and parse JSON output."""
|
||||
try:
|
||||
# Try to parse as JSON
|
||||
data = json.loads(result)
|
||||
return (True, data)
|
||||
except json.JSONDecodeError as e:
|
||||
return (False, {
|
||||
"error": "Invalid JSON format",
|
||||
"code": "JSON_ERROR",
|
||||
"context": {"line": e.lineno, "column": e.colno}
|
||||
})
|
||||
|
||||
task = Task(
|
||||
description="Generate a JSON report",
|
||||
expected_output="A valid JSON object",
|
||||
agent=analyst,
|
||||
guardrail=validate_json_output,
|
||||
max_retries=3 # Limit retry attempts
|
||||
)
|
||||
```
|
||||
|
||||
## Getting Structured Consistent Outputs from Tasks
|
||||
|
||||
<Note>
|
||||
It's also important to note that the output of the final task of a crew becomes the final output of the actual crew itself.
|
||||
</Note>
|
||||
|
||||
### Using `output_pydantic`
|
||||
The `output_pydantic` property allows you to define a Pydantic model that the task output should conform to. This ensures that the output is not only structured but also validated according to the Pydantic model.
|
||||
|
||||
Here’s an example demonstrating how to use output_pydantic:
|
||||
|
||||
```python Code
|
||||
import json
|
||||
|
||||
from crewai import Agent, Crew, Process, Task
|
||||
from pydantic import BaseModel
|
||||
|
||||
|
||||
class Blog(BaseModel):
|
||||
title: str
|
||||
content: str
|
||||
|
||||
|
||||
blog_agent = Agent(
|
||||
role="Blog Content Generator Agent",
|
||||
goal="Generate a blog title and content",
|
||||
backstory="""You are an expert content creator, skilled in crafting engaging and informative blog posts.""",
|
||||
verbose=False,
|
||||
allow_delegation=False,
|
||||
llm="gpt-4o",
|
||||
)
|
||||
|
||||
task1 = Task(
|
||||
description="""Create a blog title and content on a given topic. Make sure the content is under 200 words.""",
|
||||
expected_output="A compelling blog title and well-written content.",
|
||||
agent=blog_agent,
|
||||
output_pydantic=Blog,
|
||||
)
|
||||
|
||||
# Instantiate your crew with a sequential process
|
||||
crew = Crew(
|
||||
agents=[blog_agent],
|
||||
tasks=[task1],
|
||||
verbose=True,
|
||||
process=Process.sequential,
|
||||
)
|
||||
|
||||
result = crew.kickoff()
|
||||
|
||||
# Option 1: Accessing Properties Using Dictionary-Style Indexing
|
||||
print("Accessing Properties - Option 1")
|
||||
title = result["title"]
|
||||
content = result["content"]
|
||||
print("Title:", title)
|
||||
print("Content:", content)
|
||||
|
||||
# Option 2: Accessing Properties Directly from the Pydantic Model
|
||||
print("Accessing Properties - Option 2")
|
||||
title = result.pydantic.title
|
||||
content = result.pydantic.content
|
||||
print("Title:", title)
|
||||
print("Content:", content)
|
||||
|
||||
# Option 3: Accessing Properties Using the to_dict() Method
|
||||
print("Accessing Properties - Option 3")
|
||||
output_dict = result.to_dict()
|
||||
title = output_dict["title"]
|
||||
content = output_dict["content"]
|
||||
print("Title:", title)
|
||||
print("Content:", content)
|
||||
|
||||
# Option 4: Printing the Entire Blog Object
|
||||
print("Accessing Properties - Option 5")
|
||||
print("Blog:", result)
|
||||
|
||||
```
|
||||
In this example:
|
||||
* A Pydantic model Blog is defined with title and content fields.
|
||||
* The task task1 uses the output_pydantic property to specify that its output should conform to the Blog model.
|
||||
* After executing the crew, you can access the structured output in multiple ways as shown.
|
||||
|
||||
#### Explanation of Accessing the Output
|
||||
1. Dictionary-Style Indexing: You can directly access the fields using result["field_name"]. This works because the CrewOutput class implements the __getitem__ method.
|
||||
2. Directly from Pydantic Model: Access the attributes directly from the result.pydantic object.
|
||||
3. Using to_dict() Method: Convert the output to a dictionary and access the fields.
|
||||
4. Printing the Entire Object: Simply print the result object to see the structured output.
|
||||
|
||||
### Using `output_json`
|
||||
The `output_json` property allows you to define the expected output in JSON format. This ensures that the task's output is a valid JSON structure that can be easily parsed and used in your application.
|
||||
|
||||
Here’s an example demonstrating how to use `output_json`:
|
||||
|
||||
```python Code
|
||||
import json
|
||||
|
||||
from crewai import Agent, Crew, Process, Task
|
||||
from pydantic import BaseModel
|
||||
|
||||
|
||||
# Define the Pydantic model for the blog
|
||||
class Blog(BaseModel):
|
||||
title: str
|
||||
content: str
|
||||
|
||||
|
||||
# Define the agent
|
||||
blog_agent = Agent(
|
||||
role="Blog Content Generator Agent",
|
||||
goal="Generate a blog title and content",
|
||||
backstory="""You are an expert content creator, skilled in crafting engaging and informative blog posts.""",
|
||||
verbose=False,
|
||||
allow_delegation=False,
|
||||
llm="gpt-4o",
|
||||
)
|
||||
|
||||
# Define the task with output_json set to the Blog model
|
||||
task1 = Task(
|
||||
description="""Create a blog title and content on a given topic. Make sure the content is under 200 words.""",
|
||||
expected_output="A JSON object with 'title' and 'content' fields.",
|
||||
agent=blog_agent,
|
||||
output_json=Blog,
|
||||
)
|
||||
|
||||
# Instantiate the crew with a sequential process
|
||||
crew = Crew(
|
||||
agents=[blog_agent],
|
||||
tasks=[task1],
|
||||
verbose=True,
|
||||
process=Process.sequential,
|
||||
)
|
||||
|
||||
# Kickoff the crew to execute the task
|
||||
result = crew.kickoff()
|
||||
|
||||
# Option 1: Accessing Properties Using Dictionary-Style Indexing
|
||||
print("Accessing Properties - Option 1")
|
||||
title = result["title"]
|
||||
content = result["content"]
|
||||
print("Title:", title)
|
||||
print("Content:", content)
|
||||
|
||||
# Option 2: Printing the Entire Blog Object
|
||||
print("Accessing Properties - Option 2")
|
||||
print("Blog:", result)
|
||||
```
|
||||
|
||||
In this example:
|
||||
* A Pydantic model Blog is defined with title and content fields, which is used to specify the structure of the JSON output.
|
||||
* The task task1 uses the output_json property to indicate that it expects a JSON output conforming to the Blog model.
|
||||
* After executing the crew, you can access the structured JSON output in two ways as shown.
|
||||
|
||||
#### Explanation of Accessing the Output
|
||||
|
||||
1. Accessing Properties Using Dictionary-Style Indexing: You can access the fields directly using result["field_name"]. This is possible because the CrewOutput class implements the __getitem__ method, allowing you to treat the output like a dictionary. In this option, we're retrieving the title and content from the result.
|
||||
2. Printing the Entire Blog Object: By printing result, you get the string representation of the CrewOutput object. Since the __str__ method is implemented to return the JSON output, this will display the entire output as a formatted string representing the Blog object.
|
||||
|
||||
---
|
||||
|
||||
By using output_pydantic or output_json, you ensure that your tasks produce outputs in a consistent and structured format, making it easier to process and utilize the data within your application or across multiple tasks.
|
||||
|
||||
## Integrating Tools with Tasks
|
||||
|
||||
Leverage tools from the [CrewAI Toolkit](https://github.com/joaomdmoura/crewai-tools) and [LangChain Tools](https://python.langchain.com/docs/integrations/tools) for enhanced task performance and agent interaction.
|
||||
@@ -620,16 +167,16 @@ This is useful when you have a task that depends on the output of another task t
|
||||
# ...
|
||||
|
||||
research_ai_task = Task(
|
||||
description="Research the latest developments in AI",
|
||||
expected_output="A list of recent AI developments",
|
||||
description='Find and summarize the latest AI news',
|
||||
expected_output='A bullet list summary of the top 5 most important AI news',
|
||||
async_execution=True,
|
||||
agent=research_agent,
|
||||
tools=[search_tool]
|
||||
)
|
||||
|
||||
research_ops_task = Task(
|
||||
description="Research the latest developments in AI Ops",
|
||||
expected_output="A list of recent AI Ops developments",
|
||||
description='Find and summarize the latest AI Ops news',
|
||||
expected_output='A bullet list summary of the top 5 most important AI Ops news',
|
||||
async_execution=True,
|
||||
agent=research_agent,
|
||||
tools=[search_tool]
|
||||
@@ -637,7 +184,7 @@ research_ops_task = Task(
|
||||
|
||||
write_blog_task = Task(
|
||||
description="Write a full blog post about the importance of AI and its latest news",
|
||||
expected_output="Full blog post that is 4 paragraphs long",
|
||||
expected_output='Full blog post that is 4 paragraphs long',
|
||||
agent=writer_agent,
|
||||
context=[research_ai_task, research_ops_task]
|
||||
)
|
||||
@@ -749,114 +296,6 @@ While creating and executing tasks, certain validation mechanisms are in place t
|
||||
|
||||
These validations help in maintaining the consistency and reliability of task executions within the crewAI framework.
|
||||
|
||||
## Task Guardrails
|
||||
|
||||
Task guardrails provide a powerful way to validate, transform, or filter task outputs before they are passed to the next task. Guardrails are optional functions that execute before the next task starts, allowing you to ensure that task outputs meet specific requirements or formats.
|
||||
|
||||
### Basic Usage
|
||||
|
||||
```python Code
|
||||
from typing import Tuple, Union
|
||||
from crewai import Task
|
||||
|
||||
def validate_json_output(result: str) -> Tuple[bool, Union[dict, str]]:
|
||||
"""Validate that the output is valid JSON."""
|
||||
try:
|
||||
json_data = json.loads(result)
|
||||
return (True, json_data)
|
||||
except json.JSONDecodeError:
|
||||
return (False, "Output must be valid JSON")
|
||||
|
||||
task = Task(
|
||||
description="Generate JSON data",
|
||||
expected_output="Valid JSON object",
|
||||
guardrail=validate_json_output
|
||||
)
|
||||
```
|
||||
|
||||
### How Guardrails Work
|
||||
|
||||
1. **Optional Attribute**: Guardrails are an optional attribute at the task level, allowing you to add validation only where needed.
|
||||
2. **Execution Timing**: The guardrail function is executed before the next task starts, ensuring valid data flow between tasks.
|
||||
3. **Return Format**: Guardrails must return a tuple of `(success, data)`:
|
||||
- If `success` is `True`, `data` is the validated/transformed result
|
||||
- If `success` is `False`, `data` is the error message
|
||||
4. **Result Routing**:
|
||||
- On success (`True`), the result is automatically passed to the next task
|
||||
- On failure (`False`), the error is sent back to the agent to generate a new answer
|
||||
|
||||
### Common Use Cases
|
||||
|
||||
#### Data Format Validation
|
||||
```python Code
|
||||
def validate_email_format(result: str) -> Tuple[bool, Union[str, str]]:
|
||||
"""Ensure the output contains a valid email address."""
|
||||
import re
|
||||
email_pattern = r'^[\w\.-]+@[\w\.-]+\.\w+$'
|
||||
if re.match(email_pattern, result.strip()):
|
||||
return (True, result.strip())
|
||||
return (False, "Output must be a valid email address")
|
||||
```
|
||||
|
||||
#### Content Filtering
|
||||
```python Code
|
||||
def filter_sensitive_info(result: str) -> Tuple[bool, Union[str, str]]:
|
||||
"""Remove or validate sensitive information."""
|
||||
sensitive_patterns = ['SSN:', 'password:', 'secret:']
|
||||
for pattern in sensitive_patterns:
|
||||
if pattern.lower() in result.lower():
|
||||
return (False, f"Output contains sensitive information ({pattern})")
|
||||
return (True, result)
|
||||
```
|
||||
|
||||
#### Data Transformation
|
||||
```python Code
|
||||
def normalize_phone_number(result: str) -> Tuple[bool, Union[str, str]]:
|
||||
"""Ensure phone numbers are in a consistent format."""
|
||||
import re
|
||||
digits = re.sub(r'\D', '', result)
|
||||
if len(digits) == 10:
|
||||
formatted = f"({digits[:3]}) {digits[3:6]}-{digits[6:]}"
|
||||
return (True, formatted)
|
||||
return (False, "Output must be a 10-digit phone number")
|
||||
```
|
||||
|
||||
### Advanced Features
|
||||
|
||||
#### Chaining Multiple Validations
|
||||
```python Code
|
||||
def chain_validations(*validators):
|
||||
"""Chain multiple validators together."""
|
||||
def combined_validator(result):
|
||||
for validator in validators:
|
||||
success, data = validator(result)
|
||||
if not success:
|
||||
return (False, data)
|
||||
result = data
|
||||
return (True, result)
|
||||
return combined_validator
|
||||
|
||||
# Usage
|
||||
task = Task(
|
||||
description="Get user contact info",
|
||||
expected_output="Email and phone",
|
||||
guardrail=chain_validations(
|
||||
validate_email_format,
|
||||
filter_sensitive_info
|
||||
)
|
||||
)
|
||||
```
|
||||
|
||||
#### Custom Retry Logic
|
||||
```python Code
|
||||
task = Task(
|
||||
description="Generate data",
|
||||
expected_output="Valid data",
|
||||
guardrail=validate_data,
|
||||
max_retries=5 # Override default retry limit
|
||||
)
|
||||
```
|
||||
|
||||
## Creating Directories when Saving Files
|
||||
|
||||
You can now specify if a task should create directories when saving its output to a file. This is particularly useful for organizing outputs and ensuring that file paths are correctly structured.
|
||||
@@ -876,22 +315,9 @@ save_output_task = Task(
|
||||
#...
|
||||
```
|
||||
|
||||
Check out the video below to see how to use structured outputs in CrewAI:
|
||||
|
||||
<iframe
|
||||
width="560"
|
||||
height="315"
|
||||
src="https://www.youtube.com/embed/dNpKQk5uxHw"
|
||||
title="YouTube video player"
|
||||
frameborder="0"
|
||||
allow="accelerometer; autoplay; clipboard-write; encrypted-media; gyroscope; picture-in-picture; web-share"
|
||||
referrerpolicy="strict-origin-when-cross-origin"
|
||||
allowfullscreen
|
||||
></iframe>
|
||||
|
||||
## Conclusion
|
||||
|
||||
Tasks are the driving force behind the actions of agents in CrewAI.
|
||||
By properly defining tasks and their outcomes, you set the stage for your AI agents to work effectively, either independently or as a collaborative unit.
|
||||
Equipping tasks with appropriate tools, understanding the execution process, and following robust validation practices are crucial for maximizing CrewAI's potential,
|
||||
ensuring agents are effectively prepared for their assignments and that tasks are executed as intended.
|
||||
@@ -5,14 +5,13 @@ icon: screwdriver-wrench
|
||||
---
|
||||
|
||||
## Introduction
|
||||
|
||||
CrewAI tools empower agents with capabilities ranging from web searching and data analysis to collaboration and delegating tasks among coworkers.
|
||||
CrewAI tools empower agents with capabilities ranging from web searching and data analysis to collaboration and delegating tasks among coworkers.
|
||||
This documentation outlines how to create, integrate, and leverage these tools within the CrewAI framework, including a new focus on collaboration tools.
|
||||
|
||||
## What is a Tool?
|
||||
|
||||
A tool in CrewAI is a skill or function that agents can utilize to perform various actions.
|
||||
This includes tools from the [CrewAI Toolkit](https://github.com/joaomdmoura/crewai-tools) and [LangChain Tools](https://python.langchain.com/docs/integrations/tools),
|
||||
A tool in CrewAI is a skill or function that agents can utilize to perform various actions.
|
||||
This includes tools from the [CrewAI Toolkit](https://github.com/joaomdmoura/crewai-tools) and [LangChain Tools](https://python.langchain.com/docs/integrations/tools),
|
||||
enabling everything from simple searches to complex interactions and effective teamwork among agents.
|
||||
|
||||
## Key Characteristics of Tools
|
||||
@@ -104,72 +103,71 @@ crew.kickoff()
|
||||
|
||||
Here is a list of the available tools and their descriptions:
|
||||
|
||||
| Tool | Description |
|
||||
| :------------------------------- | :--------------------------------------------------------------------------------------------- |
|
||||
| **BrowserbaseLoadTool** | A tool for interacting with and extracting data from web browsers. |
|
||||
| **CodeDocsSearchTool** | A RAG tool optimized for searching through code documentation and related technical documents. |
|
||||
| **CodeInterpreterTool** | A tool for interpreting python code. |
|
||||
| **ComposioTool** | Enables use of Composio tools. |
|
||||
| **CSVSearchTool** | A RAG tool designed for searching within CSV files, tailored to handle structured data. |
|
||||
| **DALL-E Tool** | A tool for generating images using the DALL-E API. |
|
||||
| **DirectorySearchTool** | A RAG tool for searching within directories, useful for navigating through file systems. |
|
||||
| **DOCXSearchTool** | A RAG tool aimed at searching within DOCX documents, ideal for processing Word files. |
|
||||
| **DirectoryReadTool** | Facilitates reading and processing of directory structures and their contents. |
|
||||
| **EXASearchTool** | A tool designed for performing exhaustive searches across various data sources. |
|
||||
| **FileReadTool** | Enables reading and extracting data from files, supporting various file formats. |
|
||||
| **FirecrawlSearchTool** | A tool to search webpages using Firecrawl and return the results. |
|
||||
| **FirecrawlCrawlWebsiteTool** | A tool for crawling webpages using Firecrawl. |
|
||||
| **FirecrawlScrapeWebsiteTool** | A tool for scraping webpages URL using Firecrawl and returning its contents. |
|
||||
| **GithubSearchTool** | A RAG tool for searching within GitHub repositories, useful for code and documentation search. |
|
||||
| **SerperDevTool** | A specialized tool for development purposes, with specific functionalities under development. |
|
||||
| **TXTSearchTool** | A RAG tool focused on searching within text (.txt) files, suitable for unstructured data. |
|
||||
| **JSONSearchTool** | A RAG tool designed for searching within JSON files, catering to structured data handling. |
|
||||
| **LlamaIndexTool** | Enables the use of LlamaIndex tools. |
|
||||
| **MDXSearchTool** | A RAG tool tailored for searching within Markdown (MDX) files, useful for documentation. |
|
||||
| **PDFSearchTool** | A RAG tool aimed at searching within PDF documents, ideal for processing scanned documents. |
|
||||
| **PGSearchTool** | A RAG tool optimized for searching within PostgreSQL databases, suitable for database queries. |
|
||||
| **Vision Tool** | A tool for generating images using the DALL-E API. |
|
||||
| **RagTool** | A general-purpose RAG tool capable of handling various data sources and types. |
|
||||
| **ScrapeElementFromWebsiteTool** | Enables scraping specific elements from websites, useful for targeted data extraction. |
|
||||
| **ScrapeWebsiteTool** | Facilitates scraping entire websites, ideal for comprehensive data collection. |
|
||||
| **WebsiteSearchTool** | A RAG tool for searching website content, optimized for web data extraction. |
|
||||
| **XMLSearchTool** | A RAG tool designed for searching within XML files, suitable for structured data formats. |
|
||||
| **YoutubeChannelSearchTool** | A RAG tool for searching within YouTube channels, useful for video content analysis. |
|
||||
| **YoutubeVideoSearchTool** | A RAG tool aimed at searching within YouTube videos, ideal for video data extraction. |
|
||||
| Tool | Description |
|
||||
| :-------------------------- | :-------------------------------------------------------------------------------------------- |
|
||||
| **BrowserbaseLoadTool** | A tool for interacting with and extracting data from web browsers. |
|
||||
| **CodeDocsSearchTool** | A RAG tool optimized for searching through code documentation and related technical documents. |
|
||||
| **CodeInterpreterTool** | A tool for interpreting python code. |
|
||||
| **ComposioTool** | Enables use of Composio tools. |
|
||||
| **CSVSearchTool** | A RAG tool designed for searching within CSV files, tailored to handle structured data. |
|
||||
| **DALL-E Tool** | A tool for generating images using the DALL-E API. |
|
||||
| **DirectorySearchTool** | A RAG tool for searching within directories, useful for navigating through file systems. |
|
||||
| **DOCXSearchTool** | A RAG tool aimed at searching within DOCX documents, ideal for processing Word files. |
|
||||
| **DirectoryReadTool** | Facilitates reading and processing of directory structures and their contents. |
|
||||
| **EXASearchTool** | A tool designed for performing exhaustive searches across various data sources. |
|
||||
| **FileReadTool** | Enables reading and extracting data from files, supporting various file formats. |
|
||||
| **FirecrawlSearchTool** | A tool to search webpages using Firecrawl and return the results. |
|
||||
| **FirecrawlCrawlWebsiteTool** | A tool for crawling webpages using Firecrawl. |
|
||||
| **FirecrawlScrapeWebsiteTool** | A tool for scraping webpages URL using Firecrawl and returning its contents. |
|
||||
| **GithubSearchTool** | A RAG tool for searching within GitHub repositories, useful for code and documentation search.|
|
||||
| **SerperDevTool** | A specialized tool for development purposes, with specific functionalities under development. |
|
||||
| **TXTSearchTool** | A RAG tool focused on searching within text (.txt) files, suitable for unstructured data. |
|
||||
| **JSONSearchTool** | A RAG tool designed for searching within JSON files, catering to structured data handling. |
|
||||
| **LlamaIndexTool** | Enables the use of LlamaIndex tools. |
|
||||
| **MDXSearchTool** | A RAG tool tailored for searching within Markdown (MDX) files, useful for documentation. |
|
||||
| **PDFSearchTool** | A RAG tool aimed at searching within PDF documents, ideal for processing scanned documents. |
|
||||
| **PGSearchTool** | A RAG tool optimized for searching within PostgreSQL databases, suitable for database queries. |
|
||||
| **Vision Tool** | A tool for generating images using the DALL-E API. |
|
||||
| **RagTool** | A general-purpose RAG tool capable of handling various data sources and types. |
|
||||
| **ScrapeElementFromWebsiteTool** | Enables scraping specific elements from websites, useful for targeted data extraction. |
|
||||
| **ScrapeWebsiteTool** | Facilitates scraping entire websites, ideal for comprehensive data collection. |
|
||||
| **WebsiteSearchTool** | A RAG tool for searching website content, optimized for web data extraction. |
|
||||
| **XMLSearchTool** | A RAG tool designed for searching within XML files, suitable for structured data formats. |
|
||||
| **YoutubeChannelSearchTool**| A RAG tool for searching within YouTube channels, useful for video content analysis. |
|
||||
| **YoutubeVideoSearchTool** | A RAG tool aimed at searching within YouTube videos, ideal for video data extraction. |
|
||||
|
||||
## Creating your own Tools
|
||||
|
||||
<Tip>
|
||||
Developers can craft `custom tools` tailored for their agent’s needs or
|
||||
utilize pre-built options.
|
||||
Developers can craft `custom tools` tailored for their agent’s needs or utilize pre-built options.
|
||||
</Tip>
|
||||
|
||||
There are two main ways for one to create a CrewAI tool:
|
||||
To create your own CrewAI tools you will need to install our extra tools package:
|
||||
|
||||
```bash
|
||||
pip install 'crewai[tools]'
|
||||
```
|
||||
|
||||
Once you do that there are two main ways for one to create a CrewAI tool:
|
||||
|
||||
### Subclassing `BaseTool`
|
||||
|
||||
```python Code
|
||||
from crewai.tools import BaseTool
|
||||
from pydantic import BaseModel, Field
|
||||
|
||||
class MyToolInput(BaseModel):
|
||||
"""Input schema for MyCustomTool."""
|
||||
argument: str = Field(..., description="Description of the argument.")
|
||||
from crewai_tools import BaseTool
|
||||
|
||||
class MyCustomTool(BaseTool):
|
||||
name: str = "Name of my tool"
|
||||
description: str = "What this tool does. It's vital for effective utilization."
|
||||
args_schema: Type[BaseModel] = MyToolInput
|
||||
description: str = "Clear description for what this tool is useful for, your agent will need this information to use it."
|
||||
|
||||
def _run(self, argument: str) -> str:
|
||||
# Your tool's logic here
|
||||
return "Tool's result"
|
||||
# Implementation goes here
|
||||
return "Result from custom tool"
|
||||
```
|
||||
|
||||
### Utilizing the `tool` Decorator
|
||||
|
||||
```python Code
|
||||
from crewai.tools import tool
|
||||
from crewai_tools import tool
|
||||
@tool("Name of my tool")
|
||||
def my_tool(question: str) -> str:
|
||||
"""Clear description for what this tool is useful for, your agent will need this information to use it."""
|
||||
@@ -177,58 +175,14 @@ def my_tool(question: str) -> str:
|
||||
return "Result from your custom tool"
|
||||
```
|
||||
|
||||
### Structured Tools
|
||||
|
||||
The `StructuredTool` class wraps functions as tools, providing flexibility and validation while reducing boilerplate. It supports custom schemas and dynamic logic for seamless integration of complex functionalities.
|
||||
|
||||
#### Example:
|
||||
Using `StructuredTool.from_function`, you can wrap a function that interacts with an external API or system, providing a structured interface. This enables robust validation and consistent execution, making it easier to integrate complex functionalities into your applications as demonstrated in the following example:
|
||||
|
||||
```python
|
||||
from crewai.tools.structured_tool import CrewStructuredTool
|
||||
from pydantic import BaseModel
|
||||
|
||||
# Define the schema for the tool's input using Pydantic
|
||||
class APICallInput(BaseModel):
|
||||
endpoint: str
|
||||
parameters: dict
|
||||
|
||||
# Wrapper function to execute the API call
|
||||
def tool_wrapper(*args, **kwargs):
|
||||
# Here, you would typically call the API using the parameters
|
||||
# For demonstration, we'll return a placeholder string
|
||||
return f"Call the API at {kwargs['endpoint']} with parameters {kwargs['parameters']}"
|
||||
|
||||
# Create and return the structured tool
|
||||
def create_structured_tool():
|
||||
return CrewStructuredTool.from_function(
|
||||
name='Wrapper API',
|
||||
description="A tool to wrap API calls with structured input.",
|
||||
args_schema=APICallInput,
|
||||
func=tool_wrapper,
|
||||
)
|
||||
|
||||
# Example usage
|
||||
structured_tool = create_structured_tool()
|
||||
|
||||
# Execute the tool with structured input
|
||||
result = structured_tool._run(**{
|
||||
"endpoint": "https://example.com/api",
|
||||
"parameters": {"key1": "value1", "key2": "value2"}
|
||||
})
|
||||
print(result) # Output: Call the API at https://example.com/api with parameters {'key1': 'value1', 'key2': 'value2'}
|
||||
```
|
||||
|
||||
### Custom Caching Mechanism
|
||||
|
||||
<Tip>
|
||||
Tools can optionally implement a `cache_function` to fine-tune caching
|
||||
behavior. This function determines when to cache results based on specific
|
||||
conditions, offering granular control over caching logic.
|
||||
Tools can optionally implement a `cache_function` to fine-tune caching behavior. This function determines when to cache results based on specific conditions, offering granular control over caching logic.
|
||||
</Tip>
|
||||
|
||||
```python Code
|
||||
from crewai.tools import tool
|
||||
from crewai_tools import tool
|
||||
|
||||
@tool
|
||||
def multiplication_tool(first_number: int, second_number: int) -> str:
|
||||
@@ -254,6 +208,6 @@ writer1 = Agent(
|
||||
|
||||
## Conclusion
|
||||
|
||||
Tools are pivotal in extending the capabilities of CrewAI agents, enabling them to undertake a broad spectrum of tasks and collaborate effectively.
|
||||
When building solutions with CrewAI, leverage both custom and existing tools to empower your agents and enhance the AI ecosystem. Consider utilizing error handling,
|
||||
caching mechanisms, and the flexibility of tool arguments to optimize your agents' performance and capabilities.
|
||||
@@ -57,7 +57,7 @@ This feature is useful for debugging and understanding how agents interact with
|
||||
<Step title="Install AgentOps">
|
||||
Install AgentOps with:
|
||||
```bash
|
||||
pip install 'crewai[agentops]'
|
||||
pip install crewai[agentops]
|
||||
```
|
||||
or
|
||||
```bash
|
||||
|
||||
@@ -1,59 +0,0 @@
|
||||
---
|
||||
title: Before and After Kickoff Hooks
|
||||
description: Learn how to use before and after kickoff hooks in CrewAI
|
||||
---
|
||||
|
||||
CrewAI provides hooks that allow you to execute code before and after a crew's kickoff. These hooks are useful for preprocessing inputs or post-processing results.
|
||||
|
||||
## Before Kickoff Hook
|
||||
|
||||
The before kickoff hook is executed before the crew starts its tasks. It receives the input dictionary and can modify it before passing it to the crew. You can use this hook to set up your environment, load necessary data, or preprocess your inputs. This is useful in scenarios where the input data might need enrichment or validation before being processed by the crew.
|
||||
|
||||
Here's an example of defining a before kickoff function in your `crew.py`:
|
||||
|
||||
```python
|
||||
from crewai import CrewBase, before_kickoff
|
||||
|
||||
@CrewBase
|
||||
class MyCrew:
|
||||
@before_kickoff
|
||||
def prepare_data(self, inputs):
|
||||
# Preprocess or modify inputs
|
||||
inputs['processed'] = True
|
||||
return inputs
|
||||
|
||||
#...
|
||||
```
|
||||
|
||||
In this example, the prepare_data function modifies the inputs by adding a new key-value pair indicating that the inputs have been processed.
|
||||
|
||||
## After Kickoff Hook
|
||||
|
||||
The after kickoff hook is executed after the crew has completed its tasks. It receives the result object, which contains the outputs of the crew's execution. This hook is ideal for post-processing results, such as logging, data transformation, or further analysis.
|
||||
|
||||
Here's how you can define an after kickoff function in your `crew.py`:
|
||||
|
||||
```python
|
||||
from crewai import CrewBase, after_kickoff
|
||||
|
||||
@CrewBase
|
||||
class MyCrew:
|
||||
@after_kickoff
|
||||
def log_results(self, result):
|
||||
# Log or modify the results
|
||||
print("Crew execution completed with result:", result)
|
||||
return result
|
||||
|
||||
# ...
|
||||
```
|
||||
|
||||
|
||||
In the `log_results` function, the results of the crew execution are simply printed out. You can extend this to perform more complex operations such as sending notifications or integrating with other services.
|
||||
|
||||
## Utilizing Both Hooks
|
||||
|
||||
Both hooks can be used together to provide a comprehensive setup and teardown process for your crew's execution. They are particularly useful in maintaining clean code architecture by separating concerns and enhancing the modularity of your CrewAI implementations.
|
||||
|
||||
## Conclusion
|
||||
|
||||
Before and after kickoff hooks in CrewAI offer powerful ways to interact with the lifecycle of a crew's execution. By understanding and utilizing these hooks, you can greatly enhance the robustness and flexibility of your AI agents.
|
||||
@@ -6,27 +6,28 @@ icon: hammer
|
||||
|
||||
## Creating and Utilizing Tools in CrewAI
|
||||
|
||||
This guide provides detailed instructions on creating custom tools for the CrewAI framework and how to efficiently manage and utilize these tools,
|
||||
incorporating the latest functionalities such as tool delegation, error handling, and dynamic tool calling. It also highlights the importance of collaboration tools,
|
||||
enabling agents to perform a wide range of actions.
|
||||
|
||||
### Prerequisites
|
||||
|
||||
Before creating your own tools, ensure you have the crewAI extra tools package installed:
|
||||
|
||||
```bash
|
||||
pip install 'crewai[tools]'
|
||||
```
|
||||
|
||||
### Subclassing `BaseTool`
|
||||
|
||||
To create a personalized tool, inherit from `BaseTool` and define the necessary attributes, including the `args_schema` for input validation, and the `_run` method.
|
||||
To create a personalized tool, inherit from `BaseTool` and define the necessary attributes and the `_run` method.
|
||||
|
||||
```python Code
|
||||
from typing import Type
|
||||
from crewai.tools import BaseTool
|
||||
from pydantic import BaseModel, Field
|
||||
|
||||
class MyToolInput(BaseModel):
|
||||
"""Input schema for MyCustomTool."""
|
||||
argument: str = Field(..., description="Description of the argument.")
|
||||
from crewai_tools import BaseTool
|
||||
|
||||
class MyCustomTool(BaseTool):
|
||||
name: str = "Name of my tool"
|
||||
description: str = "What this tool does. It's vital for effective utilization."
|
||||
args_schema: Type[BaseModel] = MyToolInput
|
||||
|
||||
def _run(self, argument: str) -> str:
|
||||
# Your tool's logic here
|
||||
@@ -39,7 +40,7 @@ Alternatively, you can use the tool decorator `@tool`. This approach allows you
|
||||
offering a concise and efficient way to create specialized tools tailored to your needs.
|
||||
|
||||
```python Code
|
||||
from crewai.tools import tool
|
||||
from crewai_tools import tool
|
||||
|
||||
@tool("Tool Name")
|
||||
def my_simple_tool(question: str) -> str:
|
||||
@@ -65,5 +66,5 @@ def my_cache_strategy(arguments: dict, result: str) -> bool:
|
||||
cached_tool.cache_function = my_cache_strategy
|
||||
```
|
||||
|
||||
By adhering to these guidelines and incorporating new functionalities and collaboration tools into your tool creation and management processes,
|
||||
By adhering to these guidelines and incorporating new functionalities and collaboration tools into your tool creation and management processes,
|
||||
you can leverage the full capabilities of the CrewAI framework, enhancing both the development experience and the efficiency of your AI agents.
|
||||
|
||||
@@ -73,9 +73,9 @@ result = crew.kickoff()
|
||||
If you're using the hierarchical process and don't want to set a custom manager agent, you can specify the language model for the manager:
|
||||
|
||||
```python Code
|
||||
from crewai import LLM
|
||||
from langchain_openai import ChatOpenAI
|
||||
|
||||
manager_llm = LLM(model="gpt-4o")
|
||||
manager_llm = ChatOpenAI(model_name="gpt-4")
|
||||
|
||||
crew = Crew(
|
||||
agents=[researcher, writer],
|
||||
|
||||
@@ -48,6 +48,7 @@ Define a crew with a designated manager and establish a clear chain of command.
|
||||
</Tip>
|
||||
|
||||
```python Code
|
||||
from langchain_openai import ChatOpenAI
|
||||
from crewai import Crew, Process, Agent
|
||||
|
||||
# Agents are defined with attributes for backstory, cache, and verbose mode
|
||||
@@ -55,51 +56,38 @@ researcher = Agent(
|
||||
role='Researcher',
|
||||
goal='Conduct in-depth analysis',
|
||||
backstory='Experienced data analyst with a knack for uncovering hidden trends.',
|
||||
cache=True,
|
||||
verbose=False,
|
||||
# tools=[] # This can be optionally specified; defaults to an empty list
|
||||
use_system_prompt=True, # Enable or disable system prompts for this agent
|
||||
max_rpm=30, # Limit on the number of requests per minute
|
||||
max_iter=5 # Maximum number of iterations for a final answer
|
||||
)
|
||||
writer = Agent(
|
||||
role='Writer',
|
||||
goal='Create engaging content',
|
||||
backstory='Creative writer passionate about storytelling in technical domains.',
|
||||
cache=True,
|
||||
verbose=False,
|
||||
# tools=[] # Optionally specify tools; defaults to an empty list
|
||||
use_system_prompt=True, # Enable or disable system prompts for this agent
|
||||
max_rpm=30, # Limit on the number of requests per minute
|
||||
max_iter=5 # Maximum number of iterations for a final answer
|
||||
)
|
||||
|
||||
# Establishing the crew with a hierarchical process and additional configurations
|
||||
project_crew = Crew(
|
||||
tasks=[...], # Tasks to be delegated and executed under the manager's supervision
|
||||
agents=[researcher, writer],
|
||||
manager_llm="gpt-4o", # Specify which LLM the manager should use
|
||||
process=Process.hierarchical,
|
||||
planning=True,
|
||||
manager_llm=ChatOpenAI(temperature=0, model="gpt-4"), # Mandatory if manager_agent is not set
|
||||
process=Process.hierarchical, # Specifies the hierarchical management approach
|
||||
respect_context_window=True, # Enable respect of the context window for tasks
|
||||
memory=True, # Enable memory usage for enhanced task execution
|
||||
manager_agent=None, # Optional: explicitly set a specific agent as manager instead of the manager_llm
|
||||
planning=True, # Enable planning feature for pre-execution strategy
|
||||
)
|
||||
```
|
||||
|
||||
### Using a Custom Manager Agent
|
||||
|
||||
Alternatively, you can create a custom manager agent with specific attributes tailored to your project's management needs. This gives you more control over the manager's behavior and capabilities.
|
||||
|
||||
```python
|
||||
# Define a custom manager agent
|
||||
manager = Agent(
|
||||
role="Project Manager",
|
||||
goal="Efficiently manage the crew and ensure high-quality task completion",
|
||||
backstory="You're an experienced project manager, skilled in overseeing complex projects and guiding teams to success.",
|
||||
allow_delegation=True,
|
||||
)
|
||||
|
||||
# Use the custom manager in your crew
|
||||
project_crew = Crew(
|
||||
tasks=[...],
|
||||
agents=[researcher, writer],
|
||||
manager_agent=manager, # Use your custom manager agent
|
||||
process=Process.hierarchical,
|
||||
planning=True,
|
||||
)
|
||||
```
|
||||
|
||||
<Tip>
|
||||
For more details on creating and customizing a manager agent, check out the [Custom Manager Agent documentation](https://docs.crewai.com/how-to/custom-manager-agent#custom-manager-agent).
|
||||
</Tip>
|
||||
|
||||
|
||||
### Workflow in Action
|
||||
|
||||
1. **Task Assignment**: The manager assigns tasks strategically, considering each agent's capabilities and available tools.
|
||||
@@ -109,4 +97,4 @@ project_crew = Crew(
|
||||
## Conclusion
|
||||
|
||||
Adopting the hierarchical process in CrewAI, with the correct configurations and understanding of the system's capabilities, facilitates an organized and efficient approach to project management.
|
||||
Utilize the advanced features and customizations to tailor the workflow to your specific needs, ensuring optimal task execution and project success.
|
||||
Utilize the advanced features and customizations to tailor the workflow to your specific needs, ensuring optimal task execution and project success.
|
||||
@@ -60,12 +60,12 @@ writer = Agent(
|
||||
# Create tasks for your agents
|
||||
task1 = Task(
|
||||
description=(
|
||||
"Conduct a comprehensive analysis of the latest advancements in AI in 2025. "
|
||||
"Conduct a comprehensive analysis of the latest advancements in AI in 2024. "
|
||||
"Identify key trends, breakthrough technologies, and potential industry impacts. "
|
||||
"Compile your findings in a detailed report. "
|
||||
"Make sure to check with a human if the draft is good before finalizing your answer."
|
||||
),
|
||||
expected_output='A comprehensive full report on the latest AI advancements in 2025, leave nothing out',
|
||||
expected_output='A comprehensive full report on the latest AI advancements in 2024, leave nothing out',
|
||||
agent=researcher,
|
||||
human_input=True
|
||||
)
|
||||
@@ -76,7 +76,7 @@ task2 = Task(
|
||||
"Your post should be informative yet accessible, catering to a tech-savvy audience. "
|
||||
"Aim for a narrative that captures the essence of these breakthroughs and their implications for the future."
|
||||
),
|
||||
expected_output='A compelling 3 paragraphs blog post formatted as markdown about the latest AI advancements in 2025',
|
||||
expected_output='A compelling 3 paragraphs blog post formatted as markdown about the latest AI advancements in 2024',
|
||||
agent=writer,
|
||||
human_input=True
|
||||
)
|
||||
|
||||
@@ -54,8 +54,7 @@ coding_agent = Agent(
|
||||
# Create a task that requires code execution
|
||||
data_analysis_task = Task(
|
||||
description="Analyze the given dataset and calculate the average age of participants. Ages: {ages}",
|
||||
agent=coding_agent,
|
||||
expected_output="The average age of the participants."
|
||||
agent=coding_agent
|
||||
)
|
||||
|
||||
# Create a crew and add the task
|
||||
@@ -117,4 +116,4 @@ async def async_multiple_crews():
|
||||
|
||||
# Run the async function
|
||||
asyncio.run(async_multiple_crews())
|
||||
```
|
||||
```
|
||||
@@ -1,100 +0,0 @@
|
||||
---
|
||||
title: Agent Monitoring with Langfuse
|
||||
description: Learn how to integrate Langfuse with CrewAI via OpenTelemetry using OpenLit
|
||||
icon: magnifying-glass-chart
|
||||
---
|
||||
|
||||
# Integrate Langfuse with CrewAI
|
||||
|
||||
This notebook demonstrates how to integrate **Langfuse** with **CrewAI** using OpenTelemetry via the **OpenLit** SDK. By the end of this notebook, you will be able to trace your CrewAI applications with Langfuse for improved observability and debugging.
|
||||
|
||||
> **What is Langfuse?** [Langfuse](https://langfuse.com) is an open-source LLM engineering platform. It provides tracing and monitoring capabilities for LLM applications, helping developers debug, analyze, and optimize their AI systems. Langfuse integrates with various tools and frameworks via native integrations, OpenTelemetry, and APIs/SDKs.
|
||||
|
||||
[](https://langfuse.com/watch-demo)
|
||||
|
||||
## Get Started
|
||||
|
||||
We'll walk through a simple example of using CrewAI and integrating it with Langfuse via OpenTelemetry using OpenLit.
|
||||
|
||||
### Step 1: Install Dependencies
|
||||
|
||||
|
||||
```python
|
||||
%pip install langfuse openlit crewai crewai_tools
|
||||
```
|
||||
|
||||
### Step 2: Set Up Environment Variables
|
||||
|
||||
Set your Langfuse API keys and configure OpenTelemetry export settings to send traces to Langfuse. Please refer to the [Langfuse OpenTelemetry Docs](https://langfuse.com/docs/opentelemetry/get-started) for more information on the Langfuse OpenTelemetry endpoint `/api/public/otel` and authentication.
|
||||
|
||||
|
||||
```python
|
||||
import os
|
||||
import base64
|
||||
|
||||
LANGFUSE_PUBLIC_KEY="pk-lf-..."
|
||||
LANGFUSE_SECRET_KEY="sk-lf-..."
|
||||
LANGFUSE_AUTH=base64.b64encode(f"{LANGFUSE_PUBLIC_KEY}:{LANGFUSE_SECRET_KEY}".encode()).decode()
|
||||
|
||||
os.environ["OTEL_EXPORTER_OTLP_ENDPOINT"] = "https://cloud.langfuse.com/api/public/otel" # EU data region
|
||||
# os.environ["OTEL_EXPORTER_OTLP_ENDPOINT"] = "https://us.cloud.langfuse.com/api/public/otel" # US data region
|
||||
os.environ["OTEL_EXPORTER_OTLP_HEADERS"] = f"Authorization=Basic {LANGFUSE_AUTH}"
|
||||
|
||||
# your openai key
|
||||
os.environ["OPENAI_API_KEY"] = "sk-..."
|
||||
```
|
||||
|
||||
### Step 3: Initialize OpenLit
|
||||
|
||||
Initialize the OpenLit OpenTelemetry instrumentation SDK to start capturing OpenTelemetry traces.
|
||||
|
||||
|
||||
```python
|
||||
import openlit
|
||||
|
||||
openlit.init()
|
||||
```
|
||||
|
||||
### Step 4: Create a Simple CrewAI Application
|
||||
|
||||
We'll create a simple CrewAI application where multiple agents collaborate to answer a user's question.
|
||||
|
||||
|
||||
```python
|
||||
from crewai import Agent, Task, Crew
|
||||
|
||||
from crewai_tools import (
|
||||
WebsiteSearchTool
|
||||
)
|
||||
|
||||
web_rag_tool = WebsiteSearchTool()
|
||||
|
||||
writer = Agent(
|
||||
role="Writer",
|
||||
goal="You make math engaging and understandable for young children through poetry",
|
||||
backstory="You're an expert in writing haikus but you know nothing of math.",
|
||||
tools=[web_rag_tool],
|
||||
)
|
||||
|
||||
task = Task(description=("What is {multiplication}?"),
|
||||
expected_output=("Compose a haiku that includes the answer."),
|
||||
agent=writer)
|
||||
|
||||
crew = Crew(
|
||||
agents=[writer],
|
||||
tasks=[task],
|
||||
share_crew=False
|
||||
)
|
||||
```
|
||||
|
||||
### Step 5: See Traces in Langfuse
|
||||
|
||||
After running the agent, you can view the traces generated by your CrewAI application in [Langfuse](https://cloud.langfuse.com). You should see detailed steps of the LLM interactions, which can help you debug and optimize your AI agent.
|
||||
|
||||
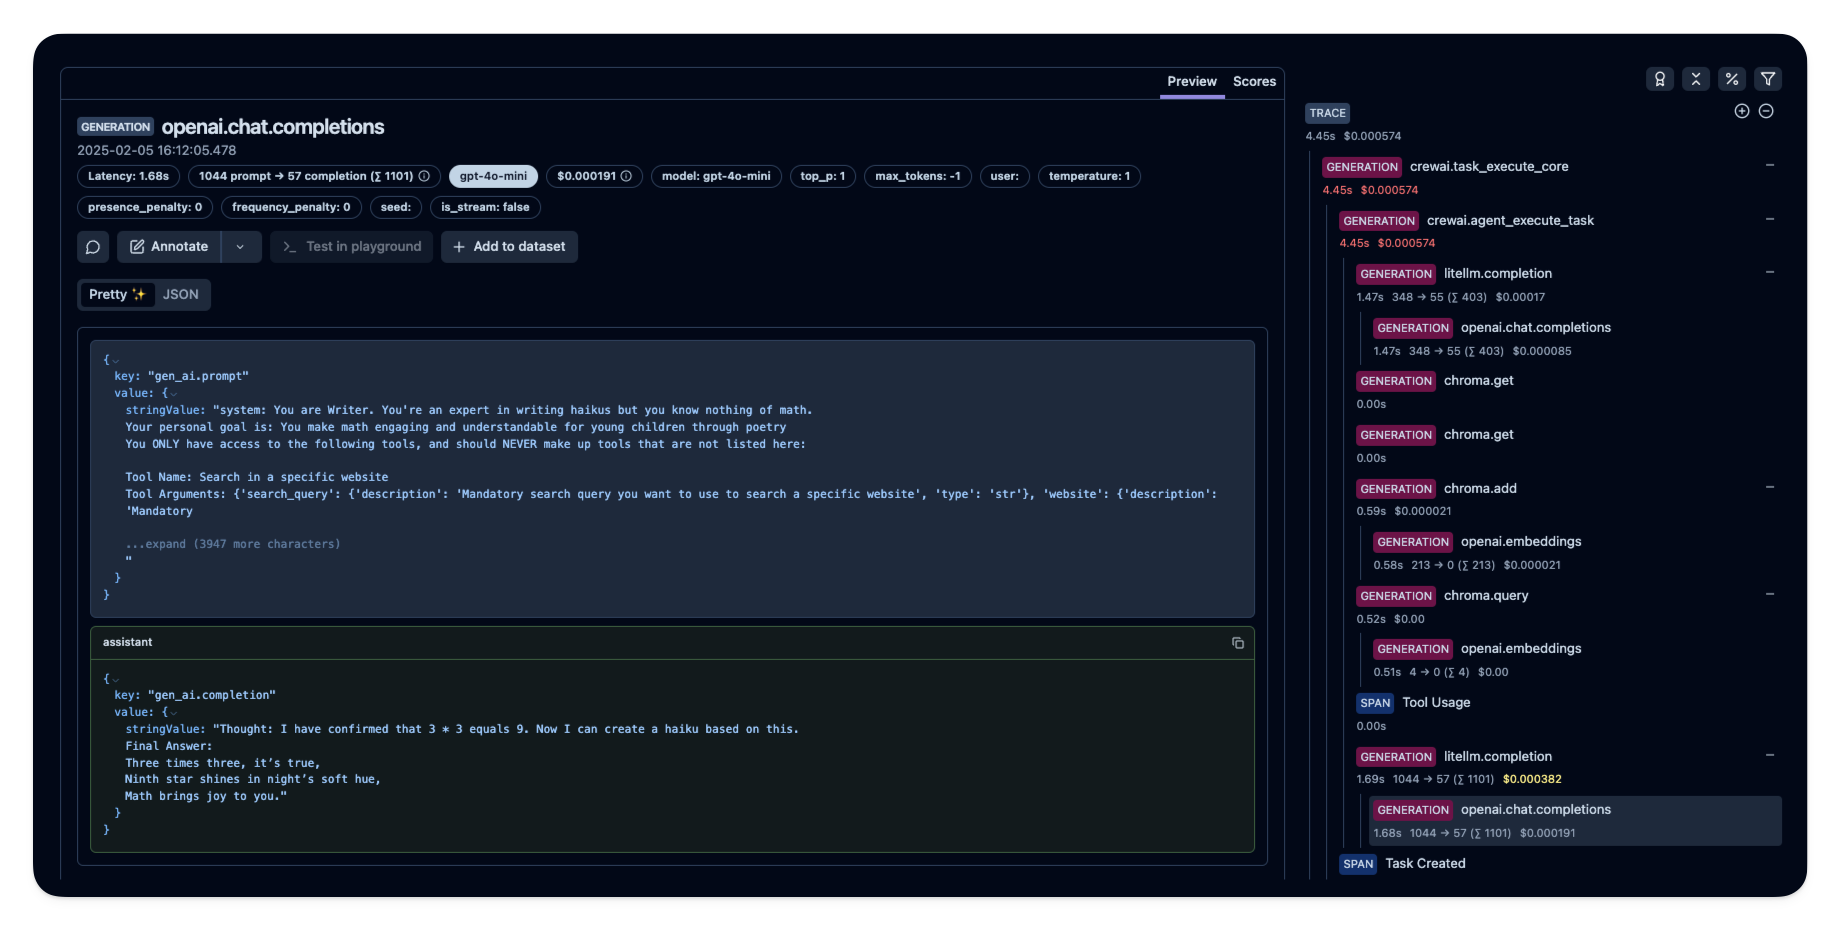
|
||||
|
||||
_[Public example trace in Langfuse](https://cloud.langfuse.com/project/cloramnkj0002jz088vzn1ja4/traces/e2cf380ffc8d47d28da98f136140642b?timestamp=2025-02-05T15%3A12%3A02.717Z&observation=3b32338ee6a5d9af)_
|
||||
|
||||
## References
|
||||
|
||||
- [Langfuse OpenTelemetry Docs](https://langfuse.com/docs/opentelemetry/get-started)
|
||||
@@ -23,7 +23,6 @@ LiteLLM supports a wide range of providers, including but not limited to:
|
||||
- Azure OpenAI
|
||||
- AWS (Bedrock, SageMaker)
|
||||
- Cohere
|
||||
- VoyageAI
|
||||
- Hugging Face
|
||||
- Ollama
|
||||
- Mistral AI
|
||||
@@ -33,8 +32,6 @@ LiteLLM supports a wide range of providers, including but not limited to:
|
||||
- Cloudflare Workers AI
|
||||
- DeepInfra
|
||||
- Groq
|
||||
- SambaNova
|
||||
- [NVIDIA NIMs](https://docs.api.nvidia.com/nim/reference/models-1)
|
||||
- And many more!
|
||||
|
||||
For a complete and up-to-date list of supported providers, please refer to the [LiteLLM Providers documentation](https://docs.litellm.ai/docs/providers).
|
||||
@@ -128,10 +125,10 @@ You can connect to OpenAI-compatible LLMs using either environment variables or
|
||||
</Tab>
|
||||
<Tab title="Using LLM Class Attributes">
|
||||
<CodeGroup>
|
||||
```python Code
|
||||
llm = LLM(
|
||||
model="custom-model-name",
|
||||
api_key="your-api-key",
|
||||
```python Code
|
||||
llm = LLM(
|
||||
model="custom-model-name",
|
||||
api_key="your-api-key",
|
||||
base_url="https://api.your-provider.com/v1"
|
||||
)
|
||||
agent = Agent(llm=llm, ...)
|
||||
@@ -182,4 +179,4 @@ This is particularly useful when working with OpenAI-compatible APIs or when you
|
||||
|
||||
## Conclusion
|
||||
|
||||
By leveraging LiteLLM, CrewAI offers seamless integration with a vast array of LLMs. This flexibility allows you to choose the most suitable model for your specific needs, whether you prioritize performance, cost-efficiency, or local deployment. Remember to consult the [LiteLLM documentation](https://docs.litellm.ai/docs/) for the most up-to-date information on supported models and configuration options.
|
||||
@@ -1,206 +0,0 @@
|
||||
---
|
||||
title: Agent Monitoring with MLflow
|
||||
description: Quickly start monitoring your Agents with MLflow.
|
||||
icon: bars-staggered
|
||||
---
|
||||
|
||||
# MLflow Overview
|
||||
|
||||
[MLflow](https://mlflow.org/) is an open-source platform to assist machine learning practitioners and teams in handling the complexities of the machine learning process.
|
||||
|
||||
It provides a tracing feature that enhances LLM observability in your Generative AI applications by capturing detailed information about the execution of your application’s services.
|
||||
Tracing provides a way to record the inputs, outputs, and metadata associated with each intermediate step of a request, enabling you to easily pinpoint the source of bugs and unexpected behaviors.
|
||||
|
||||

|
||||
|
||||
### Features
|
||||
|
||||
- **Tracing Dashboard**: Monitor activities of your crewAI agents with detailed dashboards that include inputs, outputs and metadata of spans.
|
||||
- **Automated Tracing**: A fully automated integration with crewAI, which can be enabled by running `mlflow.crewai.autolog()`.
|
||||
- **Manual Trace Instrumentation with minor efforts**: Customize trace instrumentation through MLflow's high-level fluent APIs such as decorators, function wrappers and context managers.
|
||||
- **OpenTelemetry Compatibility**: MLflow Tracing supports exporting traces to an OpenTelemetry Collector, which can then be used to export traces to various backends such as Jaeger, Zipkin, and AWS X-Ray.
|
||||
- **Package and Deploy Agents**: Package and deploy your crewAI agents to an inference server with a variety of deployment targets.
|
||||
- **Securely Host LLMs**: Host multiple LLM from various providers in one unified endpoint through MFflow gateway.
|
||||
- **Evaluation**: Evaluate your crewAI agents with a wide range of metrics using a convenient API `mlflow.evaluate()`.
|
||||
|
||||
## Setup Instructions
|
||||
|
||||
<Steps>
|
||||
<Step title="Install MLflow package">
|
||||
```shell
|
||||
# The crewAI integration is available in mlflow>=2.19.0
|
||||
pip install mlflow
|
||||
```
|
||||
</Step>
|
||||
<Step title="Start MFflow tracking server">
|
||||
```shell
|
||||
# This process is optional, but it is recommended to use MLflow tracking server for better visualization and broader features.
|
||||
mlflow server
|
||||
```
|
||||
</Step>
|
||||
<Step title="Initialize MLflow in Your Application">
|
||||
Add the following two lines to your application code:
|
||||
|
||||
```python
|
||||
import mlflow
|
||||
|
||||
mlflow.crewai.autolog()
|
||||
|
||||
# Optional: Set a tracking URI and an experiment name if you have a tracking server
|
||||
mlflow.set_tracking_uri("http://localhost:5000")
|
||||
mlflow.set_experiment("CrewAI")
|
||||
```
|
||||
|
||||
Example Usage for tracing CrewAI Agents:
|
||||
|
||||
```python
|
||||
from crewai import Agent, Crew, Task
|
||||
from crewai.knowledge.source.string_knowledge_source import StringKnowledgeSource
|
||||
from crewai_tools import SerperDevTool, WebsiteSearchTool
|
||||
|
||||
from textwrap import dedent
|
||||
|
||||
content = "Users name is John. He is 30 years old and lives in San Francisco."
|
||||
string_source = StringKnowledgeSource(
|
||||
content=content, metadata={"preference": "personal"}
|
||||
)
|
||||
|
||||
search_tool = WebsiteSearchTool()
|
||||
|
||||
|
||||
class TripAgents:
|
||||
def city_selection_agent(self):
|
||||
return Agent(
|
||||
role="City Selection Expert",
|
||||
goal="Select the best city based on weather, season, and prices",
|
||||
backstory="An expert in analyzing travel data to pick ideal destinations",
|
||||
tools=[
|
||||
search_tool,
|
||||
],
|
||||
verbose=True,
|
||||
)
|
||||
|
||||
def local_expert(self):
|
||||
return Agent(
|
||||
role="Local Expert at this city",
|
||||
goal="Provide the BEST insights about the selected city",
|
||||
backstory="""A knowledgeable local guide with extensive information
|
||||
about the city, it's attractions and customs""",
|
||||
tools=[search_tool],
|
||||
verbose=True,
|
||||
)
|
||||
|
||||
|
||||
class TripTasks:
|
||||
def identify_task(self, agent, origin, cities, interests, range):
|
||||
return Task(
|
||||
description=dedent(
|
||||
f"""
|
||||
Analyze and select the best city for the trip based
|
||||
on specific criteria such as weather patterns, seasonal
|
||||
events, and travel costs. This task involves comparing
|
||||
multiple cities, considering factors like current weather
|
||||
conditions, upcoming cultural or seasonal events, and
|
||||
overall travel expenses.
|
||||
Your final answer must be a detailed
|
||||
report on the chosen city, and everything you found out
|
||||
about it, including the actual flight costs, weather
|
||||
forecast and attractions.
|
||||
|
||||
Traveling from: {origin}
|
||||
City Options: {cities}
|
||||
Trip Date: {range}
|
||||
Traveler Interests: {interests}
|
||||
"""
|
||||
),
|
||||
agent=agent,
|
||||
expected_output="Detailed report on the chosen city including flight costs, weather forecast, and attractions",
|
||||
)
|
||||
|
||||
def gather_task(self, agent, origin, interests, range):
|
||||
return Task(
|
||||
description=dedent(
|
||||
f"""
|
||||
As a local expert on this city you must compile an
|
||||
in-depth guide for someone traveling there and wanting
|
||||
to have THE BEST trip ever!
|
||||
Gather information about key attractions, local customs,
|
||||
special events, and daily activity recommendations.
|
||||
Find the best spots to go to, the kind of place only a
|
||||
local would know.
|
||||
This guide should provide a thorough overview of what
|
||||
the city has to offer, including hidden gems, cultural
|
||||
hotspots, must-visit landmarks, weather forecasts, and
|
||||
high level costs.
|
||||
The final answer must be a comprehensive city guide,
|
||||
rich in cultural insights and practical tips,
|
||||
tailored to enhance the travel experience.
|
||||
|
||||
Trip Date: {range}
|
||||
Traveling from: {origin}
|
||||
Traveler Interests: {interests}
|
||||
"""
|
||||
),
|
||||
agent=agent,
|
||||
expected_output="Comprehensive city guide including hidden gems, cultural hotspots, and practical travel tips",
|
||||
)
|
||||
|
||||
|
||||
class TripCrew:
|
||||
def __init__(self, origin, cities, date_range, interests):
|
||||
self.cities = cities
|
||||
self.origin = origin
|
||||
self.interests = interests
|
||||
self.date_range = date_range
|
||||
|
||||
def run(self):
|
||||
agents = TripAgents()
|
||||
tasks = TripTasks()
|
||||
|
||||
city_selector_agent = agents.city_selection_agent()
|
||||
local_expert_agent = agents.local_expert()
|
||||
|
||||
identify_task = tasks.identify_task(
|
||||
city_selector_agent,
|
||||
self.origin,
|
||||
self.cities,
|
||||
self.interests,
|
||||
self.date_range,
|
||||
)
|
||||
gather_task = tasks.gather_task(
|
||||
local_expert_agent, self.origin, self.interests, self.date_range
|
||||
)
|
||||
|
||||
crew = Crew(
|
||||
agents=[city_selector_agent, local_expert_agent],
|
||||
tasks=[identify_task, gather_task],
|
||||
verbose=True,
|
||||
memory=True,
|
||||
knowledge={
|
||||
"sources": [string_source],
|
||||
"metadata": {"preference": "personal"},
|
||||
},
|
||||
)
|
||||
|
||||
result = crew.kickoff()
|
||||
return result
|
||||
|
||||
|
||||
trip_crew = TripCrew("California", "Tokyo", "Dec 12 - Dec 20", "sports")
|
||||
result = trip_crew.run()
|
||||
|
||||
print(result)
|
||||
```
|
||||
Refer to [MLflow Tracing Documentation](https://mlflow.org/docs/latest/llms/tracing/index.html) for more configurations and use cases.
|
||||
</Step>
|
||||
<Step title="Visualize Activities of Agents">
|
||||
Now traces for your crewAI agents are captured by MLflow.
|
||||
Let's visit MLflow tracking server to view the traces and get insights into your Agents.
|
||||
|
||||
Open `127.0.0.1:5000` on your browser to visit MLflow tracking server.
|
||||
<Frame caption="MLflow Tracing Dashboard">
|
||||
<img src="/images/mlflow1.png" alt="MLflow tracing example with crewai" />
|
||||
</Frame>
|
||||
</Step>
|
||||
</Steps>
|
||||
|
||||
@@ -1,140 +0,0 @@
|
||||
---
|
||||
title: Using Multimodal Agents
|
||||
description: Learn how to enable and use multimodal capabilities in your agents for processing images and other non-text content within the CrewAI framework.
|
||||
icon: video
|
||||
---
|
||||
|
||||
## Using Multimodal Agents
|
||||
|
||||
CrewAI supports multimodal agents that can process both text and non-text content like images. This guide will show you how to enable and use multimodal capabilities in your agents.
|
||||
|
||||
### Enabling Multimodal Capabilities
|
||||
|
||||
To create a multimodal agent, simply set the `multimodal` parameter to `True` when initializing your agent:
|
||||
|
||||
```python
|
||||
from crewai import Agent
|
||||
|
||||
agent = Agent(
|
||||
role="Image Analyst",
|
||||
goal="Analyze and extract insights from images",
|
||||
backstory="An expert in visual content interpretation with years of experience in image analysis",
|
||||
multimodal=True # This enables multimodal capabilities
|
||||
)
|
||||
```
|
||||
|
||||
When you set `multimodal=True`, the agent is automatically configured with the necessary tools for handling non-text content, including the `AddImageTool`.
|
||||
|
||||
### Working with Images
|
||||
|
||||
The multimodal agent comes pre-configured with the `AddImageTool`, which allows it to process images. You don't need to manually add this tool - it's automatically included when you enable multimodal capabilities.
|
||||
|
||||
Here's a complete example showing how to use a multimodal agent to analyze an image:
|
||||
|
||||
```python
|
||||
from crewai import Agent, Task, Crew
|
||||
|
||||
# Create a multimodal agent
|
||||
image_analyst = Agent(
|
||||
role="Product Analyst",
|
||||
goal="Analyze product images and provide detailed descriptions",
|
||||
backstory="Expert in visual product analysis with deep knowledge of design and features",
|
||||
multimodal=True
|
||||
)
|
||||
|
||||
# Create a task for image analysis
|
||||
task = Task(
|
||||
description="Analyze the product image at https://example.com/product.jpg and provide a detailed description",
|
||||
expected_output="A detailed description of the product image",
|
||||
agent=image_analyst
|
||||
)
|
||||
|
||||
# Create and run the crew
|
||||
crew = Crew(
|
||||
agents=[image_analyst],
|
||||
tasks=[task]
|
||||
)
|
||||
|
||||
result = crew.kickoff()
|
||||
```
|
||||
|
||||
### Advanced Usage with Context
|
||||
|
||||
You can provide additional context or specific questions about the image when creating tasks for multimodal agents. The task description can include specific aspects you want the agent to focus on:
|
||||
|
||||
```python
|
||||
from crewai import Agent, Task, Crew
|
||||
|
||||
# Create a multimodal agent for detailed analysis
|
||||
expert_analyst = Agent(
|
||||
role="Visual Quality Inspector",
|
||||
goal="Perform detailed quality analysis of product images",
|
||||
backstory="Senior quality control expert with expertise in visual inspection",
|
||||
multimodal=True # AddImageTool is automatically included
|
||||
)
|
||||
|
||||
# Create a task with specific analysis requirements
|
||||
inspection_task = Task(
|
||||
description="""
|
||||
Analyze the product image at https://example.com/product.jpg with focus on:
|
||||
1. Quality of materials
|
||||
2. Manufacturing defects
|
||||
3. Compliance with standards
|
||||
Provide a detailed report highlighting any issues found.
|
||||
""",
|
||||
expected_output="A detailed report highlighting any issues found",
|
||||
agent=expert_analyst
|
||||
)
|
||||
|
||||
# Create and run the crew
|
||||
crew = Crew(
|
||||
agents=[expert_analyst],
|
||||
tasks=[inspection_task]
|
||||
)
|
||||
|
||||
result = crew.kickoff()
|
||||
```
|
||||
|
||||
### Tool Details
|
||||
|
||||
When working with multimodal agents, the `AddImageTool` is automatically configured with the following schema:
|
||||
|
||||
```python
|
||||
class AddImageToolSchema:
|
||||
image_url: str # Required: The URL or path of the image to process
|
||||
action: Optional[str] = None # Optional: Additional context or specific questions about the image
|
||||
```
|
||||
|
||||
The multimodal agent will automatically handle the image processing through its built-in tools, allowing it to:
|
||||
- Access images via URLs or local file paths
|
||||
- Process image content with optional context or specific questions
|
||||
- Provide analysis and insights based on the visual information and task requirements
|
||||
|
||||
### Best Practices
|
||||
|
||||
When working with multimodal agents, keep these best practices in mind:
|
||||
|
||||
1. **Image Access**
|
||||
- Ensure your images are accessible via URLs that the agent can reach
|
||||
- For local images, consider hosting them temporarily or using absolute file paths
|
||||
- Verify that image URLs are valid and accessible before running tasks
|
||||
|
||||
2. **Task Description**
|
||||
- Be specific about what aspects of the image you want the agent to analyze
|
||||
- Include clear questions or requirements in the task description
|
||||
- Consider using the optional `action` parameter for focused analysis
|
||||
|
||||
3. **Resource Management**
|
||||
- Image processing may require more computational resources than text-only tasks
|
||||
- Some language models may require base64 encoding for image data
|
||||
- Consider batch processing for multiple images to optimize performance
|
||||
|
||||
4. **Environment Setup**
|
||||
- Verify that your environment has the necessary dependencies for image processing
|
||||
- Ensure your language model supports multimodal capabilities
|
||||
- Test with small images first to validate your setup
|
||||
|
||||
5. **Error Handling**
|
||||
- Implement proper error handling for image loading failures
|
||||
- Have fallback strategies for when image processing fails
|
||||
- Monitor and log image processing operations for debugging
|
||||
@@ -1,181 +0,0 @@
|
||||
---
|
||||
title: Agent Monitoring with OpenLIT
|
||||
description: Quickly start monitoring your Agents in just a single line of code with OpenTelemetry.
|
||||
icon: magnifying-glass-chart
|
||||
---
|
||||
|
||||
# OpenLIT Overview
|
||||
|
||||
[OpenLIT](https://github.com/openlit/openlit?src=crewai-docs) is an open-source tool that makes it simple to monitor the performance of AI agents, LLMs, VectorDBs, and GPUs with just **one** line of code.
|
||||
|
||||
It provides OpenTelemetry-native tracing and metrics to track important parameters like cost, latency, interactions and task sequences.
|
||||
This setup enables you to track hyperparameters and monitor for performance issues, helping you find ways to enhance and fine-tune your agents over time.
|
||||
|
||||
<Frame caption="OpenLIT Dashboard">
|
||||
<img src="/images/openlit1.png" alt="Overview Agent usage including cost and tokens" />
|
||||
<img src="/images/openlit2.png" alt="Overview of agent otel traces and metrics" />
|
||||
<img src="/images/openlit3.png" alt="Overview of agent traces in details" />
|
||||
</Frame>
|
||||
|
||||
### Features
|
||||
|
||||
- **Analytics Dashboard**: Monitor your Agents health and performance with detailed dashboards that track metrics, costs, and user interactions.
|
||||
- **OpenTelemetry-native Observability SDK**: Vendor-neutral SDKs to send traces and metrics to your existing observability tools like Grafana, DataDog and more.
|
||||
- **Cost Tracking for Custom and Fine-Tuned Models**: Tailor cost estimations for specific models using custom pricing files for precise budgeting.
|
||||
- **Exceptions Monitoring Dashboard**: Quickly spot and resolve issues by tracking common exceptions and errors with a monitoring dashboard.
|
||||
- **Compliance and Security**: Detect potential threats such as profanity and PII leaks.
|
||||
- **Prompt Injection Detection**: Identify potential code injection and secret leaks.
|
||||
- **API Keys and Secrets Management**: Securely handle your LLM API keys and secrets centrally, avoiding insecure practices.
|
||||
- **Prompt Management**: Manage and version Agent prompts using PromptHub for consistent and easy access across Agents.
|
||||
- **Model Playground** Test and compare different models for your CrewAI agents before deployment.
|
||||
|
||||
## Setup Instructions
|
||||
|
||||
<Steps>
|
||||
<Step title="Deploy OpenLIT">
|
||||
<Steps>
|
||||
<Step title="Git Clone OpenLIT Repository">
|
||||
```shell
|
||||
git clone git@github.com:openlit/openlit.git
|
||||
```
|
||||
</Step>
|
||||
<Step title="Start Docker Compose">
|
||||
From the root directory of the [OpenLIT Repo](https://github.com/openlit/openlit), Run the below command:
|
||||
```shell
|
||||
docker compose up -d
|
||||
```
|
||||
</Step>
|
||||
</Steps>
|
||||
</Step>
|
||||
<Step title="Install OpenLIT SDK">
|
||||
```shell
|
||||
pip install openlit
|
||||
```
|
||||
</Step>
|
||||
<Step title="Initialize OpenLIT in Your Application">
|
||||
Add the following two lines to your application code:
|
||||
<Tabs>
|
||||
<Tab title="Setup using function arguments">
|
||||
```python
|
||||
import openlit
|
||||
openlit.init(otlp_endpoint="http://127.0.0.1:4318")
|
||||
```
|
||||
|
||||
Example Usage for monitoring a CrewAI Agent:
|
||||
|
||||
```python
|
||||
from crewai import Agent, Task, Crew, Process
|
||||
import openlit
|
||||
|
||||
openlit.init(disable_metrics=True)
|
||||
# Define your agents
|
||||
researcher = Agent(
|
||||
role="Researcher",
|
||||
goal="Conduct thorough research and analysis on AI and AI agents",
|
||||
backstory="You're an expert researcher, specialized in technology, software engineering, AI, and startups. You work as a freelancer and are currently researching for a new client.",
|
||||
allow_delegation=False,
|
||||
llm='command-r'
|
||||
)
|
||||
|
||||
|
||||
# Define your task
|
||||
task = Task(
|
||||
description="Generate a list of 5 interesting ideas for an article, then write one captivating paragraph for each idea that showcases the potential of a full article on this topic. Return the list of ideas with their paragraphs and your notes.",
|
||||
expected_output="5 bullet points, each with a paragraph and accompanying notes.",
|
||||
)
|
||||
|
||||
# Define the manager agent
|
||||
manager = Agent(
|
||||
role="Project Manager",
|
||||
goal="Efficiently manage the crew and ensure high-quality task completion",
|
||||
backstory="You're an experienced project manager, skilled in overseeing complex projects and guiding teams to success. Your role is to coordinate the efforts of the crew members, ensuring that each task is completed on time and to the highest standard.",
|
||||
allow_delegation=True,
|
||||
llm='command-r'
|
||||
)
|
||||
|
||||
# Instantiate your crew with a custom manager
|
||||
crew = Crew(
|
||||
agents=[researcher],
|
||||
tasks=[task],
|
||||
manager_agent=manager,
|
||||
process=Process.hierarchical,
|
||||
)
|
||||
|
||||
# Start the crew's work
|
||||
result = crew.kickoff()
|
||||
|
||||
print(result)
|
||||
```
|
||||
</Tab>
|
||||
<Tab title="Setup using Environment Variables">
|
||||
|
||||
Add the following two lines to your application code:
|
||||
```python
|
||||
import openlit
|
||||
|
||||
openlit.init()
|
||||
```
|
||||
|
||||
Run the following command to configure the OTEL export endpoint:
|
||||
```shell
|
||||
export OTEL_EXPORTER_OTLP_ENDPOINT = "http://127.0.0.1:4318"
|
||||
```
|
||||
|
||||
Example Usage for monitoring a CrewAI Async Agent:
|
||||
|
||||
```python
|
||||
import asyncio
|
||||
from crewai import Crew, Agent, Task
|
||||
import openlit
|
||||
|
||||
openlit.init(otlp_endpoint="http://127.0.0.1:4318")
|
||||
|
||||
# Create an agent with code execution enabled
|
||||
coding_agent = Agent(
|
||||
role="Python Data Analyst",
|
||||
goal="Analyze data and provide insights using Python",
|
||||
backstory="You are an experienced data analyst with strong Python skills.",
|
||||
allow_code_execution=True,
|
||||
llm="command-r"
|
||||
)
|
||||
|
||||
# Create a task that requires code execution
|
||||
data_analysis_task = Task(
|
||||
description="Analyze the given dataset and calculate the average age of participants. Ages: {ages}",
|
||||
agent=coding_agent,
|
||||
expected_output="5 bullet points, each with a paragraph and accompanying notes.",
|
||||
)
|
||||
|
||||
# Create a crew and add the task
|
||||
analysis_crew = Crew(
|
||||
agents=[coding_agent],
|
||||
tasks=[data_analysis_task]
|
||||
)
|
||||
|
||||
# Async function to kickoff the crew asynchronously
|
||||
async def async_crew_execution():
|
||||
result = await analysis_crew.kickoff_async(inputs={"ages": [25, 30, 35, 40, 45]})
|
||||
print("Crew Result:", result)
|
||||
|
||||
# Run the async function
|
||||
asyncio.run(async_crew_execution())
|
||||
```
|
||||
</Tab>
|
||||
</Tabs>
|
||||
Refer to OpenLIT [Python SDK repository](https://github.com/openlit/openlit/tree/main/sdk/python) for more advanced configurations and use cases.
|
||||
</Step>
|
||||
<Step title="Visualize and Analyze">
|
||||
With the Agent Observability data now being collected and sent to OpenLIT, the next step is to visualize and analyze this data to get insights into your Agent's performance, behavior, and identify areas of improvement.
|
||||
|
||||
Just head over to OpenLIT at `127.0.0.1:3000` on your browser to start exploring. You can login using the default credentials
|
||||
- **Email**: `user@openlit.io`
|
||||
- **Password**: `openlituser`
|
||||
|
||||
<Frame caption="OpenLIT Dashboard">
|
||||
<img src="/images/openlit1.png" alt="Overview Agent usage including cost and tokens" />
|
||||
<img src="/images/openlit2.png" alt="Overview of agent otel traces and metrics" />
|
||||
</Frame>
|
||||
|
||||
</Step>
|
||||
</Steps>
|
||||
|
||||
@@ -1,202 +0,0 @@
|
||||
---
|
||||
title: Agent Monitoring with Portkey
|
||||
description: How to use Portkey with CrewAI
|
||||
icon: key
|
||||
---
|
||||
|
||||
<img src="https://raw.githubusercontent.com/siddharthsambharia-portkey/Portkey-Product-Images/main/Portkey-CrewAI.png" alt="Portkey CrewAI Header Image" width="70%" />
|
||||
|
||||
|
||||
[Portkey](https://portkey.ai/?utm_source=crewai&utm_medium=crewai&utm_campaign=crewai) is a 2-line upgrade to make your CrewAI agents reliable, cost-efficient, and fast.
|
||||
|
||||
Portkey adds 4 core production capabilities to any CrewAI agent:
|
||||
1. Routing to **200+ LLMs**
|
||||
2. Making each LLM call more robust
|
||||
3. Full-stack tracing & cost, performance analytics
|
||||
4. Real-time guardrails to enforce behavior
|
||||
|
||||
## Getting Started
|
||||
|
||||
<Steps>
|
||||
<Step title="Install CrewAI and Portkey">
|
||||
```bash
|
||||
pip install -qU crewai portkey-ai
|
||||
```
|
||||
</Step>
|
||||
<Step title="Configure the LLM Client">
|
||||
To build CrewAI Agents with Portkey, you'll need two keys:
|
||||
- **Portkey API Key**: Sign up on the [Portkey app](https://app.portkey.ai/?utm_source=crewai&utm_medium=crewai&utm_campaign=crewai) and copy your API key
|
||||
- **Virtual Key**: Virtual Keys securely manage your LLM API keys in one place. Store your LLM provider API keys securely in Portkey's vault
|
||||
|
||||
```python
|
||||
from crewai import LLM
|
||||
from portkey_ai import createHeaders, PORTKEY_GATEWAY_URL
|
||||
|
||||
gpt_llm = LLM(
|
||||
model="gpt-4",
|
||||
base_url=PORTKEY_GATEWAY_URL,
|
||||
api_key="dummy", # We are using Virtual key
|
||||
extra_headers=createHeaders(
|
||||
api_key="YOUR_PORTKEY_API_KEY",
|
||||
virtual_key="YOUR_VIRTUAL_KEY", # Enter your Virtual key from Portkey
|
||||
)
|
||||
)
|
||||
```
|
||||
</Step>
|
||||
<Step title="Create and Run Your First Agent">
|
||||
```python
|
||||
from crewai import Agent, Task, Crew
|
||||
|
||||
# Define your agents with roles and goals
|
||||
coder = Agent(
|
||||
role='Software developer',
|
||||
goal='Write clear, concise code on demand',
|
||||
backstory='An expert coder with a keen eye for software trends.',
|
||||
llm=gpt_llm
|
||||
)
|
||||
|
||||
# Create tasks for your agents
|
||||
task1 = Task(
|
||||
description="Define the HTML for making a simple website with heading- Hello World! Portkey is working!",
|
||||
expected_output="A clear and concise HTML code",
|
||||
agent=coder
|
||||
)
|
||||
|
||||
# Instantiate your crew
|
||||
crew = Crew(
|
||||
agents=[coder],
|
||||
tasks=[task1],
|
||||
)
|
||||
|
||||
result = crew.kickoff()
|
||||
print(result)
|
||||
```
|
||||
</Step>
|
||||
</Steps>
|
||||
|
||||
## Key Features
|
||||
|
||||
| Feature | Description |
|
||||
|:--------|:------------|
|
||||
| 🌐 Multi-LLM Support | Access OpenAI, Anthropic, Gemini, Azure, and 250+ providers through a unified interface |
|
||||
| 🛡️ Production Reliability | Implement retries, timeouts, load balancing, and fallbacks |
|
||||
| 📊 Advanced Observability | Track 40+ metrics including costs, tokens, latency, and custom metadata |
|
||||
| 🔍 Comprehensive Logging | Debug with detailed execution traces and function call logs |
|
||||
| 🚧 Security Controls | Set budget limits and implement role-based access control |
|
||||
| 🔄 Performance Analytics | Capture and analyze feedback for continuous improvement |
|
||||
| 💾 Intelligent Caching | Reduce costs and latency with semantic or simple caching |
|
||||
|
||||
|
||||
## Production Features with Portkey Configs
|
||||
|
||||
All features mentioned below are through Portkey's Config system. Portkey's Config system allows you to define routing strategies using simple JSON objects in your LLM API calls. You can create and manage Configs directly in your code or through the Portkey Dashboard. Each Config has a unique ID for easy reference.
|
||||
|
||||
<Frame>
|
||||
<img src="https://raw.githubusercontent.com/Portkey-AI/docs-core/refs/heads/main/images/libraries/libraries-3.avif"/>
|
||||
</Frame>
|
||||
|
||||
|
||||
### 1. Use 250+ LLMs
|
||||
Access various LLMs like Anthropic, Gemini, Mistral, Azure OpenAI, and more with minimal code changes. Switch between providers or use them together seamlessly. [Learn more about Universal API](https://portkey.ai/docs/product/ai-gateway/universal-api)
|
||||
|
||||
|
||||
Easily switch between different LLM providers:
|
||||
|
||||
```python
|
||||
# Anthropic Configuration
|
||||
anthropic_llm = LLM(
|
||||
model="claude-3-5-sonnet-latest",
|
||||
base_url=PORTKEY_GATEWAY_URL,
|
||||
api_key="dummy",
|
||||
extra_headers=createHeaders(
|
||||
api_key="YOUR_PORTKEY_API_KEY",
|
||||
virtual_key="YOUR_ANTHROPIC_VIRTUAL_KEY", #You don't need provider when using Virtual keys
|
||||
trace_id="anthropic_agent"
|
||||
)
|
||||
)
|
||||
|
||||
# Azure OpenAI Configuration
|
||||
azure_llm = LLM(
|
||||
model="gpt-4",
|
||||
base_url=PORTKEY_GATEWAY_URL,
|
||||
api_key="dummy",
|
||||
extra_headers=createHeaders(
|
||||
api_key="YOUR_PORTKEY_API_KEY",
|
||||
virtual_key="YOUR_AZURE_VIRTUAL_KEY", #You don't need provider when using Virtual keys
|
||||
trace_id="azure_agent"
|
||||
)
|
||||
)
|
||||
```
|
||||
|
||||
|
||||
### 2. Caching
|
||||
Improve response times and reduce costs with two powerful caching modes:
|
||||
- **Simple Cache**: Perfect for exact matches
|
||||
- **Semantic Cache**: Matches responses for requests that are semantically similar
|
||||
[Learn more about Caching](https://portkey.ai/docs/product/ai-gateway/cache-simple-and-semantic)
|
||||
|
||||
```py
|
||||
config = {
|
||||
"cache": {
|
||||
"mode": "semantic", # or "simple" for exact matching
|
||||
}
|
||||
}
|
||||
```
|
||||
|
||||
### 3. Production Reliability
|
||||
Portkey provides comprehensive reliability features:
|
||||
- **Automatic Retries**: Handle temporary failures gracefully
|
||||
- **Request Timeouts**: Prevent hanging operations
|
||||
- **Conditional Routing**: Route requests based on specific conditions
|
||||
- **Fallbacks**: Set up automatic provider failovers
|
||||
- **Load Balancing**: Distribute requests efficiently
|
||||
|
||||
[Learn more about Reliability Features](https://portkey.ai/docs/product/ai-gateway/)
|
||||
|
||||
|
||||
|
||||
### 4. Metrics
|
||||
|
||||
Agent runs are complex. Portkey automatically logs **40+ comprehensive metrics** for your AI agents, including cost, tokens used, latency, etc. Whether you need a broad overview or granular insights into your agent runs, Portkey's customizable filters provide the metrics you need.
|
||||
|
||||
|
||||
- Cost per agent interaction
|
||||
- Response times and latency
|
||||
- Token usage and efficiency
|
||||
- Success/failure rates
|
||||
- Cache hit rates
|
||||
|
||||
<img src="https://github.com/siddharthsambharia-portkey/Portkey-Product-Images/blob/main/Portkey-Dashboard.png?raw=true" width="70%" alt="Portkey Dashboard" />
|
||||
|
||||
### 5. Detailed Logging
|
||||
Logs are essential for understanding agent behavior, diagnosing issues, and improving performance. They provide a detailed record of agent activities and tool use, which is crucial for debugging and optimizing processes.
|
||||
|
||||
|
||||
Access a dedicated section to view records of agent executions, including parameters, outcomes, function calls, and errors. Filter logs based on multiple parameters such as trace ID, model, tokens used, and metadata.
|
||||
|
||||
<details>
|
||||
<summary><b>Traces</b></summary>
|
||||
<img src="https://raw.githubusercontent.com/siddharthsambharia-portkey/Portkey-Product-Images/main/Portkey-Traces.png" alt="Portkey Traces" width="70%" />
|
||||
</details>
|
||||
|
||||
<details>
|
||||
<summary><b>Logs</b></summary>
|
||||
<img src="https://raw.githubusercontent.com/siddharthsambharia-portkey/Portkey-Product-Images/main/Portkey-Logs.png" alt="Portkey Logs" width="70%" />
|
||||
</details>
|
||||
|
||||
### 6. Enterprise Security Features
|
||||
- Set budget limit and rate limts per Virtual Key (disposable API keys)
|
||||
- Implement role-based access control
|
||||
- Track system changes with audit logs
|
||||
- Configure data retention policies
|
||||
|
||||
|
||||
|
||||
For detailed information on creating and managing Configs, visit the [Portkey documentation](https://docs.portkey.ai/product/ai-gateway/configs).
|
||||
|
||||
## Resources
|
||||
|
||||
- [📘 Portkey Documentation](https://docs.portkey.ai)
|
||||
- [📊 Portkey Dashboard](https://app.portkey.ai/?utm_source=crewai&utm_medium=crewai&utm_campaign=crewai)
|
||||
- [🐦 Twitter](https://twitter.com/portkeyai)
|
||||
- [💬 Discord Community](https://discord.gg/DD7vgKK299)
|
||||
Binary file not shown.
|
Before Width: | Height: | Size: 16 MiB |
Binary file not shown.
|
Before Width: | Height: | Size: 382 KiB |
Binary file not shown.
|
Before Width: | Height: | Size: 390 KiB |
Binary file not shown.
|
Before Width: | Height: | Size: 422 KiB |
Binary file not shown.
|
Before Width: | Height: | Size: 799 KiB |
@@ -1,156 +1,128 @@
|
||||
---
|
||||
title: Installation
|
||||
description: Get started with CrewAI - Install, configure, and build your first AI crew
|
||||
description:
|
||||
icon: wrench
|
||||
---
|
||||
|
||||
<Note>
|
||||
**Python Version Requirements**
|
||||
|
||||
CrewAI requires `Python >=3.10 and <3.13`. Here's how to check your version:
|
||||
```bash
|
||||
python3 --version
|
||||
```
|
||||
|
||||
If you need to update Python, visit [python.org/downloads](https://python.org/downloads)
|
||||
</Note>
|
||||
This guide will walk you through the installation process for CrewAI and its dependencies.
|
||||
CrewAI is a flexible and powerful AI framework that enables you to create and manage AI agents, tools, and tasks efficiently.
|
||||
Let's get started! 🚀
|
||||
|
||||
CrewAI uses the `uv` as its dependency management and package handling tool. It simplifies project setup and execution, offering a seamless experience.
|
||||
|
||||
If you haven't installed `uv` yet, follow **step 1** to quickly get it set up on your system, else you can skip to **step 2**.
|
||||
<Tip>
|
||||
Make sure you have `Python >=3.10 <=3.13` installed on your system before you proceed.
|
||||
</Tip>
|
||||
|
||||
<Steps>
|
||||
<Step title="Install uv">
|
||||
- **On macOS/Linux:**
|
||||
|
||||
Use `curl` to download the script and execute it with `sh`:
|
||||
|
||||
```shell
|
||||
curl -LsSf https://astral.sh/uv/install.sh | sh
|
||||
```
|
||||
If your system doesn't have `curl`, you can use `wget`:
|
||||
|
||||
```shell
|
||||
wget -qO- https://astral.sh/uv/install.sh | sh
|
||||
```
|
||||
|
||||
- **On Windows:**
|
||||
|
||||
Use `irm` to download the script and `iex` to execute it:
|
||||
|
||||
```shell
|
||||
powershell -ExecutionPolicy ByPass -c "irm https://astral.sh/uv/install.ps1 | iex"
|
||||
```
|
||||
If you run into any issues, refer to [UV's installation guide](https://docs.astral.sh/uv/getting-started/installation/) for more information.
|
||||
<Step title="Install CrewAI">
|
||||
Install the main CrewAI package with the following command:
|
||||
<CodeGroup>
|
||||
```shell Terminal
|
||||
pip install crewai
|
||||
```
|
||||
</CodeGroup>
|
||||
You can also install the main CrewAI package and the tools package that include a series of helpful tools for your agents:
|
||||
<CodeGroup>
|
||||
```shell Terminal
|
||||
pip install 'crewai[tools]'
|
||||
```
|
||||
</CodeGroup>
|
||||
Alternatively, you can also use:
|
||||
<CodeGroup>
|
||||
```shell Terminal
|
||||
pip install crewai crewai-tools
|
||||
```
|
||||
</CodeGroup>
|
||||
</Step>
|
||||
<Step title="Upgrade CrewAI">
|
||||
To upgrade CrewAI and CrewAI Tools to the latest version, run the following command
|
||||
<CodeGroup>
|
||||
```shell Terminal
|
||||
pip install --upgrade crewai crewai-tools
|
||||
```
|
||||
</CodeGroup>
|
||||
<Note>
|
||||
1. If you're using an older version of CrewAI, you may receive a warning about using `Poetry` for dependency management.
|
||||

|
||||
|
||||
<Step title="Install CrewAI 🚀">
|
||||
- Run the following command to install `crewai` CLI:
|
||||
```shell
|
||||
uv tool install crewai
|
||||
2. In this case, you'll need to run the command below to update your project.
|
||||
This command will migrate your project to use [UV](https://github.com/astral-sh/uv) and update the necessary files.
|
||||
```shell Terminal
|
||||
crewai update
|
||||
```
|
||||
<Warning>
|
||||
If you encounter a `PATH` warning, run this command to update your shell:
|
||||
```shell
|
||||
uv tool update-shell
|
||||
```
|
||||
</Warning>
|
||||
3. After running the command above, you should see the following output:
|
||||

|
||||
|
||||
- To verify that `crewai` is installed, run:
|
||||
```shell
|
||||
uv tools list
|
||||
```
|
||||
- You should see something like:
|
||||
```markdown
|
||||
crewai v0.102.0
|
||||
- crewai
|
||||
```
|
||||
<Check>Installation successful! You're ready to create your first crew! 🎉</Check>
|
||||
4. You're all set! You can now proceed to the next step! 🎉
|
||||
</Note>
|
||||
</Step>
|
||||
<Step title="Verify the installation">
|
||||
To verify that `crewai` and `crewai-tools` are installed correctly, run the following command
|
||||
<CodeGroup>
|
||||
```shell Terminal
|
||||
pip freeze | grep crewai
|
||||
```
|
||||
</CodeGroup>
|
||||
You should see the version number of `crewai` and `crewai-tools`.
|
||||
<CodeGroup>
|
||||
```markdown Version
|
||||
crewai==X.X.X
|
||||
crewai-tools==X.X.X
|
||||
```
|
||||
</CodeGroup>
|
||||
If you see the version number, then the installation was successful! 🎉
|
||||
</Step>
|
||||
</Steps>
|
||||
|
||||
# Creating a CrewAI Project
|
||||
## Create a new CrewAI project
|
||||
|
||||
We recommend using the `YAML` template scaffolding for a structured approach to defining agents and tasks. Here's how to get started:
|
||||
The next step is to create a new CrewAI project.
|
||||
We recommend using the YAML Template scaffolding to get started as it provides a structured approach to defining agents and tasks.
|
||||
|
||||
<Steps>
|
||||
<Step title="Generate Project Scaffolding">
|
||||
- Run the `crewai` CLI command:
|
||||
```shell
|
||||
crewai create crew <your_project_name>
|
||||
<Step title="Create a new CrewAI project using the YAML Template Configuration">
|
||||
To create a new CrewAI project, run the following CLI (Command Line Interface) command:
|
||||
<CodeGroup>
|
||||
```shell Terminal
|
||||
crewai create crew <project_name>
|
||||
```
|
||||
</CodeGroup>
|
||||
This command creates a new project folder with the following structure:
|
||||
| File/Directory | Description |
|
||||
|:------------------------|:-------------------------------------------------|
|
||||
| `my_project/` | Root directory of the project |
|
||||
| ├── `.gitignore` | Specifies files and directories to ignore in Git |
|
||||
| ├── `pyproject.toml` | Project configuration and dependencies |
|
||||
| ├── `README.md` | Project documentation |
|
||||
| ├── `.env` | Environment variables |
|
||||
| └── `src/` | Source code directory |
|
||||
| └── `my_project/` | Main application package |
|
||||
| ├── `__init__.py` | Marks the directory as a Python package |
|
||||
| ├── `main.py` | Main application script |
|
||||
| ├── `crew.py` | Crew-related functionalities |
|
||||
| ├── `tools/` | Custom tools directory |
|
||||
| │ ├── `custom_tool.py` | Custom tool implementation |
|
||||
| │ └── `__init__.py` | Marks tools directory as a package |
|
||||
| └── `config/` | Configuration files directory |
|
||||
| ├── `agents.yaml` | Agent configurations |
|
||||
| └── `tasks.yaml` | Task configurations |
|
||||
|
||||
- This creates a new project with the following structure:
|
||||
<Frame>
|
||||
```
|
||||
my_project/
|
||||
├── .gitignore
|
||||
├── knowledge/
|
||||
├── pyproject.toml
|
||||
├── README.md
|
||||
├── .env
|
||||
└── src/
|
||||
└── my_project/
|
||||
├── __init__.py
|
||||
├── main.py
|
||||
├── crew.py
|
||||
├── tools/
|
||||
│ ├── custom_tool.py
|
||||
│ └── __init__.py
|
||||
└── config/
|
||||
├── agents.yaml
|
||||
└── tasks.yaml
|
||||
```
|
||||
</Frame>
|
||||
</Step>
|
||||
|
||||
<Step title="Customize Your Project">
|
||||
- Your project will contain these essential files:
|
||||
| File | Purpose |
|
||||
| --- | --- |
|
||||
| `agents.yaml` | Define your AI agents and their roles |
|
||||
| `tasks.yaml` | Set up agent tasks and workflows |
|
||||
| `.env` | Store API keys and environment variables |
|
||||
| `main.py` | Project entry point and execution flow |
|
||||
| `crew.py` | Crew orchestration and coordination |
|
||||
| `tools/` | Directory for custom agent tools |
|
||||
| `knowledge/` | Directory for knowledge base |
|
||||
|
||||
- Start by editing `agents.yaml` and `tasks.yaml` to define your crew's behavior.
|
||||
- Keep sensitive information like API keys in `.env`.
|
||||
</Step>
|
||||
|
||||
<Step title="Run your Crew">
|
||||
- Before you run your crew, make sure to run:
|
||||
```bash
|
||||
crewai install
|
||||
```
|
||||
- If you need to install additional packages, use:
|
||||
```shell
|
||||
uv add <package-name>
|
||||
```
|
||||
- To run your crew, execute the following command in the root of your project:
|
||||
```bash
|
||||
crewai run
|
||||
```
|
||||
You can now start developing your crew by editing the files in the `src/my_project` folder.
|
||||
The `main.py` file is the entry point of the project, the `crew.py` file is where you define your crew, the `agents.yaml` file is where you define your agents,
|
||||
and the `tasks.yaml` file is where you define your tasks.
|
||||
</Step>
|
||||
<Step title="Customize your project">
|
||||
To customize your project, you can:
|
||||
- Modify `src/my_project/config/agents.yaml` to define your agents.
|
||||
- Modify `src/my_project/config/tasks.yaml` to define your tasks.
|
||||
- Modify `src/my_project/crew.py` to add your own logic, tools, and specific arguments.
|
||||
- Modify `src/my_project/main.py` to add custom inputs for your agents and tasks.
|
||||
- Add your environment variables into the `.env` file.
|
||||
</Step>
|
||||
</Steps>
|
||||
|
||||
## Next Steps
|
||||
## Next steps
|
||||
|
||||
<CardGroup cols={2}>
|
||||
<Card
|
||||
title="Build Your First Agent"
|
||||
icon="code"
|
||||
href="/quickstart"
|
||||
>
|
||||
Follow our quickstart guide to create your first CrewAI agent and get hands-on experience.
|
||||
</Card>
|
||||
<Card
|
||||
title="Join the Community"
|
||||
icon="comments"
|
||||
href="https://community.crewai.com"
|
||||
>
|
||||
Connect with other developers, get help, and share your CrewAI experiences.
|
||||
</Card>
|
||||
</CardGroup>
|
||||
Now that you have installed `crewai` and `crewai-tools`, you're ready to spin up your first crew!
|
||||
|
||||
- 👨💻 Build your first agent with CrewAI by following the [Quickstart](/quickstart) guide.
|
||||
- 💬 Join the [Community](https://community.crewai.com) to get help and share your feedback.
|
||||
|
||||
@@ -1,85 +1,49 @@
|
||||
---
|
||||
title: Introduction
|
||||
description: Build AI agent teams that work together to tackle complex tasks
|
||||
description: Welcome to CrewAI docs!
|
||||
icon: handshake
|
||||
---
|
||||
|
||||
# What is CrewAI?
|
||||
|
||||
**CrewAI is a cutting-edge framework for orchestrating autonomous AI agents.**
|
||||
**CrewAI is a cutting-edge Python framework for orchestrating role-playing, autonomous AI agents.**
|
||||
|
||||
CrewAI enables you to create AI teams where each agent has specific roles, tools, and goals, working together to accomplish complex tasks.
|
||||
By fostering collaborative intelligence, CrewAI empowers agents to work together seamlessly, tackling complex tasks.
|
||||
|
||||
Think of it as assembling your dream team - each member (agent) brings unique skills and expertise, collaborating seamlessly to achieve your objectives.
|
||||
<Frame caption="CrewAI Mindmap">
|
||||
<img src="crewAI-mindmap.png" alt="CrewAI Mindmap" />
|
||||
</Frame>
|
||||
|
||||
## How CrewAI Works
|
||||
## Why CrewAI?
|
||||
- 🤼♀️ **Role-Playing Agents**: Agents can take on different roles and personas to better understand and interact with complex systems.
|
||||
- 🤖 **Autonomous Decision Making**: Agents can make decisions autonomously based on the given context and available tools.
|
||||
- 🤝 **Seamless Collaboration**: Agents can work together seamlessly, sharing information and resources to achieve common goals.
|
||||
- 🧠 **Complex Task Tackling**: CrewAI is designed to tackle complex tasks, such as multi-step workflows, decision making, and problem solving.
|
||||
|
||||
<Note>
|
||||
Just like a company has departments (Sales, Engineering, Marketing) working together under leadership to achieve business goals, CrewAI helps you create an organization of AI agents with specialized roles collaborating to accomplish complex tasks.
|
||||
</Note>
|
||||
|
||||
<Frame caption="CrewAI Framework Overview">
|
||||
<img src="crewAI-mindmap.png" alt="CrewAI Framework Overview" />
|
||||
</Frame>
|
||||
|
||||
| Component | Description | Key Features |
|
||||
|:----------|:-----------:|:------------|
|
||||
| **Crew** | The top-level organization | • Manages AI agent teams<br/>• Oversees workflows<br/>• Ensures collaboration<br/>• Delivers outcomes |
|
||||
| **AI Agents** | Specialized team members | • Have specific roles (researcher, writer)<br/>• Use designated tools<br/>• Can delegate tasks<br/>• Make autonomous decisions |
|
||||
| **Process** | Workflow management system | • Defines collaboration patterns<br/>• Controls task assignments<br/>• Manages interactions<br/>• Ensures efficient execution |
|
||||
| **Tasks** | Individual assignments | • Have clear objectives<br/>• Use specific tools<br/>• Feed into larger process<br/>• Produce actionable results |
|
||||
|
||||
### How It All Works Together
|
||||
|
||||
1. The **Crew** organizes the overall operation
|
||||
2. **AI Agents** work on their specialized tasks
|
||||
3. The **Process** ensures smooth collaboration
|
||||
4. **Tasks** get completed to achieve the goal
|
||||
|
||||
## Key Features
|
||||
# Get Started with CrewAI
|
||||
|
||||
<CardGroup cols={2}>
|
||||
<Card title="Role-Based Agents" icon="users">
|
||||
Create specialized agents with defined roles, expertise, and goals - from researchers to analysts to writers
|
||||
</Card>
|
||||
<Card title="Flexible Tools" icon="screwdriver-wrench">
|
||||
Equip agents with custom tools and APIs to interact with external services and data sources
|
||||
</Card>
|
||||
<Card title="Intelligent Collaboration" icon="people-arrows">
|
||||
Agents work together, sharing insights and coordinating tasks to achieve complex objectives
|
||||
</Card>
|
||||
<Card title="Task Management" icon="list-check">
|
||||
Define sequential or parallel workflows, with agents automatically handling task dependencies
|
||||
</Card>
|
||||
</CardGroup>
|
||||
|
||||
## Why Choose CrewAI?
|
||||
|
||||
- 🧠 **Autonomous Operation**: Agents make intelligent decisions based on their roles and available tools
|
||||
- 📝 **Natural Interaction**: Agents communicate and collaborate like human team members
|
||||
- 🛠️ **Extensible Design**: Easy to add new tools, roles, and capabilities
|
||||
- 🚀 **Production Ready**: Built for reliability and scalability in real-world applications
|
||||
|
||||
<CardGroup cols={3}>
|
||||
<Card
|
||||
title="Install CrewAI"
|
||||
icon="wrench"
|
||||
href="/installation"
|
||||
title="Quickstart"
|
||||
color="#F3A78B"
|
||||
href="quickstart"
|
||||
icon="terminal"
|
||||
iconType="solid"
|
||||
>
|
||||
Get started with CrewAI in your development environment.
|
||||
</Card>
|
||||
<Card
|
||||
title="Quick Start"
|
||||
icon="bolt"
|
||||
href="/quickstart"
|
||||
>
|
||||
Follow our quickstart guide to create your first CrewAI agent and get hands-on experience.
|
||||
Getting started with CrewAI
|
||||
</Card>
|
||||
<Card
|
||||
title="Join the Community"
|
||||
icon="comments"
|
||||
color="#F3A78B"
|
||||
href="https://community.crewai.com"
|
||||
>
|
||||
Connect with other developers, get help, and share your CrewAI experiences.
|
||||
</Card>
|
||||
</CardGroup>
|
||||
icon="comment-question"
|
||||
iconType="duotone"
|
||||
>
|
||||
Join the CrewAI community and get help with your project!
|
||||
</Card>
|
||||
</CardGroup>
|
||||
|
||||
## Next Step
|
||||
|
||||
- [Install CrewAI](/installation) to get started with your first agent.
|
||||
|
||||
|
||||
@@ -68,7 +68,6 @@
|
||||
"concepts/tasks",
|
||||
"concepts/crews",
|
||||
"concepts/flows",
|
||||
"concepts/knowledge",
|
||||
"concepts/llms",
|
||||
"concepts/processes",
|
||||
"concepts/collaboration",
|
||||
@@ -91,7 +90,6 @@
|
||||
"how-to/custom-manager-agent",
|
||||
"how-to/llm-connections",
|
||||
"how-to/customizing-agents",
|
||||
"how-to/multimodal-agents",
|
||||
"how-to/coding-agents",
|
||||
"how-to/force-tool-output-as-result",
|
||||
"how-to/human-input-on-execution",
|
||||
@@ -100,11 +98,7 @@
|
||||
"how-to/replay-tasks-from-latest-crew-kickoff",
|
||||
"how-to/conditional-tasks",
|
||||
"how-to/agentops-observability",
|
||||
"how-to/langtrace-observability",
|
||||
"how-to/mlflow-observability",
|
||||
"how-to/openlit-observability",
|
||||
"how-to/portkey-observability",
|
||||
"how-to/langfuse-observability"
|
||||
"how-to/langtrace-observability"
|
||||
]
|
||||
},
|
||||
{
|
||||
@@ -116,8 +110,6 @@
|
||||
{
|
||||
"group": "Tools",
|
||||
"pages": [
|
||||
"tools/aimindtool",
|
||||
"tools/bravesearchtool",
|
||||
"tools/browserbaseloadtool",
|
||||
"tools/codedocssearchtool",
|
||||
"tools/codeinterpretertool",
|
||||
@@ -134,32 +126,18 @@
|
||||
"tools/firecrawlscrapewebsitetool",
|
||||
"tools/firecrawlsearchtool",
|
||||
"tools/githubsearchtool",
|
||||
"tools/hyperbrowserloadtool",
|
||||
"tools/linkupsearchtool",
|
||||
"tools/llamaindextool",
|
||||
"tools/serperdevtool",
|
||||
"tools/s3readertool",
|
||||
"tools/s3writertool",
|
||||
"tools/scrapegraphscrapetool",
|
||||
"tools/scrapeelementfromwebsitetool",
|
||||
"tools/jsonsearchtool",
|
||||
"tools/mdxsearchtool",
|
||||
"tools/mysqltool",
|
||||
"tools/multiontool",
|
||||
"tools/nl2sqltool",
|
||||
"tools/patronustools",
|
||||
"tools/pdfsearchtool",
|
||||
"tools/pgsearchtool",
|
||||
"tools/qdrantvectorsearchtool",
|
||||
"tools/ragtool",
|
||||
"tools/scrapewebsitetool",
|
||||
"tools/scrapflyscrapetool",
|
||||
"tools/seleniumscrapingtool",
|
||||
"tools/snowflakesearchtool",
|
||||
"tools/spidertool",
|
||||
"tools/txtsearchtool",
|
||||
"tools/visiontool",
|
||||
"tools/weaviatevectorsearchtool",
|
||||
"tools/websitesearchtool",
|
||||
"tools/xmlsearchtool",
|
||||
"tools/youtubechannelsearchtool",
|
||||
|
||||
@@ -8,10 +8,10 @@ icon: rocket
|
||||
|
||||
Let's create a simple crew that will help us `research` and `report` on the `latest AI developments` for a given topic or subject.
|
||||
|
||||
Before we proceed, make sure you have finished installing CrewAI.
|
||||
Before we proceed, make sure you have `crewai` and `crewai-tools` installed.
|
||||
If you haven't installed them yet, you can do so by following the [installation guide](/installation).
|
||||
|
||||
Follow the steps below to get Crewing! 🚣♂️
|
||||
Follow the steps below to get crewing! 🚣♂️
|
||||
|
||||
<Steps>
|
||||
<Step title="Create your crew">
|
||||
@@ -23,14 +23,7 @@ Follow the steps below to get Crewing! 🚣♂️
|
||||
```
|
||||
</CodeGroup>
|
||||
</Step>
|
||||
<Step title="Navigate to your new crew project">
|
||||
<CodeGroup>
|
||||
```shell Terminal
|
||||
cd latest-ai-development
|
||||
```
|
||||
</CodeGroup>
|
||||
</Step>
|
||||
<Step title="Modify your `agents.yaml` file">
|
||||
<Step title="Modify your `agents.yaml` file">
|
||||
<Tip>
|
||||
You can also modify the agents as needed to fit your use case or copy and paste as is to your project.
|
||||
Any variable interpolated in your `agents.yaml` and `tasks.yaml` files like `{topic}` will be replaced by the value of the variable in the `main.py` file.
|
||||
@@ -46,7 +39,7 @@ Follow the steps below to get Crewing! 🚣♂️
|
||||
You're a seasoned researcher with a knack for uncovering the latest
|
||||
developments in {topic}. Known for your ability to find the most relevant
|
||||
information and present it in a clear and concise manner.
|
||||
|
||||
|
||||
reporting_analyst:
|
||||
role: >
|
||||
{topic} Reporting Analyst
|
||||
@@ -58,14 +51,14 @@ Follow the steps below to get Crewing! 🚣♂️
|
||||
it easy for others to understand and act on the information you provide.
|
||||
```
|
||||
</Step>
|
||||
<Step title="Modify your `tasks.yaml` file">
|
||||
<Step title="Modify your `tasks.yaml` file">
|
||||
```yaml tasks.yaml
|
||||
# src/latest_ai_development/config/tasks.yaml
|
||||
research_task:
|
||||
description: >
|
||||
Conduct a thorough research about {topic}
|
||||
Make sure you find any interesting and relevant information given
|
||||
the current year is 2025.
|
||||
the current year is 2024.
|
||||
expected_output: >
|
||||
A list with 10 bullet points of the most relevant information about {topic}
|
||||
agent: researcher
|
||||
@@ -80,8 +73,8 @@ Follow the steps below to get Crewing! 🚣♂️
|
||||
agent: reporting_analyst
|
||||
output_file: report.md
|
||||
```
|
||||
</Step>
|
||||
<Step title="Modify your `crew.py` file">
|
||||
</Step>
|
||||
<Step title="Modify your `crew.py` file">
|
||||
```python crew.py
|
||||
# src/latest_ai_development/crew.py
|
||||
from crewai import Agent, Crew, Process, Task
|
||||
@@ -128,34 +121,10 @@ Follow the steps below to get Crewing! 🚣♂️
|
||||
tasks=self.tasks, # Automatically created by the @task decorator
|
||||
process=Process.sequential,
|
||||
verbose=True,
|
||||
)
|
||||
)
|
||||
```
|
||||
</Step>
|
||||
<Step title="[Optional] Add before and after crew functions">
|
||||
```python crew.py
|
||||
# src/latest_ai_development/crew.py
|
||||
from crewai import Agent, Crew, Process, Task
|
||||
from crewai.project import CrewBase, agent, crew, task, before_kickoff, after_kickoff
|
||||
from crewai_tools import SerperDevTool
|
||||
|
||||
@CrewBase
|
||||
class LatestAiDevelopmentCrew():
|
||||
"""LatestAiDevelopment crew"""
|
||||
|
||||
@before_kickoff
|
||||
def before_kickoff_function(self, inputs):
|
||||
print(f"Before kickoff function with inputs: {inputs}")
|
||||
return inputs # You can return the inputs or modify them as needed
|
||||
|
||||
@after_kickoff
|
||||
def after_kickoff_function(self, result):
|
||||
print(f"After kickoff function with result: {result}")
|
||||
return result # You can return the result or modify it as needed
|
||||
|
||||
# ... remaining code
|
||||
```
|
||||
</Step>
|
||||
<Step title="Feel free to pass custom inputs to your crew">
|
||||
<Step title="Feel free to pass custom inputs to your crew">
|
||||
For example, you can pass the `topic` input to your crew to customize the research and reporting.
|
||||
```python main.py
|
||||
#!/usr/bin/env python
|
||||
@@ -179,26 +148,21 @@ Follow the steps below to get Crewing! 🚣♂️
|
||||
- A [Serper.dev](https://serper.dev/) API key: `SERPER_API_KEY=YOUR_KEY_HERE`
|
||||
</Step>
|
||||
<Step title="Lock and install the dependencies">
|
||||
- Lock the dependencies and install them by using the CLI command:
|
||||
<CodeGroup>
|
||||
```shell Terminal
|
||||
crewai install
|
||||
```
|
||||
</CodeGroup>
|
||||
- If you have additional packages that you want to install, you can do so by running:
|
||||
<CodeGroup>
|
||||
```shell Terminal
|
||||
uv add <package-name>
|
||||
```
|
||||
</CodeGroup>
|
||||
Lock the dependencies and install them by using the CLI command but first, navigate to your project directory:
|
||||
<CodeGroup>
|
||||
```shell Terminal
|
||||
cd latest-ai-development
|
||||
crewai install
|
||||
```
|
||||
</CodeGroup>
|
||||
</Step>
|
||||
<Step title="Run your crew">
|
||||
- To run your crew, execute the following command in the root of your project:
|
||||
<CodeGroup>
|
||||
```bash Terminal
|
||||
crewai run
|
||||
```
|
||||
</CodeGroup>
|
||||
To run your crew, execute the following command in the root of your project:
|
||||
<CodeGroup>
|
||||
```bash Terminal
|
||||
crewai run
|
||||
```
|
||||
</CodeGroup>
|
||||
</Step>
|
||||
<Step title="View your final report">
|
||||
You should see the output in the console and the `report.md` file should be created in the root of your project with the final report.
|
||||
@@ -207,10 +171,10 @@ Follow the steps below to get Crewing! 🚣♂️
|
||||
|
||||
<CodeGroup>
|
||||
```markdown output/report.md
|
||||
# Comprehensive Report on the Rise and Impact of AI Agents in 2025
|
||||
# Comprehensive Report on the Rise and Impact of AI Agents in 2024
|
||||
|
||||
## 1. Introduction to AI Agents
|
||||
In 2025, Artificial Intelligence (AI) agents are at the forefront of innovation across various industries. As intelligent systems that can perform tasks typically requiring human cognition, AI agents are paving the way for significant advancements in operational efficiency, decision-making, and overall productivity within sectors like Human Resources (HR) and Finance. This report aims to detail the rise of AI agents, their frameworks, applications, and potential implications on the workforce.
|
||||
In 2024, Artificial Intelligence (AI) agents are at the forefront of innovation across various industries. As intelligent systems that can perform tasks typically requiring human cognition, AI agents are paving the way for significant advancements in operational efficiency, decision-making, and overall productivity within sectors like Human Resources (HR) and Finance. This report aims to detail the rise of AI agents, their frameworks, applications, and potential implications on the workforce.
|
||||
|
||||
## 2. Benefits of AI Agents
|
||||
AI agents bring numerous advantages that are transforming traditional work environments. Key benefits include:
|
||||
@@ -264,29 +228,23 @@ Follow the steps below to get Crewing! 🚣♂️
|
||||
To stay competitive and harness the full potential of AI agents, organizations must remain vigilant about latest developments in AI technology and consider continuous learning and adaptation in their strategic planning.
|
||||
|
||||
## 8. Conclusion
|
||||
The emergence of AI agents is undeniably reshaping the workplace landscape in 5. With their ability to automate tasks, enhance efficiency, and improve decision-making, AI agents are critical in driving operational success. Organizations must embrace and adapt to AI developments to thrive in an increasingly digital business environment.
|
||||
The emergence of AI agents is undeniably reshaping the workplace landscape in 2024. With their ability to automate tasks, enhance efficiency, and improve decision-making, AI agents are critical in driving operational success. Organizations must embrace and adapt to AI developments to thrive in an increasingly digital business environment.
|
||||
```
|
||||
</CodeGroup>
|
||||
</Step>
|
||||
</Steps>
|
||||
|
||||
<Check>
|
||||
Congratulations!
|
||||
|
||||
You have successfully set up your crew project and are ready to start building your own agentic workflows!
|
||||
</Check>
|
||||
|
||||
### Note on Consistency in Naming
|
||||
|
||||
The names you use in your YAML files (`agents.yaml` and `tasks.yaml`) should match the method names in your Python code.
|
||||
For example, you can reference the agent for specific tasks from `tasks.yaml` file.
|
||||
For example, you can reference the agent for specific tasks from `tasks.yaml` file.
|
||||
This naming consistency allows CrewAI to automatically link your configurations with your code; otherwise, your task won't recognize the reference properly.
|
||||
|
||||
#### Example References
|
||||
|
||||
<Tip>
|
||||
Note how we use the same name for the agent in the `agents.yaml` (`email_summarizer`) file as the method name in the `crew.py` (`email_summarizer`) file.
|
||||
</Tip>
|
||||
</Tip>
|
||||
|
||||
```yaml agents.yaml
|
||||
email_summarizer:
|
||||
@@ -296,7 +254,7 @@ email_summarizer:
|
||||
Summarize emails into a concise and clear summary
|
||||
backstory: >
|
||||
You will create a 5 bullet point summary of the report
|
||||
llm: openai/gpt-4o
|
||||
llm: mixtal_llm
|
||||
```
|
||||
|
||||
<Tip>
|
||||
@@ -315,23 +273,61 @@ email_summarizer_task:
|
||||
- research_task
|
||||
```
|
||||
|
||||
Use the annotations to properly reference the agent and task in the `crew.py` file.
|
||||
|
||||
### Annotations include:
|
||||
|
||||
* `@agent`
|
||||
* `@task`
|
||||
* `@crew`
|
||||
* `@tool`
|
||||
* `@callback`
|
||||
* `@output_json`
|
||||
* `@output_pydantic`
|
||||
* `@cache_handler`
|
||||
|
||||
```python crew.py
|
||||
# ...
|
||||
@agent
|
||||
def email_summarizer(self) -> Agent:
|
||||
return Agent(
|
||||
config=self.agents_config["email_summarizer"],
|
||||
)
|
||||
|
||||
@task
|
||||
def email_summarizer_task(self) -> Task:
|
||||
return Task(
|
||||
config=self.tasks_config["email_summarizer_task"],
|
||||
)
|
||||
# ...
|
||||
```
|
||||
|
||||
<Tip>
|
||||
In addition to the [sequential process](../how-to/sequential-process), you can use the [hierarchical process](../how-to/hierarchical-process),
|
||||
which automatically assigns a manager to the defined crew to properly coordinate the planning and execution of tasks through delegation and validation of results.
|
||||
You can learn more about the core concepts [here](/concepts).
|
||||
</Tip>
|
||||
|
||||
### Replay Tasks from Latest Crew Kickoff
|
||||
|
||||
CrewAI now includes a replay feature that allows you to list the tasks from the last run and replay from a specific one. To use this feature, run.
|
||||
|
||||
```shell
|
||||
crewai replay <task_id>
|
||||
```
|
||||
|
||||
Replace `<task_id>` with the ID of the task you want to replay.
|
||||
|
||||
### Reset Crew Memory
|
||||
|
||||
If you need to reset the memory of your crew before running it again, you can do so by calling the reset memory feature:
|
||||
|
||||
```shell
|
||||
crewai reset-memory
|
||||
```
|
||||
|
||||
This will clear the crew's memory, allowing for a fresh start.
|
||||
|
||||
## Deploying Your Project
|
||||
|
||||
The easiest way to deploy your crew is through [CrewAI Enterprise](http://app.crewai.com), where you can deploy your crew in a few clicks.
|
||||
|
||||
<CardGroup cols={2}>
|
||||
<Card
|
||||
title="Deploy on Enterprise"
|
||||
icon="rocket"
|
||||
href="http://app.crewai.com"
|
||||
>
|
||||
Get started with CrewAI Enterprise and deploy your crew in a production environment with just a few clicks.
|
||||
</Card>
|
||||
<Card
|
||||
title="Join the Community"
|
||||
icon="comments"
|
||||
href="https://community.crewai.com"
|
||||
>
|
||||
Join our open source community to discuss ideas, share your projects, and connect with other CrewAI developers.
|
||||
</Card>
|
||||
</CardGroup>
|
||||
The easiest way to deploy your crew is through [CrewAI Enterprise](https://www.crewai.com/crewaiplus), where you can deploy your crew in a few clicks.
|
||||
|
||||
@@ -1,118 +0,0 @@
|
||||
---
|
||||
title: AI Mind Tool
|
||||
description: The `AIMindTool` is designed to query data sources in natural language.
|
||||
icon: brain
|
||||
---
|
||||
|
||||
# `AIMindTool`
|
||||
|
||||
## Description
|
||||
|
||||
The `AIMindTool` is a wrapper around [AI-Minds](https://mindsdb.com/minds) provided by [MindsDB](https://mindsdb.com/). It allows you to query data sources in natural language by simply configuring their connection parameters. This tool is useful when you need answers to questions from your data stored in various data sources including PostgreSQL, MySQL, MariaDB, ClickHouse, Snowflake, and Google BigQuery.
|
||||
|
||||
Minds are AI systems that work similarly to large language models (LLMs) but go beyond by answering any question from any data. This is accomplished by:
|
||||
- Selecting the most relevant data for an answer using parametric search
|
||||
- Understanding the meaning and providing responses within the correct context through semantic search
|
||||
- Delivering precise answers by analyzing data and using machine learning (ML) models
|
||||
|
||||
## Installation
|
||||
|
||||
To incorporate this tool into your project, you need to install the Minds SDK:
|
||||
|
||||
```shell
|
||||
uv add minds-sdk
|
||||
```
|
||||
|
||||
## Steps to Get Started
|
||||
|
||||
To effectively use the `AIMindTool`, follow these steps:
|
||||
|
||||
1. **Package Installation**: Confirm that the `crewai[tools]` and `minds-sdk` packages are installed in your Python environment.
|
||||
2. **API Key Acquisition**: Sign up for a Minds account [here](https://mdb.ai/register), and obtain an API key.
|
||||
3. **Environment Configuration**: Store your obtained API key in an environment variable named `MINDS_API_KEY` to facilitate its use by the tool.
|
||||
|
||||
## Example
|
||||
|
||||
The following example demonstrates how to initialize the tool and execute a query:
|
||||
|
||||
```python Code
|
||||
from crewai_tools import AIMindTool
|
||||
|
||||
# Initialize the AIMindTool
|
||||
aimind_tool = AIMindTool(
|
||||
datasources=[
|
||||
{
|
||||
"description": "house sales data",
|
||||
"engine": "postgres",
|
||||
"connection_data": {
|
||||
"user": "demo_user",
|
||||
"password": "demo_password",
|
||||
"host": "samples.mindsdb.com",
|
||||
"port": 5432,
|
||||
"database": "demo",
|
||||
"schema": "demo_data"
|
||||
},
|
||||
"tables": ["house_sales"]
|
||||
}
|
||||
]
|
||||
)
|
||||
|
||||
# Run a natural language query
|
||||
result = aimind_tool.run("How many 3 bedroom houses were sold in 2008?")
|
||||
print(result)
|
||||
```
|
||||
|
||||
## Parameters
|
||||
|
||||
The `AIMindTool` accepts the following parameters:
|
||||
|
||||
- **api_key**: Optional. Your Minds API key. If not provided, it will be read from the `MINDS_API_KEY` environment variable.
|
||||
- **datasources**: A list of dictionaries, each containing the following keys:
|
||||
- **description**: A description of the data contained in the datasource.
|
||||
- **engine**: The engine (or type) of the datasource.
|
||||
- **connection_data**: A dictionary containing the connection parameters for the datasource.
|
||||
- **tables**: A list of tables that the data source will use. This is optional and can be omitted if all tables in the data source are to be used.
|
||||
|
||||
A list of supported data sources and their connection parameters can be found [here](https://docs.mdb.ai/docs/data_sources).
|
||||
|
||||
## Agent Integration Example
|
||||
|
||||
Here's how to integrate the `AIMindTool` with a CrewAI agent:
|
||||
|
||||
```python Code
|
||||
from crewai import Agent
|
||||
from crewai.project import agent
|
||||
from crewai_tools import AIMindTool
|
||||
|
||||
# Initialize the tool
|
||||
aimind_tool = AIMindTool(
|
||||
datasources=[
|
||||
{
|
||||
"description": "sales data",
|
||||
"engine": "postgres",
|
||||
"connection_data": {
|
||||
"user": "your_user",
|
||||
"password": "your_password",
|
||||
"host": "your_host",
|
||||
"port": 5432,
|
||||
"database": "your_db",
|
||||
"schema": "your_schema"
|
||||
},
|
||||
"tables": ["sales"]
|
||||
}
|
||||
]
|
||||
)
|
||||
|
||||
# Define an agent with the AIMindTool
|
||||
@agent
|
||||
def data_analyst(self) -> Agent:
|
||||
return Agent(
|
||||
config=self.agents_config["data_analyst"],
|
||||
allow_delegation=False,
|
||||
tools=[aimind_tool]
|
||||
)
|
||||
```
|
||||
|
||||
## Conclusion
|
||||
|
||||
The `AIMindTool` provides a powerful way to query your data sources using natural language, making it easier to extract insights without writing complex SQL queries. By connecting to various data sources and leveraging AI-Minds technology, this tool enables agents to access and analyze data efficiently.
|
||||
@@ -1,96 +0,0 @@
|
||||
---
|
||||
title: Brave Search
|
||||
description: The `BraveSearchTool` is designed to search the internet using the Brave Search API.
|
||||
icon: searchengin
|
||||
---
|
||||
|
||||
# `BraveSearchTool`
|
||||
|
||||
## Description
|
||||
|
||||
This tool is designed to perform web searches using the Brave Search API. It allows you to search the internet with a specified query and retrieve relevant results. The tool supports customizable result counts and country-specific searches.
|
||||
|
||||
## Installation
|
||||
|
||||
To incorporate this tool into your project, follow the installation instructions below:
|
||||
|
||||
```shell
|
||||
pip install 'crewai[tools]'
|
||||
```
|
||||
|
||||
## Steps to Get Started
|
||||
|
||||
To effectively use the `BraveSearchTool`, follow these steps:
|
||||
|
||||
1. **Package Installation**: Confirm that the `crewai[tools]` package is installed in your Python environment.
|
||||
2. **API Key Acquisition**: Acquire a Brave Search API key by registering at [Brave Search API](https://api.search.brave.com/app/keys).
|
||||
3. **Environment Configuration**: Store your obtained API key in an environment variable named `BRAVE_API_KEY` to facilitate its use by the tool.
|
||||
|
||||
## Example
|
||||
|
||||
The following example demonstrates how to initialize the tool and execute a search with a given query:
|
||||
|
||||
```python Code
|
||||
from crewai_tools import BraveSearchTool
|
||||
|
||||
# Initialize the tool for internet searching capabilities
|
||||
tool = BraveSearchTool()
|
||||
|
||||
# Execute a search
|
||||
results = tool.run(search_query="CrewAI agent framework")
|
||||
print(results)
|
||||
```
|
||||
|
||||
## Parameters
|
||||
|
||||
The `BraveSearchTool` accepts the following parameters:
|
||||
|
||||
- **search_query**: Mandatory. The search query you want to use to search the internet.
|
||||
- **country**: Optional. Specify the country for the search results. Default is empty string.
|
||||
- **n_results**: Optional. Number of search results to return. Default is `10`.
|
||||
- **save_file**: Optional. Whether to save the search results to a file. Default is `False`.
|
||||
|
||||
## Example with Parameters
|
||||
|
||||
Here is an example demonstrating how to use the tool with additional parameters:
|
||||
|
||||
```python Code
|
||||
from crewai_tools import BraveSearchTool
|
||||
|
||||
# Initialize the tool with custom parameters
|
||||
tool = BraveSearchTool(
|
||||
country="US",
|
||||
n_results=5,
|
||||
save_file=True
|
||||
)
|
||||
|
||||
# Execute a search
|
||||
results = tool.run(search_query="Latest AI developments")
|
||||
print(results)
|
||||
```
|
||||
|
||||
## Agent Integration Example
|
||||
|
||||
Here's how to integrate the `BraveSearchTool` with a CrewAI agent:
|
||||
|
||||
```python Code
|
||||
from crewai import Agent
|
||||
from crewai.project import agent
|
||||
from crewai_tools import BraveSearchTool
|
||||
|
||||
# Initialize the tool
|
||||
brave_search_tool = BraveSearchTool()
|
||||
|
||||
# Define an agent with the BraveSearchTool
|
||||
@agent
|
||||
def researcher(self) -> Agent:
|
||||
return Agent(
|
||||
config=self.agents_config["researcher"],
|
||||
allow_delegation=False,
|
||||
tools=[brave_search_tool]
|
||||
)
|
||||
```
|
||||
|
||||
## Conclusion
|
||||
|
||||
By integrating the `BraveSearchTool` into Python projects, users gain the ability to conduct real-time, relevant searches across the internet directly from their applications. The tool provides a simple interface to the powerful Brave Search API, making it easy to retrieve and process search results programmatically. By adhering to the setup and usage guidelines provided, incorporating this tool into projects is streamlined and straightforward.
|
||||
@@ -8,15 +8,18 @@ icon: code-simple
|
||||
|
||||
## Description
|
||||
|
||||
The `CodeInterpreterTool` enables CrewAI agents to execute Python 3 code that they generate autonomously. The code is run in a secure, isolated Docker container, ensuring safety regardless of the content. This functionality is particularly valuable as it allows agents to create code, execute it, obtain the results, and utilize that information to inform subsequent decisions and actions.
|
||||
This tool enables the Agent to execute Python 3 code that it has generated autonomously. The code is run in a secure, isolated environment, ensuring safety regardless of the content.
|
||||
|
||||
This functionality is particularly valuable as it allows the Agent to create code, execute it within the same ecosystem,
|
||||
obtain the results, and utilize that information to inform subsequent decisions and actions.
|
||||
|
||||
## Requirements
|
||||
|
||||
- Docker must be installed and running on your system. If you don't have it, you can install it from [here](https://docs.docker.com/get-docker/).
|
||||
- Docker
|
||||
|
||||
## Installation
|
||||
|
||||
To use this tool, you need to install the CrewAI tools package:
|
||||
Install the `crewai_tools` package
|
||||
|
||||
```shell
|
||||
pip install 'crewai[tools]'
|
||||
@@ -24,153 +27,27 @@ pip install 'crewai[tools]'
|
||||
|
||||
## Example
|
||||
|
||||
The following example demonstrates how to use the `CodeInterpreterTool` with a CrewAI agent:
|
||||
Remember that when using this tool, the code must be generated by the Agent itself.
|
||||
The code must be a Python3 code. And it will take some time for the first time to run
|
||||
because it needs to build the Docker image.
|
||||
|
||||
```python Code
|
||||
from crewai import Agent, Task, Crew, Process
|
||||
from crewai import Agent
|
||||
from crewai_tools import CodeInterpreterTool
|
||||
|
||||
# Initialize the tool
|
||||
code_interpreter = CodeInterpreterTool()
|
||||
|
||||
# Define an agent that uses the tool
|
||||
programmer_agent = Agent(
|
||||
role="Python Programmer",
|
||||
goal="Write and execute Python code to solve problems",
|
||||
backstory="An expert Python programmer who can write efficient code to solve complex problems.",
|
||||
tools=[code_interpreter],
|
||||
verbose=True,
|
||||
Agent(
|
||||
...
|
||||
tools=[CodeInterpreterTool()],
|
||||
)
|
||||
|
||||
# Example task to generate and execute code
|
||||
coding_task = Task(
|
||||
description="Write a Python function to calculate the Fibonacci sequence up to the 10th number and print the result.",
|
||||
expected_output="The Fibonacci sequence up to the 10th number.",
|
||||
agent=programmer_agent,
|
||||
)
|
||||
|
||||
# Create and run the crew
|
||||
crew = Crew(
|
||||
agents=[programmer_agent],
|
||||
tasks=[coding_task],
|
||||
verbose=True,
|
||||
process=Process.sequential,
|
||||
)
|
||||
result = crew.kickoff()
|
||||
```
|
||||
|
||||
You can also enable code execution directly when creating an agent:
|
||||
We also provide a simple way to use it directly from the Agent.
|
||||
|
||||
```python Code
|
||||
from crewai import Agent
|
||||
|
||||
# Create an agent with code execution enabled
|
||||
programmer_agent = Agent(
|
||||
role="Python Programmer",
|
||||
goal="Write and execute Python code to solve problems",
|
||||
backstory="An expert Python programmer who can write efficient code to solve complex problems.",
|
||||
allow_code_execution=True, # This automatically adds the CodeInterpreterTool
|
||||
verbose=True,
|
||||
agent = Agent(
|
||||
...
|
||||
allow_code_execution=True,
|
||||
)
|
||||
```
|
||||
|
||||
## Parameters
|
||||
|
||||
The `CodeInterpreterTool` accepts the following parameters during initialization:
|
||||
|
||||
- **user_dockerfile_path**: Optional. Path to a custom Dockerfile to use for the code interpreter container.
|
||||
- **user_docker_base_url**: Optional. URL to the Docker daemon to use for running the container.
|
||||
- **unsafe_mode**: Optional. Whether to run code directly on the host machine instead of in a Docker container. Default is `False`. Use with caution!
|
||||
|
||||
When using the tool with an agent, the agent will need to provide:
|
||||
|
||||
- **code**: Required. The Python 3 code to execute.
|
||||
- **libraries_used**: Required. A list of libraries used in the code that need to be installed.
|
||||
|
||||
## Agent Integration Example
|
||||
|
||||
Here's a more detailed example of how to integrate the `CodeInterpreterTool` with a CrewAI agent:
|
||||
|
||||
```python Code
|
||||
from crewai import Agent, Task, Crew
|
||||
from crewai_tools import CodeInterpreterTool
|
||||
|
||||
# Initialize the tool
|
||||
code_interpreter = CodeInterpreterTool()
|
||||
|
||||
# Define an agent that uses the tool
|
||||
data_analyst = Agent(
|
||||
role="Data Analyst",
|
||||
goal="Analyze data using Python code",
|
||||
backstory="""You are an expert data analyst who specializes in using Python
|
||||
to analyze and visualize data. You can write efficient code to process
|
||||
large datasets and extract meaningful insights.""",
|
||||
tools=[code_interpreter],
|
||||
verbose=True,
|
||||
)
|
||||
|
||||
# Create a task for the agent
|
||||
analysis_task = Task(
|
||||
description="""
|
||||
Write Python code to:
|
||||
1. Generate a random dataset of 100 points with x and y coordinates
|
||||
2. Calculate the correlation coefficient between x and y
|
||||
3. Create a scatter plot of the data
|
||||
4. Print the correlation coefficient and save the plot as 'scatter.png'
|
||||
|
||||
Make sure to handle any necessary imports and print the results.
|
||||
""",
|
||||
expected_output="The correlation coefficient and confirmation that the scatter plot has been saved.",
|
||||
agent=data_analyst,
|
||||
)
|
||||
|
||||
# Run the task
|
||||
crew = Crew(
|
||||
agents=[data_analyst],
|
||||
tasks=[analysis_task],
|
||||
verbose=True,
|
||||
process=Process.sequential,
|
||||
)
|
||||
result = crew.kickoff()
|
||||
```
|
||||
|
||||
## Implementation Details
|
||||
|
||||
The `CodeInterpreterTool` uses Docker to create a secure environment for code execution:
|
||||
|
||||
```python Code
|
||||
class CodeInterpreterTool(BaseTool):
|
||||
name: str = "Code Interpreter"
|
||||
description: str = "Interprets Python3 code strings with a final print statement."
|
||||
args_schema: Type[BaseModel] = CodeInterpreterSchema
|
||||
default_image_tag: str = "code-interpreter:latest"
|
||||
|
||||
def _run(self, **kwargs) -> str:
|
||||
code = kwargs.get("code", self.code)
|
||||
libraries_used = kwargs.get("libraries_used", [])
|
||||
|
||||
if self.unsafe_mode:
|
||||
return self.run_code_unsafe(code, libraries_used)
|
||||
else:
|
||||
return self.run_code_in_docker(code, libraries_used)
|
||||
```
|
||||
|
||||
The tool performs the following steps:
|
||||
1. Verifies that the Docker image exists or builds it if necessary
|
||||
2. Creates a Docker container with the current working directory mounted
|
||||
3. Installs any required libraries specified by the agent
|
||||
4. Executes the Python code in the container
|
||||
5. Returns the output of the code execution
|
||||
6. Cleans up by stopping and removing the container
|
||||
|
||||
## Security Considerations
|
||||
|
||||
By default, the `CodeInterpreterTool` runs code in an isolated Docker container, which provides a layer of security. However, there are still some security considerations to keep in mind:
|
||||
|
||||
1. The Docker container has access to the current working directory, so sensitive files could potentially be accessed.
|
||||
2. The `unsafe_mode` parameter allows code to be executed directly on the host machine, which should only be used in trusted environments.
|
||||
3. Be cautious when allowing agents to install arbitrary libraries, as they could potentially include malicious code.
|
||||
|
||||
## Conclusion
|
||||
|
||||
The `CodeInterpreterTool` provides a powerful way for CrewAI agents to execute Python code in a relatively secure environment. By enabling agents to write and run code, it significantly expands their problem-solving capabilities, especially for tasks involving data analysis, calculations, or other computational work. This tool is particularly useful for agents that need to perform complex operations that are more efficiently expressed in code than in natural language.
|
||||
|
||||
@@ -1,118 +1,78 @@
|
||||
---
|
||||
title: Composio Tool
|
||||
description: Composio provides 250+ production-ready tools for AI agents with flexible authentication management.
|
||||
description: The `ComposioTool` is a wrapper around the composio set of tools and gives your agent access to a wide variety of tools from the Composio SDK.
|
||||
icon: gear-code
|
||||
---
|
||||
|
||||
# `ComposioToolSet`
|
||||
# `ComposioTool`
|
||||
|
||||
## Description
|
||||
Composio is an integration platform that allows you to connect your AI agents to 250+ tools. Key features include:
|
||||
|
||||
- **Enterprise-Grade Authentication**: Built-in support for OAuth, API Keys, JWT with automatic token refresh
|
||||
- **Full Observability**: Detailed tool usage logs, execution timestamps, and more
|
||||
This tools is a wrapper around the composio set of tools and gives your agent access to a wide variety of tools from the Composio SDK.
|
||||
|
||||
## Installation
|
||||
|
||||
To incorporate Composio tools into your project, follow the instructions below:
|
||||
To incorporate this tool into your project, follow the installation instructions below:
|
||||
|
||||
```shell
|
||||
pip install composio-crewai
|
||||
pip install crewai
|
||||
pip install composio-core
|
||||
pip install 'crewai[tools]'
|
||||
```
|
||||
|
||||
After the installation is complete, either run `composio login` or export your composio API key as `COMPOSIO_API_KEY`. Get your Composio API key from [here](https://app.composio.dev)
|
||||
after the installation is complete, either run `composio login` or export your composio API key as `COMPOSIO_API_KEY`.
|
||||
|
||||
## Example
|
||||
|
||||
The following example demonstrates how to initialize the tool and execute a github action:
|
||||
|
||||
1. Initialize Composio toolset
|
||||
1. Initialize Composio tools
|
||||
|
||||
```python Code
|
||||
from composio_crewai import ComposioToolSet, App, Action
|
||||
from crewai import Agent, Task, Crew
|
||||
from composio import App
|
||||
from crewai_tools import ComposioTool
|
||||
from crewai import Agent, Task
|
||||
|
||||
toolset = ComposioToolSet()
|
||||
|
||||
tools = [ComposioTool.from_action(action=Action.GITHUB_ACTIVITY_STAR_REPO_FOR_AUTHENTICATED_USER)]
|
||||
```
|
||||
|
||||
2. Connect your GitHub account
|
||||
<CodeGroup>
|
||||
```shell CLI
|
||||
composio add github
|
||||
```
|
||||
If you don't know what action you want to use, use `from_app` and `tags` filter to get relevant actions
|
||||
|
||||
```python Code
|
||||
request = toolset.initiate_connection(app=App.GITHUB)
|
||||
print(f"Open this URL to authenticate: {request.redirectUrl}")
|
||||
tools = ComposioTool.from_app(App.GITHUB, tags=["important"])
|
||||
```
|
||||
</CodeGroup>
|
||||
|
||||
3. Get Tools
|
||||
or use `use_case` to search relevant actions
|
||||
|
||||
- Retrieving all the tools from an app (not recommended for production):
|
||||
```python Code
|
||||
tools = toolset.get_tools(apps=[App.GITHUB])
|
||||
tools = ComposioTool.from_app(App.GITHUB, use_case="Star a github repository")
|
||||
```
|
||||
|
||||
- Filtering tools based on tags:
|
||||
```python Code
|
||||
tag = "users"
|
||||
|
||||
filtered_action_enums = toolset.find_actions_by_tags(
|
||||
App.GITHUB,
|
||||
tags=[tag],
|
||||
)
|
||||
|
||||
tools = toolset.get_tools(actions=filtered_action_enums)
|
||||
```
|
||||
|
||||
- Filtering tools based on use case:
|
||||
```python Code
|
||||
use_case = "Star a repository on GitHub"
|
||||
|
||||
filtered_action_enums = toolset.find_actions_by_use_case(
|
||||
App.GITHUB, use_case=use_case, advanced=False
|
||||
)
|
||||
|
||||
tools = toolset.get_tools(actions=filtered_action_enums)
|
||||
```
|
||||
<Tip>Set `advanced` to True to get actions for complex use cases</Tip>
|
||||
|
||||
- Using specific tools:
|
||||
|
||||
In this demo, we will use the `GITHUB_STAR_A_REPOSITORY_FOR_THE_AUTHENTICATED_USER` action from the GitHub app.
|
||||
```python Code
|
||||
tools = toolset.get_tools(
|
||||
actions=[Action.GITHUB_STAR_A_REPOSITORY_FOR_THE_AUTHENTICATED_USER]
|
||||
)
|
||||
```
|
||||
Learn more about filtering actions [here](https://docs.composio.dev/patterns/tools/use-tools/use-specific-actions)
|
||||
|
||||
4. Define agent
|
||||
2. Define agent
|
||||
|
||||
```python Code
|
||||
crewai_agent = Agent(
|
||||
role="GitHub Agent",
|
||||
goal="You take action on GitHub using GitHub APIs",
|
||||
backstory="You are AI agent that is responsible for taking actions on GitHub on behalf of users using GitHub APIs",
|
||||
role="Github Agent",
|
||||
goal="You take action on Github using Github APIs",
|
||||
backstory=(
|
||||
"You are AI agent that is responsible for taking actions on Github "
|
||||
"on users behalf. You need to take action on Github using Github APIs"
|
||||
),
|
||||
verbose=True,
|
||||
tools=tools,
|
||||
llm= # pass an llm
|
||||
)
|
||||
```
|
||||
|
||||
5. Execute task
|
||||
3. Execute task
|
||||
|
||||
```python Code
|
||||
task = Task(
|
||||
description="Star a repo composiohq/composio on GitHub",
|
||||
description="Star a repo ComposioHQ/composio on GitHub",
|
||||
agent=crewai_agent,
|
||||
expected_output="Status of the operation",
|
||||
expected_output="if the star happened",
|
||||
)
|
||||
|
||||
crew = Crew(agents=[crewai_agent], tasks=[task])
|
||||
|
||||
crew.kickoff()
|
||||
task.execute()
|
||||
```
|
||||
|
||||
* More detailed list of tools can be found [here](https://app.composio.dev)
|
||||
* More detailed list of tools can be found [here](https://app.composio.dev)
|
||||
@@ -8,9 +8,9 @@ icon: file-pen
|
||||
|
||||
## Description
|
||||
|
||||
The `FileWriterTool` is a component of the crewai_tools package, designed to simplify the process of writing content to files with cross-platform compatibility (Windows, Linux, macOS).
|
||||
The `FileWriterTool` is a component of the crewai_tools package, designed to simplify the process of writing content to files.
|
||||
It is particularly useful in scenarios such as generating reports, saving logs, creating configuration files, and more.
|
||||
This tool handles path differences across operating systems, supports UTF-8 encoding, and automatically creates directories if they don't exist, making it easier to organize your output reliably across different platforms.
|
||||
This tool supports creating new directories if they don't exist, making it easier to organize your output.
|
||||
|
||||
## Installation
|
||||
|
||||
@@ -43,8 +43,6 @@ print(result)
|
||||
|
||||
## Conclusion
|
||||
|
||||
By integrating the `FileWriterTool` into your crews, the agents can reliably write content to files across different operating systems.
|
||||
This tool is essential for tasks that require saving output data, creating structured file systems, and handling cross-platform file operations.
|
||||
It's particularly recommended for Windows users who may encounter file writing issues with standard Python file operations.
|
||||
|
||||
By adhering to the setup and usage guidelines provided, incorporating this tool into projects is straightforward and ensures consistent file writing behavior across all platforms.
|
||||
By integrating the `FileWriterTool` into your crews, the agents can execute the process of writing content to files and creating directories.
|
||||
This tool is essential for tasks that require saving output data, creating structured file systems, and more. By adhering to the setup and usage guidelines provided,
|
||||
incorporating this tool into projects is straightforward and efficient.
|
||||
@@ -34,7 +34,6 @@ from crewai_tools import GithubSearchTool
|
||||
# Initialize the tool for semantic searches within a specific GitHub repository
|
||||
tool = GithubSearchTool(
|
||||
github_repo='https://github.com/example/repo',
|
||||
gh_token='your_github_personal_access_token',
|
||||
content_types=['code', 'issue'] # Options: code, repo, pr, issue
|
||||
)
|
||||
|
||||
@@ -42,7 +41,6 @@ tool = GithubSearchTool(
|
||||
|
||||
# Initialize the tool for semantic searches within a specific GitHub repository, so the agent can search any repository if it learns about during its execution
|
||||
tool = GithubSearchTool(
|
||||
gh_token='your_github_personal_access_token',
|
||||
content_types=['code', 'issue'] # Options: code, repo, pr, issue
|
||||
)
|
||||
```
|
||||
@@ -50,7 +48,6 @@ tool = GithubSearchTool(
|
||||
## Arguments
|
||||
|
||||
- `github_repo` : The URL of the GitHub repository where the search will be conducted. This is a mandatory field and specifies the target repository for your search.
|
||||
- `gh_token` : Your GitHub Personal Access Token (PAT) required for authentication. You can create one in your GitHub account settings under Developer Settings > Personal Access Tokens.
|
||||
- `content_types` : Specifies the types of content to include in your search. You must provide a list of content types from the following options: `code` for searching within the code,
|
||||
`repo` for searching within the repository's general information, `pr` for searching within pull requests, and `issue` for searching within issues.
|
||||
This field is mandatory and allows tailoring the search to specific content types within the GitHub repository.
|
||||
@@ -80,4 +77,5 @@ tool = GithubSearchTool(
|
||||
),
|
||||
),
|
||||
)
|
||||
)
|
||||
)
|
||||
```
|
||||
@@ -1,86 +0,0 @@
|
||||
---
|
||||
title: Hyperbrowser Load Tool
|
||||
description: The `HyperbrowserLoadTool` enables web scraping and crawling using Hyperbrowser.
|
||||
icon: globe
|
||||
---
|
||||
|
||||
# `HyperbrowserLoadTool`
|
||||
|
||||
## Description
|
||||
|
||||
The `HyperbrowserLoadTool` enables web scraping and crawling using [Hyperbrowser](https://hyperbrowser.ai), a platform for running and scaling headless browsers. This tool allows you to scrape a single page or crawl an entire site, returning the content in properly formatted markdown or HTML.
|
||||
|
||||
Key Features:
|
||||
- Instant Scalability - Spin up hundreds of browser sessions in seconds without infrastructure headaches
|
||||
- Simple Integration - Works seamlessly with popular tools like Puppeteer and Playwright
|
||||
- Powerful APIs - Easy to use APIs for scraping/crawling any site
|
||||
- Bypass Anti-Bot Measures - Built-in stealth mode, ad blocking, automatic CAPTCHA solving, and rotating proxies
|
||||
|
||||
## Installation
|
||||
|
||||
To use this tool, you need to install the Hyperbrowser SDK:
|
||||
|
||||
```shell
|
||||
uv add hyperbrowser
|
||||
```
|
||||
|
||||
## Steps to Get Started
|
||||
|
||||
To effectively use the `HyperbrowserLoadTool`, follow these steps:
|
||||
|
||||
1. **Sign Up**: Head to [Hyperbrowser](https://app.hyperbrowser.ai/) to sign up and generate an API key.
|
||||
2. **API Key**: Set the `HYPERBROWSER_API_KEY` environment variable or pass it directly to the tool constructor.
|
||||
3. **Install SDK**: Install the Hyperbrowser SDK using the command above.
|
||||
|
||||
## Example
|
||||
|
||||
The following example demonstrates how to initialize the tool and use it to scrape a website:
|
||||
|
||||
```python Code
|
||||
from crewai_tools import HyperbrowserLoadTool
|
||||
from crewai import Agent
|
||||
|
||||
# Initialize the tool with your API key
|
||||
tool = HyperbrowserLoadTool(api_key="your_api_key") # Or use environment variable
|
||||
|
||||
# Define an agent that uses the tool
|
||||
@agent
|
||||
def web_researcher(self) -> Agent:
|
||||
'''
|
||||
This agent uses the HyperbrowserLoadTool to scrape websites
|
||||
and extract information.
|
||||
'''
|
||||
return Agent(
|
||||
config=self.agents_config["web_researcher"],
|
||||
tools=[tool]
|
||||
)
|
||||
```
|
||||
|
||||
## Parameters
|
||||
|
||||
The `HyperbrowserLoadTool` accepts the following parameters:
|
||||
|
||||
### Constructor Parameters
|
||||
- **api_key**: Optional. Your Hyperbrowser API key. If not provided, it will be read from the `HYPERBROWSER_API_KEY` environment variable.
|
||||
|
||||
### Run Parameters
|
||||
- **url**: Required. The website URL to scrape or crawl.
|
||||
- **operation**: Optional. The operation to perform on the website. Either 'scrape' or 'crawl'. Default is 'scrape'.
|
||||
- **params**: Optional. Additional parameters for the scrape or crawl operation.
|
||||
|
||||
## Supported Parameters
|
||||
|
||||
For detailed information on all supported parameters, visit:
|
||||
- [Scrape Parameters](https://docs.hyperbrowser.ai/reference/sdks/python/scrape#start-scrape-job-and-wait)
|
||||
- [Crawl Parameters](https://docs.hyperbrowser.ai/reference/sdks/python/crawl#start-crawl-job-and-wait)
|
||||
|
||||
## Return Format
|
||||
|
||||
The tool returns content in the following format:
|
||||
|
||||
- For **scrape** operations: The content of the page in markdown or HTML format.
|
||||
- For **crawl** operations: The content of each page separated by dividers, including the URL of each page.
|
||||
|
||||
## Conclusion
|
||||
|
||||
The `HyperbrowserLoadTool` provides a powerful way to scrape and crawl websites, handling complex scenarios like anti-bot measures, CAPTCHAs, and more. By leveraging Hyperbrowser's platform, this tool enables agents to access and extract web content efficiently.
|
||||
@@ -1,112 +0,0 @@
|
||||
---
|
||||
title: Linkup Search Tool
|
||||
description: The `LinkupSearchTool` enables querying the Linkup API for contextual information.
|
||||
icon: link
|
||||
---
|
||||
|
||||
# `LinkupSearchTool`
|
||||
|
||||
## Description
|
||||
|
||||
The `LinkupSearchTool` provides the ability to query the Linkup API for contextual information and retrieve structured results. This tool is ideal for enriching workflows with up-to-date and reliable information from Linkup, allowing agents to access relevant data during their tasks.
|
||||
|
||||
## Installation
|
||||
|
||||
To use this tool, you need to install the Linkup SDK:
|
||||
|
||||
```shell
|
||||
uv add linkup-sdk
|
||||
```
|
||||
|
||||
## Steps to Get Started
|
||||
|
||||
To effectively use the `LinkupSearchTool`, follow these steps:
|
||||
|
||||
1. **API Key**: Obtain a Linkup API key.
|
||||
2. **Environment Setup**: Set up your environment with the API key.
|
||||
3. **Install SDK**: Install the Linkup SDK using the command above.
|
||||
|
||||
## Example
|
||||
|
||||
The following example demonstrates how to initialize the tool and use it in an agent:
|
||||
|
||||
```python Code
|
||||
from crewai_tools import LinkupSearchTool
|
||||
from crewai import Agent
|
||||
import os
|
||||
|
||||
# Initialize the tool with your API key
|
||||
linkup_tool = LinkupSearchTool(api_key=os.getenv("LINKUP_API_KEY"))
|
||||
|
||||
# Define an agent that uses the tool
|
||||
@agent
|
||||
def researcher(self) -> Agent:
|
||||
'''
|
||||
This agent uses the LinkupSearchTool to retrieve contextual information
|
||||
from the Linkup API.
|
||||
'''
|
||||
return Agent(
|
||||
config=self.agents_config["researcher"],
|
||||
tools=[linkup_tool]
|
||||
)
|
||||
```
|
||||
|
||||
## Parameters
|
||||
|
||||
The `LinkupSearchTool` accepts the following parameters:
|
||||
|
||||
### Constructor Parameters
|
||||
- **api_key**: Required. Your Linkup API key.
|
||||
|
||||
### Run Parameters
|
||||
- **query**: Required. The search term or phrase.
|
||||
- **depth**: Optional. The search depth. Default is "standard".
|
||||
- **output_type**: Optional. The type of output. Default is "searchResults".
|
||||
|
||||
## Advanced Usage
|
||||
|
||||
You can customize the search parameters for more specific results:
|
||||
|
||||
```python Code
|
||||
# Perform a search with custom parameters
|
||||
results = linkup_tool.run(
|
||||
query="Women Nobel Prize Physics",
|
||||
depth="deep",
|
||||
output_type="searchResults"
|
||||
)
|
||||
```
|
||||
|
||||
## Return Format
|
||||
|
||||
The tool returns results in the following format:
|
||||
|
||||
```json
|
||||
{
|
||||
"success": true,
|
||||
"results": [
|
||||
{
|
||||
"name": "Result Title",
|
||||
"url": "https://example.com/result",
|
||||
"content": "Content of the result..."
|
||||
},
|
||||
// Additional results...
|
||||
]
|
||||
}
|
||||
```
|
||||
|
||||
If an error occurs, the response will be:
|
||||
|
||||
```json
|
||||
{
|
||||
"success": false,
|
||||
"error": "Error message"
|
||||
}
|
||||
```
|
||||
|
||||
## Error Handling
|
||||
|
||||
The tool gracefully handles API errors and provides structured feedback. If the API request fails, the tool will return a dictionary with `success: false` and an error message.
|
||||
|
||||
## Conclusion
|
||||
|
||||
The `LinkupSearchTool` provides a seamless way to integrate Linkup's contextual information retrieval capabilities into your CrewAI agents. By leveraging this tool, agents can access relevant and up-to-date information to enhance their decision-making and task execution.
|
||||
@@ -1,146 +0,0 @@
|
||||
---
|
||||
title: LlamaIndex Tool
|
||||
description: The `LlamaIndexTool` is a wrapper for LlamaIndex tools and query engines.
|
||||
icon: address-book
|
||||
---
|
||||
|
||||
# `LlamaIndexTool`
|
||||
|
||||
## Description
|
||||
|
||||
The `LlamaIndexTool` is designed to be a general wrapper around LlamaIndex tools and query engines, enabling you to leverage LlamaIndex resources in terms of RAG/agentic pipelines as tools to plug into CrewAI agents. This tool allows you to seamlessly integrate LlamaIndex's powerful data processing and retrieval capabilities into your CrewAI workflows.
|
||||
|
||||
## Installation
|
||||
|
||||
To use this tool, you need to install LlamaIndex:
|
||||
|
||||
```shell
|
||||
uv add llama-index
|
||||
```
|
||||
|
||||
## Steps to Get Started
|
||||
|
||||
To effectively use the `LlamaIndexTool`, follow these steps:
|
||||
|
||||
1. **Install LlamaIndex**: Install the LlamaIndex package using the command above.
|
||||
2. **Set Up LlamaIndex**: Follow the [LlamaIndex documentation](https://docs.llamaindex.ai/) to set up a RAG/agent pipeline.
|
||||
3. **Create a Tool or Query Engine**: Create a LlamaIndex tool or query engine that you want to use with CrewAI.
|
||||
|
||||
## Example
|
||||
|
||||
The following examples demonstrate how to initialize the tool from different LlamaIndex components:
|
||||
|
||||
### From a LlamaIndex Tool
|
||||
|
||||
```python Code
|
||||
from crewai_tools import LlamaIndexTool
|
||||
from crewai import Agent
|
||||
from llama_index.core.tools import FunctionTool
|
||||
|
||||
# Example 1: Initialize from FunctionTool
|
||||
def search_data(query: str) -> str:
|
||||
"""Search for information in the data."""
|
||||
# Your implementation here
|
||||
return f"Results for: {query}"
|
||||
|
||||
# Create a LlamaIndex FunctionTool
|
||||
og_tool = FunctionTool.from_defaults(
|
||||
search_data,
|
||||
name="DataSearchTool",
|
||||
description="Search for information in the data"
|
||||
)
|
||||
|
||||
# Wrap it with LlamaIndexTool
|
||||
tool = LlamaIndexTool.from_tool(og_tool)
|
||||
|
||||
# Define an agent that uses the tool
|
||||
@agent
|
||||
def researcher(self) -> Agent:
|
||||
'''
|
||||
This agent uses the LlamaIndexTool to search for information.
|
||||
'''
|
||||
return Agent(
|
||||
config=self.agents_config["researcher"],
|
||||
tools=[tool]
|
||||
)
|
||||
```
|
||||
|
||||
### From LlamaHub Tools
|
||||
|
||||
```python Code
|
||||
from crewai_tools import LlamaIndexTool
|
||||
from llama_index.tools.wolfram_alpha import WolframAlphaToolSpec
|
||||
|
||||
# Initialize from LlamaHub Tools
|
||||
wolfram_spec = WolframAlphaToolSpec(app_id="your_app_id")
|
||||
wolfram_tools = wolfram_spec.to_tool_list()
|
||||
tools = [LlamaIndexTool.from_tool(t) for t in wolfram_tools]
|
||||
```
|
||||
|
||||
### From a LlamaIndex Query Engine
|
||||
|
||||
```python Code
|
||||
from crewai_tools import LlamaIndexTool
|
||||
from llama_index.core import VectorStoreIndex
|
||||
from llama_index.core.readers import SimpleDirectoryReader
|
||||
|
||||
# Load documents
|
||||
documents = SimpleDirectoryReader("./data").load_data()
|
||||
|
||||
# Create an index
|
||||
index = VectorStoreIndex.from_documents(documents)
|
||||
|
||||
# Create a query engine
|
||||
query_engine = index.as_query_engine()
|
||||
|
||||
# Create a LlamaIndexTool from the query engine
|
||||
query_tool = LlamaIndexTool.from_query_engine(
|
||||
query_engine,
|
||||
name="Company Data Query Tool",
|
||||
description="Use this tool to lookup information in company documents"
|
||||
)
|
||||
```
|
||||
|
||||
## Class Methods
|
||||
|
||||
The `LlamaIndexTool` provides two main class methods for creating instances:
|
||||
|
||||
### from_tool
|
||||
|
||||
Creates a `LlamaIndexTool` from a LlamaIndex tool.
|
||||
|
||||
```python Code
|
||||
@classmethod
|
||||
def from_tool(cls, tool: Any, **kwargs: Any) -> "LlamaIndexTool":
|
||||
# Implementation details
|
||||
```
|
||||
|
||||
### from_query_engine
|
||||
|
||||
Creates a `LlamaIndexTool` from a LlamaIndex query engine.
|
||||
|
||||
```python Code
|
||||
@classmethod
|
||||
def from_query_engine(
|
||||
cls,
|
||||
query_engine: Any,
|
||||
name: Optional[str] = None,
|
||||
description: Optional[str] = None,
|
||||
return_direct: bool = False,
|
||||
**kwargs: Any,
|
||||
) -> "LlamaIndexTool":
|
||||
# Implementation details
|
||||
```
|
||||
|
||||
## Parameters
|
||||
|
||||
The `from_query_engine` method accepts the following parameters:
|
||||
|
||||
- **query_engine**: Required. The LlamaIndex query engine to wrap.
|
||||
- **name**: Optional. The name of the tool.
|
||||
- **description**: Optional. The description of the tool.
|
||||
- **return_direct**: Optional. Whether to return the response directly. Default is `False`.
|
||||
|
||||
## Conclusion
|
||||
|
||||
The `LlamaIndexTool` provides a powerful way to integrate LlamaIndex's capabilities into CrewAI agents. By wrapping LlamaIndex tools and query engines, it enables agents to leverage sophisticated data retrieval and processing functionalities, enhancing their ability to work with complex information sources.
|
||||
@@ -1,128 +0,0 @@
|
||||
---
|
||||
title: MultiOn Tool
|
||||
description: The `MultiOnTool` empowers CrewAI agents with the capability to navigate and interact with the web through natural language instructions.
|
||||
icon: globe
|
||||
---
|
||||
|
||||
# `MultiOnTool`
|
||||
|
||||
## Description
|
||||
|
||||
The `MultiOnTool` is designed to wrap [MultiOn's](https://docs.multion.ai/welcome) web browsing capabilities, enabling CrewAI agents to control web browsers using natural language instructions. This tool facilitates seamless web browsing, making it an essential asset for projects requiring dynamic web data interaction and automation of web-based tasks.
|
||||
|
||||
## Installation
|
||||
|
||||
To use this tool, you need to install the MultiOn package:
|
||||
|
||||
```shell
|
||||
uv add multion
|
||||
```
|
||||
|
||||
You'll also need to install the MultiOn browser extension and enable API usage.
|
||||
|
||||
## Steps to Get Started
|
||||
|
||||
To effectively use the `MultiOnTool`, follow these steps:
|
||||
|
||||
1. **Install CrewAI**: Ensure that the `crewai[tools]` package is installed in your Python environment.
|
||||
2. **Install and use MultiOn**: Follow [MultiOn documentation](https://docs.multion.ai/learn/browser-extension) for installing the MultiOn Browser Extension.
|
||||
3. **Enable API Usage**: Click on the MultiOn extension in the extensions folder of your browser (not the hovering MultiOn icon on the web page) to open the extension configurations. Click the API Enabled toggle to enable the API.
|
||||
|
||||
## Example
|
||||
|
||||
The following example demonstrates how to initialize the tool and execute a web browsing task:
|
||||
|
||||
```python Code
|
||||
from crewai import Agent, Task, Crew
|
||||
from crewai_tools import MultiOnTool
|
||||
|
||||
# Initialize the tool
|
||||
multion_tool = MultiOnTool(api_key="YOUR_MULTION_API_KEY", local=False)
|
||||
|
||||
# Define an agent that uses the tool
|
||||
browser_agent = Agent(
|
||||
role="Browser Agent",
|
||||
goal="Control web browsers using natural language",
|
||||
backstory="An expert browsing agent.",
|
||||
tools=[multion_tool],
|
||||
verbose=True,
|
||||
)
|
||||
|
||||
# Example task to search and summarize news
|
||||
browse_task = Task(
|
||||
description="Summarize the top 3 trending AI News headlines",
|
||||
expected_output="A summary of the top 3 trending AI News headlines",
|
||||
agent=browser_agent,
|
||||
)
|
||||
|
||||
# Create and run the crew
|
||||
crew = Crew(agents=[browser_agent], tasks=[browse_task])
|
||||
result = crew.kickoff()
|
||||
```
|
||||
|
||||
## Parameters
|
||||
|
||||
The `MultiOnTool` accepts the following parameters during initialization:
|
||||
|
||||
- **api_key**: Optional. Specifies the MultiOn API key. If not provided, it will look for the `MULTION_API_KEY` environment variable.
|
||||
- **local**: Optional. Set to `True` to run the agent locally on your browser. Make sure the MultiOn browser extension is installed and API Enabled is checked. Default is `False`.
|
||||
- **max_steps**: Optional. Sets the maximum number of steps the MultiOn agent can take for a command. Default is `3`.
|
||||
|
||||
## Usage
|
||||
|
||||
When using the `MultiOnTool`, the agent will provide natural language instructions that the tool translates into web browsing actions. The tool returns the results of the browsing session along with a status.
|
||||
|
||||
```python Code
|
||||
# Example of using the tool with an agent
|
||||
browser_agent = Agent(
|
||||
role="Web Browser Agent",
|
||||
goal="Search for and summarize information from the web",
|
||||
backstory="An expert at finding and extracting information from websites.",
|
||||
tools=[multion_tool],
|
||||
verbose=True,
|
||||
)
|
||||
|
||||
# Create a task for the agent
|
||||
search_task = Task(
|
||||
description="Search for the latest AI news on TechCrunch and summarize the top 3 headlines",
|
||||
expected_output="A summary of the top 3 AI news headlines from TechCrunch",
|
||||
agent=browser_agent,
|
||||
)
|
||||
|
||||
# Run the task
|
||||
crew = Crew(agents=[browser_agent], tasks=[search_task])
|
||||
result = crew.kickoff()
|
||||
```
|
||||
|
||||
If the status returned is `CONTINUE`, the agent should be instructed to reissue the same instruction to continue execution.
|
||||
|
||||
## Implementation Details
|
||||
|
||||
The `MultiOnTool` is implemented as a subclass of `BaseTool` from CrewAI. It wraps the MultiOn client to provide web browsing capabilities:
|
||||
|
||||
```python Code
|
||||
class MultiOnTool(BaseTool):
|
||||
"""Tool to wrap MultiOn Browse Capabilities."""
|
||||
|
||||
name: str = "Multion Browse Tool"
|
||||
description: str = """Multion gives the ability for LLMs to control web browsers using natural language instructions.
|
||||
If the status is 'CONTINUE', reissue the same instruction to continue execution
|
||||
"""
|
||||
|
||||
# Implementation details...
|
||||
|
||||
def _run(self, cmd: str, *args: Any, **kwargs: Any) -> str:
|
||||
"""
|
||||
Run the Multion client with the given command.
|
||||
|
||||
Args:
|
||||
cmd (str): The detailed and specific natural language instruction for web browsing
|
||||
*args (Any): Additional arguments to pass to the Multion client
|
||||
**kwargs (Any): Additional keyword arguments to pass to the Multion client
|
||||
"""
|
||||
# Implementation details...
|
||||
```
|
||||
|
||||
## Conclusion
|
||||
|
||||
The `MultiOnTool` provides a powerful way to integrate web browsing capabilities into CrewAI agents. By enabling agents to interact with websites through natural language instructions, it opens up a wide range of possibilities for web-based tasks, from data collection and research to automated interactions with web services.
|
||||
@@ -1,195 +0,0 @@
|
||||
---
|
||||
title: Patronus Evaluation Tools
|
||||
description: The Patronus evaluation tools enable CrewAI agents to evaluate and score model inputs and outputs using the Patronus AI platform.
|
||||
icon: check
|
||||
---
|
||||
|
||||
# `Patronus Evaluation Tools`
|
||||
|
||||
## Description
|
||||
|
||||
The [Patronus evaluation tools](https://patronus.ai) are designed to enable CrewAI agents to evaluate and score model inputs and outputs using the Patronus AI platform. These tools provide different levels of control over the evaluation process, from allowing agents to select the most appropriate evaluator and criteria to using predefined criteria or custom local evaluators.
|
||||
|
||||
There are three main Patronus evaluation tools:
|
||||
|
||||
1. **PatronusEvalTool**: Allows agents to select the most appropriate evaluator and criteria for the evaluation task.
|
||||
2. **PatronusPredefinedCriteriaEvalTool**: Uses predefined evaluator and criteria specified by the user.
|
||||
3. **PatronusLocalEvaluatorTool**: Uses custom function evaluators defined by the user.
|
||||
|
||||
## Installation
|
||||
|
||||
To use these tools, you need to install the Patronus package:
|
||||
|
||||
```shell
|
||||
uv add patronus
|
||||
```
|
||||
|
||||
You'll also need to set up your Patronus API key as an environment variable:
|
||||
|
||||
```shell
|
||||
export PATRONUS_API_KEY="your_patronus_api_key"
|
||||
```
|
||||
|
||||
## Steps to Get Started
|
||||
|
||||
To effectively use the Patronus evaluation tools, follow these steps:
|
||||
|
||||
1. **Install Patronus**: Install the Patronus package using the command above.
|
||||
2. **Set Up API Key**: Set your Patronus API key as an environment variable.
|
||||
3. **Choose the Right Tool**: Select the appropriate Patronus evaluation tool based on your needs.
|
||||
4. **Configure the Tool**: Configure the tool with the necessary parameters.
|
||||
|
||||
## Examples
|
||||
|
||||
### Using PatronusEvalTool
|
||||
|
||||
The following example demonstrates how to use the `PatronusEvalTool`, which allows agents to select the most appropriate evaluator and criteria:
|
||||
|
||||
```python Code
|
||||
from crewai import Agent, Task, Crew
|
||||
from crewai_tools import PatronusEvalTool
|
||||
|
||||
# Initialize the tool
|
||||
patronus_eval_tool = PatronusEvalTool()
|
||||
|
||||
# Define an agent that uses the tool
|
||||
coding_agent = Agent(
|
||||
role="Coding Agent",
|
||||
goal="Generate high quality code and verify that the output is code",
|
||||
backstory="An experienced coder who can generate high quality python code.",
|
||||
tools=[patronus_eval_tool],
|
||||
verbose=True,
|
||||
)
|
||||
|
||||
# Example task to generate and evaluate code
|
||||
generate_code_task = Task(
|
||||
description="Create a simple program to generate the first N numbers in the Fibonacci sequence. Select the most appropriate evaluator and criteria for evaluating your output.",
|
||||
expected_output="Program that generates the first N numbers in the Fibonacci sequence.",
|
||||
agent=coding_agent,
|
||||
)
|
||||
|
||||
# Create and run the crew
|
||||
crew = Crew(agents=[coding_agent], tasks=[generate_code_task])
|
||||
result = crew.kickoff()
|
||||
```
|
||||
|
||||
### Using PatronusPredefinedCriteriaEvalTool
|
||||
|
||||
The following example demonstrates how to use the `PatronusPredefinedCriteriaEvalTool`, which uses predefined evaluator and criteria:
|
||||
|
||||
```python Code
|
||||
from crewai import Agent, Task, Crew
|
||||
from crewai_tools import PatronusPredefinedCriteriaEvalTool
|
||||
|
||||
# Initialize the tool with predefined criteria
|
||||
patronus_eval_tool = PatronusPredefinedCriteriaEvalTool(
|
||||
evaluators=[{"evaluator": "judge", "criteria": "contains-code"}]
|
||||
)
|
||||
|
||||
# Define an agent that uses the tool
|
||||
coding_agent = Agent(
|
||||
role="Coding Agent",
|
||||
goal="Generate high quality code",
|
||||
backstory="An experienced coder who can generate high quality python code.",
|
||||
tools=[patronus_eval_tool],
|
||||
verbose=True,
|
||||
)
|
||||
|
||||
# Example task to generate code
|
||||
generate_code_task = Task(
|
||||
description="Create a simple program to generate the first N numbers in the Fibonacci sequence.",
|
||||
expected_output="Program that generates the first N numbers in the Fibonacci sequence.",
|
||||
agent=coding_agent,
|
||||
)
|
||||
|
||||
# Create and run the crew
|
||||
crew = Crew(agents=[coding_agent], tasks=[generate_code_task])
|
||||
result = crew.kickoff()
|
||||
```
|
||||
|
||||
### Using PatronusLocalEvaluatorTool
|
||||
|
||||
The following example demonstrates how to use the `PatronusLocalEvaluatorTool`, which uses custom function evaluators:
|
||||
|
||||
```python Code
|
||||
from crewai import Agent, Task, Crew
|
||||
from crewai_tools import PatronusLocalEvaluatorTool
|
||||
from patronus import Client, EvaluationResult
|
||||
import random
|
||||
|
||||
# Initialize the Patronus client
|
||||
client = Client()
|
||||
|
||||
# Register a custom evaluator
|
||||
@client.register_local_evaluator("random_evaluator")
|
||||
def random_evaluator(**kwargs):
|
||||
score = random.random()
|
||||
return EvaluationResult(
|
||||
score_raw=score,
|
||||
pass_=score >= 0.5,
|
||||
explanation="example explanation",
|
||||
)
|
||||
|
||||
# Initialize the tool with the custom evaluator
|
||||
patronus_eval_tool = PatronusLocalEvaluatorTool(
|
||||
patronus_client=client,
|
||||
evaluator="random_evaluator",
|
||||
evaluated_model_gold_answer="example label",
|
||||
)
|
||||
|
||||
# Define an agent that uses the tool
|
||||
coding_agent = Agent(
|
||||
role="Coding Agent",
|
||||
goal="Generate high quality code",
|
||||
backstory="An experienced coder who can generate high quality python code.",
|
||||
tools=[patronus_eval_tool],
|
||||
verbose=True,
|
||||
)
|
||||
|
||||
# Example task to generate code
|
||||
generate_code_task = Task(
|
||||
description="Create a simple program to generate the first N numbers in the Fibonacci sequence.",
|
||||
expected_output="Program that generates the first N numbers in the Fibonacci sequence.",
|
||||
agent=coding_agent,
|
||||
)
|
||||
|
||||
# Create and run the crew
|
||||
crew = Crew(agents=[coding_agent], tasks=[generate_code_task])
|
||||
result = crew.kickoff()
|
||||
```
|
||||
|
||||
## Parameters
|
||||
|
||||
### PatronusEvalTool
|
||||
|
||||
The `PatronusEvalTool` does not require any parameters during initialization. It automatically fetches available evaluators and criteria from the Patronus API.
|
||||
|
||||
### PatronusPredefinedCriteriaEvalTool
|
||||
|
||||
The `PatronusPredefinedCriteriaEvalTool` accepts the following parameters during initialization:
|
||||
|
||||
- **evaluators**: Required. A list of dictionaries containing the evaluator and criteria to use. For example: `[{"evaluator": "judge", "criteria": "contains-code"}]`.
|
||||
|
||||
### PatronusLocalEvaluatorTool
|
||||
|
||||
The `PatronusLocalEvaluatorTool` accepts the following parameters during initialization:
|
||||
|
||||
- **patronus_client**: Required. The Patronus client instance.
|
||||
- **evaluator**: Optional. The name of the registered local evaluator to use. Default is an empty string.
|
||||
- **evaluated_model_gold_answer**: Optional. The gold answer to use for evaluation. Default is an empty string.
|
||||
|
||||
## Usage
|
||||
|
||||
When using the Patronus evaluation tools, you provide the model input, output, and context, and the tool returns the evaluation results from the Patronus API.
|
||||
|
||||
For the `PatronusEvalTool` and `PatronusPredefinedCriteriaEvalTool`, the following parameters are required when calling the tool:
|
||||
|
||||
- **evaluated_model_input**: The agent's task description in simple text.
|
||||
- **evaluated_model_output**: The agent's output of the task.
|
||||
- **evaluated_model_retrieved_context**: The agent's context.
|
||||
|
||||
For the `PatronusLocalEvaluatorTool`, the same parameters are required, but the evaluator and gold answer are specified during initialization.
|
||||
|
||||
## Conclusion
|
||||
|
||||
The Patronus evaluation tools provide a powerful way to evaluate and score model inputs and outputs using the Patronus AI platform. By enabling agents to evaluate their own outputs or the outputs of other agents, these tools can help improve the quality and reliability of CrewAI workflows.
|
||||
@@ -1,271 +0,0 @@
|
||||
---
|
||||
title: 'Qdrant Vector Search Tool'
|
||||
description: 'Semantic search capabilities for CrewAI agents using Qdrant vector database'
|
||||
icon: magnifying-glass-plus
|
||||
---
|
||||
|
||||
# `QdrantVectorSearchTool`
|
||||
|
||||
The Qdrant Vector Search Tool enables semantic search capabilities in your CrewAI agents by leveraging [Qdrant](https://qdrant.tech/), a vector similarity search engine. This tool allows your agents to search through documents stored in a Qdrant collection using semantic similarity.
|
||||
|
||||
## Installation
|
||||
|
||||
Install the required packages:
|
||||
|
||||
```bash
|
||||
uv add qdrant-client
|
||||
```
|
||||
|
||||
## Basic Usage
|
||||
|
||||
Here's a minimal example of how to use the tool:
|
||||
|
||||
```python
|
||||
from crewai import Agent
|
||||
from crewai_tools import QdrantVectorSearchTool
|
||||
|
||||
# Initialize the tool
|
||||
qdrant_tool = QdrantVectorSearchTool(
|
||||
qdrant_url="your_qdrant_url",
|
||||
qdrant_api_key="your_qdrant_api_key",
|
||||
collection_name="your_collection"
|
||||
)
|
||||
|
||||
# Create an agent that uses the tool
|
||||
agent = Agent(
|
||||
role="Research Assistant",
|
||||
goal="Find relevant information in documents",
|
||||
tools=[qdrant_tool]
|
||||
)
|
||||
|
||||
# The tool will automatically use OpenAI embeddings
|
||||
# and return the 3 most relevant results with scores > 0.35
|
||||
```
|
||||
|
||||
## Complete Working Example
|
||||
|
||||
Here's a complete example showing how to:
|
||||
1. Extract text from a PDF
|
||||
2. Generate embeddings using OpenAI
|
||||
3. Store in Qdrant
|
||||
4. Create a CrewAI agentic RAG workflow for semantic search
|
||||
|
||||
```python
|
||||
import os
|
||||
import uuid
|
||||
import pdfplumber
|
||||
from openai import OpenAI
|
||||
from dotenv import load_dotenv
|
||||
from crewai import Agent, Task, Crew, Process, LLM
|
||||
from crewai_tools import QdrantVectorSearchTool
|
||||
from qdrant_client import QdrantClient
|
||||
from qdrant_client.models import PointStruct, Distance, VectorParams
|
||||
|
||||
# Load environment variables
|
||||
load_dotenv()
|
||||
|
||||
# Initialize OpenAI client
|
||||
client = OpenAI(api_key=os.getenv("OPENAI_API_KEY"))
|
||||
|
||||
# Extract text from PDF
|
||||
def extract_text_from_pdf(pdf_path):
|
||||
text = []
|
||||
with pdfplumber.open(pdf_path) as pdf:
|
||||
for page in pdf.pages:
|
||||
page_text = page.extract_text()
|
||||
if page_text:
|
||||
text.append(page_text.strip())
|
||||
return text
|
||||
|
||||
# Generate OpenAI embeddings
|
||||
def get_openai_embedding(text):
|
||||
response = client.embeddings.create(
|
||||
input=text,
|
||||
model="text-embedding-3-small"
|
||||
)
|
||||
return response.data[0].embedding
|
||||
|
||||
# Store text and embeddings in Qdrant
|
||||
def load_pdf_to_qdrant(pdf_path, qdrant, collection_name):
|
||||
# Extract text from PDF
|
||||
text_chunks = extract_text_from_pdf(pdf_path)
|
||||
|
||||
# Create Qdrant collection
|
||||
if qdrant.collection_exists(collection_name):
|
||||
qdrant.delete_collection(collection_name)
|
||||
qdrant.create_collection(
|
||||
collection_name=collection_name,
|
||||
vectors_config=VectorParams(size=1536, distance=Distance.COSINE)
|
||||
)
|
||||
|
||||
# Store embeddings
|
||||
points = []
|
||||
for chunk in text_chunks:
|
||||
embedding = get_openai_embedding(chunk)
|
||||
points.append(PointStruct(
|
||||
id=str(uuid.uuid4()),
|
||||
vector=embedding,
|
||||
payload={"text": chunk}
|
||||
))
|
||||
qdrant.upsert(collection_name=collection_name, points=points)
|
||||
|
||||
# Initialize Qdrant client and load data
|
||||
qdrant = QdrantClient(
|
||||
url=os.getenv("QDRANT_URL"),
|
||||
api_key=os.getenv("QDRANT_API_KEY")
|
||||
)
|
||||
collection_name = "example_collection"
|
||||
pdf_path = "path/to/your/document.pdf"
|
||||
load_pdf_to_qdrant(pdf_path, qdrant, collection_name)
|
||||
|
||||
# Initialize Qdrant search tool
|
||||
qdrant_tool = QdrantVectorSearchTool(
|
||||
qdrant_url=os.getenv("QDRANT_URL"),
|
||||
qdrant_api_key=os.getenv("QDRANT_API_KEY"),
|
||||
collection_name=collection_name,
|
||||
limit=3,
|
||||
score_threshold=0.35
|
||||
)
|
||||
|
||||
# Create CrewAI agents
|
||||
search_agent = Agent(
|
||||
role="Senior Semantic Search Agent",
|
||||
goal="Find and analyze documents based on semantic search",
|
||||
backstory="""You are an expert research assistant who can find relevant
|
||||
information using semantic search in a Qdrant database.""",
|
||||
tools=[qdrant_tool],
|
||||
verbose=True
|
||||
)
|
||||
|
||||
answer_agent = Agent(
|
||||
role="Senior Answer Assistant",
|
||||
goal="Generate answers to questions based on the context provided",
|
||||
backstory="""You are an expert answer assistant who can generate
|
||||
answers to questions based on the context provided.""",
|
||||
tools=[qdrant_tool],
|
||||
verbose=True
|
||||
)
|
||||
|
||||
# Define tasks
|
||||
search_task = Task(
|
||||
description="""Search for relevant documents about the {query}.
|
||||
Your final answer should include:
|
||||
- The relevant information found
|
||||
- The similarity scores of the results
|
||||
- The metadata of the relevant documents""",
|
||||
agent=search_agent
|
||||
)
|
||||
|
||||
answer_task = Task(
|
||||
description="""Given the context and metadata of relevant documents,
|
||||
generate a final answer based on the context.""",
|
||||
agent=answer_agent
|
||||
)
|
||||
|
||||
# Run CrewAI workflow
|
||||
crew = Crew(
|
||||
agents=[search_agent, answer_agent],
|
||||
tasks=[search_task, answer_task],
|
||||
process=Process.sequential,
|
||||
verbose=True
|
||||
)
|
||||
|
||||
result = crew.kickoff(
|
||||
inputs={"query": "What is the role of X in the document?"}
|
||||
)
|
||||
print(result)
|
||||
```
|
||||
|
||||
## Tool Parameters
|
||||
|
||||
### Required Parameters
|
||||
- `qdrant_url` (str): The URL of your Qdrant server
|
||||
- `qdrant_api_key` (str): API key for authentication with Qdrant
|
||||
- `collection_name` (str): Name of the Qdrant collection to search
|
||||
|
||||
### Optional Parameters
|
||||
- `limit` (int): Maximum number of results to return (default: 3)
|
||||
- `score_threshold` (float): Minimum similarity score threshold (default: 0.35)
|
||||
- `custom_embedding_fn` (Callable[[str], list[float]]): Custom function for text vectorization
|
||||
|
||||
## Search Parameters
|
||||
|
||||
The tool accepts these parameters in its schema:
|
||||
- `query` (str): The search query to find similar documents
|
||||
- `filter_by` (str, optional): Metadata field to filter on
|
||||
- `filter_value` (str, optional): Value to filter by
|
||||
|
||||
## Return Format
|
||||
|
||||
The tool returns results in JSON format:
|
||||
|
||||
```json
|
||||
[
|
||||
{
|
||||
"metadata": {
|
||||
// Any metadata stored with the document
|
||||
},
|
||||
"context": "The actual text content of the document",
|
||||
"distance": 0.95 // Similarity score
|
||||
}
|
||||
]
|
||||
```
|
||||
|
||||
## Default Embedding
|
||||
|
||||
By default, the tool uses OpenAI's `text-embedding-3-small` model for vectorization. This requires:
|
||||
- OpenAI API key set in environment: `OPENAI_API_KEY`
|
||||
|
||||
## Custom Embeddings
|
||||
|
||||
Instead of using the default embedding model, you might want to use your own embedding function in cases where you:
|
||||
|
||||
1. Want to use a different embedding model (e.g., Cohere, HuggingFace, Ollama models)
|
||||
2. Need to reduce costs by using open-source embedding models
|
||||
3. Have specific requirements for vector dimensions or embedding quality
|
||||
4. Want to use domain-specific embeddings (e.g., for medical or legal text)
|
||||
|
||||
Here's an example using a HuggingFace model:
|
||||
|
||||
```python
|
||||
from transformers import AutoTokenizer, AutoModel
|
||||
import torch
|
||||
|
||||
# Load model and tokenizer
|
||||
tokenizer = AutoTokenizer.from_pretrained('sentence-transformers/all-MiniLM-L6-v2')
|
||||
model = AutoModel.from_pretrained('sentence-transformers/all-MiniLM-L6-v2')
|
||||
|
||||
def custom_embeddings(text: str) -> list[float]:
|
||||
# Tokenize and get model outputs
|
||||
inputs = tokenizer(text, return_tensors="pt", padding=True, truncation=True)
|
||||
outputs = model(**inputs)
|
||||
|
||||
# Use mean pooling to get text embedding
|
||||
embeddings = outputs.last_hidden_state.mean(dim=1)
|
||||
|
||||
# Convert to list of floats and return
|
||||
return embeddings[0].tolist()
|
||||
|
||||
# Use custom embeddings with the tool
|
||||
tool = QdrantVectorSearchTool(
|
||||
qdrant_url="your_url",
|
||||
qdrant_api_key="your_key",
|
||||
collection_name="your_collection",
|
||||
custom_embedding_fn=custom_embeddings # Pass your custom function
|
||||
)
|
||||
```
|
||||
|
||||
## Error Handling
|
||||
|
||||
The tool handles these specific errors:
|
||||
- Raises ImportError if `qdrant-client` is not installed (with option to auto-install)
|
||||
- Raises ValueError if `QDRANT_URL` is not set
|
||||
- Prompts to install `qdrant-client` if missing using `uv add qdrant-client`
|
||||
|
||||
## Environment Variables
|
||||
|
||||
Required environment variables:
|
||||
```bash
|
||||
export QDRANT_URL="your_qdrant_url" # If not provided in constructor
|
||||
export QDRANT_API_KEY="your_api_key" # If not provided in constructor
|
||||
export OPENAI_API_KEY="your_openai_key" # If using default embeddings
|
||||
@@ -1,154 +0,0 @@
|
||||
---
|
||||
title: RAG Tool
|
||||
description: The `RagTool` is a dynamic knowledge base tool for answering questions using Retrieval-Augmented Generation.
|
||||
icon: vector-square
|
||||
---
|
||||
|
||||
# `RagTool`
|
||||
|
||||
## Description
|
||||
|
||||
The `RagTool` is designed to answer questions by leveraging the power of Retrieval-Augmented Generation (RAG) through EmbedChain.
|
||||
It provides a dynamic knowledge base that can be queried to retrieve relevant information from various data sources.
|
||||
This tool is particularly useful for applications that require access to a vast array of information and need to provide contextually relevant answers.
|
||||
|
||||
## Example
|
||||
|
||||
The following example demonstrates how to initialize the tool and use it with different data sources:
|
||||
|
||||
```python Code
|
||||
from crewai_tools import RagTool
|
||||
|
||||
# Create a RAG tool with default settings
|
||||
rag_tool = RagTool()
|
||||
|
||||
# Add content from a file
|
||||
rag_tool.add(data_type="file", path="path/to/your/document.pdf")
|
||||
|
||||
# Add content from a web page
|
||||
rag_tool.add(data_type="web_page", url="https://example.com")
|
||||
|
||||
# Define an agent with the RagTool
|
||||
@agent
|
||||
def knowledge_expert(self) -> Agent:
|
||||
'''
|
||||
This agent uses the RagTool to answer questions about the knowledge base.
|
||||
'''
|
||||
return Agent(
|
||||
config=self.agents_config["knowledge_expert"],
|
||||
allow_delegation=False,
|
||||
tools=[rag_tool]
|
||||
)
|
||||
```
|
||||
|
||||
## Supported Data Sources
|
||||
|
||||
The `RagTool` can be used with a wide variety of data sources, including:
|
||||
|
||||
- 📰 PDF files
|
||||
- 📊 CSV files
|
||||
- 📃 JSON files
|
||||
- 📝 Text
|
||||
- 📁 Directories/Folders
|
||||
- 🌐 HTML Web pages
|
||||
- 📽️ YouTube Channels
|
||||
- 📺 YouTube Videos
|
||||
- 📚 Documentation websites
|
||||
- 📝 MDX files
|
||||
- 📄 DOCX files
|
||||
- 🧾 XML files
|
||||
- 📬 Gmail
|
||||
- 📝 GitHub repositories
|
||||
- 🐘 PostgreSQL databases
|
||||
- 🐬 MySQL databases
|
||||
- 🤖 Slack conversations
|
||||
- 💬 Discord messages
|
||||
- 🗨️ Discourse forums
|
||||
- 📝 Substack newsletters
|
||||
- 🐝 Beehiiv content
|
||||
- 💾 Dropbox files
|
||||
- 🖼️ Images
|
||||
- ⚙️ Custom data sources
|
||||
|
||||
## Parameters
|
||||
|
||||
The `RagTool` accepts the following parameters:
|
||||
|
||||
- **summarize**: Optional. Whether to summarize the retrieved content. Default is `False`.
|
||||
- **adapter**: Optional. A custom adapter for the knowledge base. If not provided, an EmbedchainAdapter will be used.
|
||||
- **config**: Optional. Configuration for the underlying EmbedChain App.
|
||||
|
||||
## Adding Content
|
||||
|
||||
You can add content to the knowledge base using the `add` method:
|
||||
|
||||
```python Code
|
||||
# Add a PDF file
|
||||
rag_tool.add(data_type="file", path="path/to/your/document.pdf")
|
||||
|
||||
# Add a web page
|
||||
rag_tool.add(data_type="web_page", url="https://example.com")
|
||||
|
||||
# Add a YouTube video
|
||||
rag_tool.add(data_type="youtube_video", url="https://www.youtube.com/watch?v=VIDEO_ID")
|
||||
|
||||
# Add a directory of files
|
||||
rag_tool.add(data_type="directory", path="path/to/your/directory")
|
||||
```
|
||||
|
||||
## Agent Integration Example
|
||||
|
||||
Here's how to integrate the `RagTool` with a CrewAI agent:
|
||||
|
||||
```python Code
|
||||
from crewai import Agent
|
||||
from crewai.project import agent
|
||||
from crewai_tools import RagTool
|
||||
|
||||
# Initialize the tool and add content
|
||||
rag_tool = RagTool()
|
||||
rag_tool.add(data_type="web_page", url="https://docs.crewai.com")
|
||||
rag_tool.add(data_type="file", path="company_data.pdf")
|
||||
|
||||
# Define an agent with the RagTool
|
||||
@agent
|
||||
def knowledge_expert(self) -> Agent:
|
||||
return Agent(
|
||||
config=self.agents_config["knowledge_expert"],
|
||||
allow_delegation=False,
|
||||
tools=[rag_tool]
|
||||
)
|
||||
```
|
||||
|
||||
## Advanced Configuration
|
||||
|
||||
You can customize the behavior of the `RagTool` by providing a configuration dictionary:
|
||||
|
||||
```python Code
|
||||
from crewai_tools import RagTool
|
||||
|
||||
# Create a RAG tool with custom configuration
|
||||
config = {
|
||||
"app": {
|
||||
"name": "custom_app",
|
||||
},
|
||||
"llm": {
|
||||
"provider": "openai",
|
||||
"config": {
|
||||
"model": "gpt-4",
|
||||
}
|
||||
},
|
||||
"embedder": {
|
||||
"provider": "openai",
|
||||
"config": {
|
||||
"model": "text-embedding-ada-002"
|
||||
}
|
||||
}
|
||||
}
|
||||
|
||||
rag_tool = RagTool(config=config, summarize=True)
|
||||
```
|
||||
|
||||
## Conclusion
|
||||
|
||||
The `RagTool` provides a powerful way to create and query knowledge bases from various data sources. By leveraging Retrieval-Augmented Generation, it enables agents to access and retrieve relevant information efficiently, enhancing their ability to provide accurate and contextually appropriate responses.
|
||||
@@ -1,144 +0,0 @@
|
||||
---
|
||||
title: S3 Reader Tool
|
||||
description: The `S3ReaderTool` enables CrewAI agents to read files from Amazon S3 buckets.
|
||||
icon: aws
|
||||
---
|
||||
|
||||
# `S3ReaderTool`
|
||||
|
||||
## Description
|
||||
|
||||
The `S3ReaderTool` is designed to read files from Amazon S3 buckets. This tool allows CrewAI agents to access and retrieve content stored in S3, making it ideal for workflows that require reading data, configuration files, or any other content stored in AWS S3 storage.
|
||||
|
||||
## Installation
|
||||
|
||||
To use this tool, you need to install the required dependencies:
|
||||
|
||||
```shell
|
||||
uv add boto3
|
||||
```
|
||||
|
||||
## Steps to Get Started
|
||||
|
||||
To effectively use the `S3ReaderTool`, follow these steps:
|
||||
|
||||
1. **Install Dependencies**: Install the required packages using the command above.
|
||||
2. **Configure AWS Credentials**: Set up your AWS credentials as environment variables.
|
||||
3. **Initialize the Tool**: Create an instance of the tool.
|
||||
4. **Specify S3 Path**: Provide the S3 path to the file you want to read.
|
||||
|
||||
## Example
|
||||
|
||||
The following example demonstrates how to use the `S3ReaderTool` to read a file from an S3 bucket:
|
||||
|
||||
```python Code
|
||||
from crewai import Agent, Task, Crew
|
||||
from crewai_tools.aws.s3 import S3ReaderTool
|
||||
|
||||
# Initialize the tool
|
||||
s3_reader_tool = S3ReaderTool()
|
||||
|
||||
# Define an agent that uses the tool
|
||||
file_reader_agent = Agent(
|
||||
role="File Reader",
|
||||
goal="Read files from S3 buckets",
|
||||
backstory="An expert in retrieving and processing files from cloud storage.",
|
||||
tools=[s3_reader_tool],
|
||||
verbose=True,
|
||||
)
|
||||
|
||||
# Example task to read a configuration file
|
||||
read_task = Task(
|
||||
description="Read the configuration file from {my_bucket} and summarize its contents.",
|
||||
expected_output="A summary of the configuration file contents.",
|
||||
agent=file_reader_agent,
|
||||
)
|
||||
|
||||
# Create and run the crew
|
||||
crew = Crew(agents=[file_reader_agent], tasks=[read_task])
|
||||
result = crew.kickoff(inputs={"my_bucket": "s3://my-bucket/config/app-config.json"})
|
||||
```
|
||||
|
||||
## Parameters
|
||||
|
||||
The `S3ReaderTool` accepts the following parameter when used by an agent:
|
||||
|
||||
- **file_path**: Required. The S3 file path in the format `s3://bucket-name/file-name`.
|
||||
|
||||
## AWS Credentials
|
||||
|
||||
The tool requires AWS credentials to access S3 buckets. You can configure these credentials using environment variables:
|
||||
|
||||
- **CREW_AWS_REGION**: The AWS region where your S3 bucket is located. Default is `us-east-1`.
|
||||
- **CREW_AWS_ACCESS_KEY_ID**: Your AWS access key ID.
|
||||
- **CREW_AWS_SEC_ACCESS_KEY**: Your AWS secret access key.
|
||||
|
||||
## Usage
|
||||
|
||||
When using the `S3ReaderTool` with an agent, the agent will need to provide the S3 file path:
|
||||
|
||||
```python Code
|
||||
# Example of using the tool with an agent
|
||||
file_reader_agent = Agent(
|
||||
role="File Reader",
|
||||
goal="Read files from S3 buckets",
|
||||
backstory="An expert in retrieving and processing files from cloud storage.",
|
||||
tools=[s3_reader_tool],
|
||||
verbose=True,
|
||||
)
|
||||
|
||||
# Create a task for the agent to read a specific file
|
||||
read_config_task = Task(
|
||||
description="Read the application configuration file from {my_bucket} and extract the database connection settings.",
|
||||
expected_output="The database connection settings from the configuration file.",
|
||||
agent=file_reader_agent,
|
||||
)
|
||||
|
||||
# Run the task
|
||||
crew = Crew(agents=[file_reader_agent], tasks=[read_config_task])
|
||||
result = crew.kickoff(inputs={"my_bucket": "s3://my-bucket/config/app-config.json"})
|
||||
```
|
||||
|
||||
## Error Handling
|
||||
|
||||
The `S3ReaderTool` includes error handling for common S3 issues:
|
||||
|
||||
- Invalid S3 path format
|
||||
- Missing or inaccessible files
|
||||
- Permission issues
|
||||
- AWS credential problems
|
||||
|
||||
When an error occurs, the tool will return an error message that includes details about the issue.
|
||||
|
||||
## Implementation Details
|
||||
|
||||
The `S3ReaderTool` uses the AWS SDK for Python (boto3) to interact with S3:
|
||||
|
||||
```python Code
|
||||
class S3ReaderTool(BaseTool):
|
||||
name: str = "S3 Reader Tool"
|
||||
description: str = "Reads a file from Amazon S3 given an S3 file path"
|
||||
|
||||
def _run(self, file_path: str) -> str:
|
||||
try:
|
||||
bucket_name, object_key = self._parse_s3_path(file_path)
|
||||
|
||||
s3 = boto3.client(
|
||||
's3',
|
||||
region_name=os.getenv('CREW_AWS_REGION', 'us-east-1'),
|
||||
aws_access_key_id=os.getenv('CREW_AWS_ACCESS_KEY_ID'),
|
||||
aws_secret_access_key=os.getenv('CREW_AWS_SEC_ACCESS_KEY')
|
||||
)
|
||||
|
||||
# Read file content from S3
|
||||
response = s3.get_object(Bucket=bucket_name, Key=object_key)
|
||||
file_content = response['Body'].read().decode('utf-8')
|
||||
|
||||
return file_content
|
||||
except ClientError as e:
|
||||
return f"Error reading file from S3: {str(e)}"
|
||||
```
|
||||
|
||||
## Conclusion
|
||||
|
||||
The `S3ReaderTool` provides a straightforward way to read files from Amazon S3 buckets. By enabling agents to access content stored in S3, it facilitates workflows that require cloud-based file access. This tool is particularly useful for data processing, configuration management, and any task that involves retrieving information from AWS S3 storage.
|
||||
@@ -1,150 +0,0 @@
|
||||
---
|
||||
title: S3 Writer Tool
|
||||
description: The `S3WriterTool` enables CrewAI agents to write content to files in Amazon S3 buckets.
|
||||
icon: aws
|
||||
---
|
||||
|
||||
# `S3WriterTool`
|
||||
|
||||
## Description
|
||||
|
||||
The `S3WriterTool` is designed to write content to files in Amazon S3 buckets. This tool allows CrewAI agents to create or update files in S3, making it ideal for workflows that require storing data, saving configuration files, or persisting any other content to AWS S3 storage.
|
||||
|
||||
## Installation
|
||||
|
||||
To use this tool, you need to install the required dependencies:
|
||||
|
||||
```shell
|
||||
uv add boto3
|
||||
```
|
||||
|
||||
## Steps to Get Started
|
||||
|
||||
To effectively use the `S3WriterTool`, follow these steps:
|
||||
|
||||
1. **Install Dependencies**: Install the required packages using the command above.
|
||||
2. **Configure AWS Credentials**: Set up your AWS credentials as environment variables.
|
||||
3. **Initialize the Tool**: Create an instance of the tool.
|
||||
4. **Specify S3 Path and Content**: Provide the S3 path where you want to write the file and the content to be written.
|
||||
|
||||
## Example
|
||||
|
||||
The following example demonstrates how to use the `S3WriterTool` to write content to a file in an S3 bucket:
|
||||
|
||||
```python Code
|
||||
from crewai import Agent, Task, Crew
|
||||
from crewai_tools.aws.s3 import S3WriterTool
|
||||
|
||||
# Initialize the tool
|
||||
s3_writer_tool = S3WriterTool()
|
||||
|
||||
# Define an agent that uses the tool
|
||||
file_writer_agent = Agent(
|
||||
role="File Writer",
|
||||
goal="Write content to files in S3 buckets",
|
||||
backstory="An expert in storing and managing files in cloud storage.",
|
||||
tools=[s3_writer_tool],
|
||||
verbose=True,
|
||||
)
|
||||
|
||||
# Example task to write a report
|
||||
write_task = Task(
|
||||
description="Generate a summary report of the quarterly sales data and save it to {my_bucket}.",
|
||||
expected_output="Confirmation that the report was successfully saved to S3.",
|
||||
agent=file_writer_agent,
|
||||
)
|
||||
|
||||
# Create and run the crew
|
||||
crew = Crew(agents=[file_writer_agent], tasks=[write_task])
|
||||
result = crew.kickoff(inputs={"my_bucket": "s3://my-bucket/reports/quarterly-summary.txt"})
|
||||
```
|
||||
|
||||
## Parameters
|
||||
|
||||
The `S3WriterTool` accepts the following parameters when used by an agent:
|
||||
|
||||
- **file_path**: Required. The S3 file path in the format `s3://bucket-name/file-name`.
|
||||
- **content**: Required. The content to write to the file.
|
||||
|
||||
## AWS Credentials
|
||||
|
||||
The tool requires AWS credentials to access S3 buckets. You can configure these credentials using environment variables:
|
||||
|
||||
- **CREW_AWS_REGION**: The AWS region where your S3 bucket is located. Default is `us-east-1`.
|
||||
- **CREW_AWS_ACCESS_KEY_ID**: Your AWS access key ID.
|
||||
- **CREW_AWS_SEC_ACCESS_KEY**: Your AWS secret access key.
|
||||
|
||||
## Usage
|
||||
|
||||
When using the `S3WriterTool` with an agent, the agent will need to provide both the S3 file path and the content to write:
|
||||
|
||||
```python Code
|
||||
# Example of using the tool with an agent
|
||||
file_writer_agent = Agent(
|
||||
role="File Writer",
|
||||
goal="Write content to files in S3 buckets",
|
||||
backstory="An expert in storing and managing files in cloud storage.",
|
||||
tools=[s3_writer_tool],
|
||||
verbose=True,
|
||||
)
|
||||
|
||||
# Create a task for the agent to write a specific file
|
||||
write_config_task = Task(
|
||||
description="""
|
||||
Create a configuration file with the following database settings:
|
||||
- host: db.example.com
|
||||
- port: 5432
|
||||
- username: app_user
|
||||
- password: secure_password
|
||||
|
||||
Save this configuration as JSON to {my_bucket}.
|
||||
""",
|
||||
expected_output="Confirmation that the configuration file was successfully saved to S3.",
|
||||
agent=file_writer_agent,
|
||||
)
|
||||
|
||||
# Run the task
|
||||
crew = Crew(agents=[file_writer_agent], tasks=[write_config_task])
|
||||
result = crew.kickoff(inputs={"my_bucket": "s3://my-bucket/config/db-config.json"})
|
||||
```
|
||||
|
||||
## Error Handling
|
||||
|
||||
The `S3WriterTool` includes error handling for common S3 issues:
|
||||
|
||||
- Invalid S3 path format
|
||||
- Permission issues (e.g., no write access to the bucket)
|
||||
- AWS credential problems
|
||||
- Bucket does not exist
|
||||
|
||||
When an error occurs, the tool will return an error message that includes details about the issue.
|
||||
|
||||
## Implementation Details
|
||||
|
||||
The `S3WriterTool` uses the AWS SDK for Python (boto3) to interact with S3:
|
||||
|
||||
```python Code
|
||||
class S3WriterTool(BaseTool):
|
||||
name: str = "S3 Writer Tool"
|
||||
description: str = "Writes content to a file in Amazon S3 given an S3 file path"
|
||||
|
||||
def _run(self, file_path: str, content: str) -> str:
|
||||
try:
|
||||
bucket_name, object_key = self._parse_s3_path(file_path)
|
||||
|
||||
s3 = boto3.client(
|
||||
's3',
|
||||
region_name=os.getenv('CREW_AWS_REGION', 'us-east-1'),
|
||||
aws_access_key_id=os.getenv('CREW_AWS_ACCESS_KEY_ID'),
|
||||
aws_secret_access_key=os.getenv('CREW_AWS_SEC_ACCESS_KEY')
|
||||
)
|
||||
|
||||
s3.put_object(Bucket=bucket_name, Key=object_key, Body=content.encode('utf-8'))
|
||||
return f"Successfully wrote content to {file_path}"
|
||||
except ClientError as e:
|
||||
return f"Error writing file to S3: {str(e)}"
|
||||
```
|
||||
|
||||
## Conclusion
|
||||
|
||||
The `S3WriterTool` provides a straightforward way to write content to files in Amazon S3 buckets. By enabling agents to create and update files in S3, it facilitates workflows that require cloud-based file storage. This tool is particularly useful for data persistence, configuration management, report generation, and any task that involves storing information in AWS S3 storage.
|
||||
@@ -1,139 +0,0 @@
|
||||
---
|
||||
title: Scrape Element From Website Tool
|
||||
description: The `ScrapeElementFromWebsiteTool` enables CrewAI agents to extract specific elements from websites using CSS selectors.
|
||||
icon: code
|
||||
---
|
||||
|
||||
# `ScrapeElementFromWebsiteTool`
|
||||
|
||||
## Description
|
||||
|
||||
The `ScrapeElementFromWebsiteTool` is designed to extract specific elements from websites using CSS selectors. This tool allows CrewAI agents to scrape targeted content from web pages, making it useful for data extraction tasks where only specific parts of a webpage are needed.
|
||||
|
||||
## Installation
|
||||
|
||||
To use this tool, you need to install the required dependencies:
|
||||
|
||||
```shell
|
||||
uv add requests beautifulsoup4
|
||||
```
|
||||
|
||||
## Steps to Get Started
|
||||
|
||||
To effectively use the `ScrapeElementFromWebsiteTool`, follow these steps:
|
||||
|
||||
1. **Install Dependencies**: Install the required packages using the command above.
|
||||
2. **Identify CSS Selectors**: Determine the CSS selectors for the elements you want to extract from the website.
|
||||
3. **Initialize the Tool**: Create an instance of the tool with the necessary parameters.
|
||||
|
||||
## Example
|
||||
|
||||
The following example demonstrates how to use the `ScrapeElementFromWebsiteTool` to extract specific elements from a website:
|
||||
|
||||
```python Code
|
||||
from crewai import Agent, Task, Crew
|
||||
from crewai_tools import ScrapeElementFromWebsiteTool
|
||||
|
||||
# Initialize the tool
|
||||
scrape_tool = ScrapeElementFromWebsiteTool()
|
||||
|
||||
# Define an agent that uses the tool
|
||||
web_scraper_agent = Agent(
|
||||
role="Web Scraper",
|
||||
goal="Extract specific information from websites",
|
||||
backstory="An expert in web scraping who can extract targeted content from web pages.",
|
||||
tools=[scrape_tool],
|
||||
verbose=True,
|
||||
)
|
||||
|
||||
# Example task to extract headlines from a news website
|
||||
scrape_task = Task(
|
||||
description="Extract the main headlines from the CNN homepage. Use the CSS selector '.headline' to target the headline elements.",
|
||||
expected_output="A list of the main headlines from CNN.",
|
||||
agent=web_scraper_agent,
|
||||
)
|
||||
|
||||
# Create and run the crew
|
||||
crew = Crew(agents=[web_scraper_agent], tasks=[scrape_task])
|
||||
result = crew.kickoff()
|
||||
```
|
||||
|
||||
You can also initialize the tool with predefined parameters:
|
||||
|
||||
```python Code
|
||||
# Initialize the tool with predefined parameters
|
||||
scrape_tool = ScrapeElementFromWebsiteTool(
|
||||
website_url="https://www.example.com",
|
||||
css_element=".main-content"
|
||||
)
|
||||
```
|
||||
|
||||
## Parameters
|
||||
|
||||
The `ScrapeElementFromWebsiteTool` accepts the following parameters during initialization:
|
||||
|
||||
- **website_url**: Optional. The URL of the website to scrape. If provided during initialization, the agent won't need to specify it when using the tool.
|
||||
- **css_element**: Optional. The CSS selector for the elements to extract. If provided during initialization, the agent won't need to specify it when using the tool.
|
||||
- **cookies**: Optional. A dictionary containing cookies to be sent with the request. This can be useful for websites that require authentication.
|
||||
|
||||
## Usage
|
||||
|
||||
When using the `ScrapeElementFromWebsiteTool` with an agent, the agent will need to provide the following parameters (unless they were specified during initialization):
|
||||
|
||||
- **website_url**: The URL of the website to scrape.
|
||||
- **css_element**: The CSS selector for the elements to extract.
|
||||
|
||||
The tool will return the text content of all elements matching the CSS selector, joined by newlines.
|
||||
|
||||
```python Code
|
||||
# Example of using the tool with an agent
|
||||
web_scraper_agent = Agent(
|
||||
role="Web Scraper",
|
||||
goal="Extract specific elements from websites",
|
||||
backstory="An expert in web scraping who can extract targeted content using CSS selectors.",
|
||||
tools=[scrape_tool],
|
||||
verbose=True,
|
||||
)
|
||||
|
||||
# Create a task for the agent to extract specific elements
|
||||
extract_task = Task(
|
||||
description="""
|
||||
Extract all product titles from the featured products section on example.com.
|
||||
Use the CSS selector '.product-title' to target the title elements.
|
||||
""",
|
||||
expected_output="A list of product titles from the website",
|
||||
agent=web_scraper_agent,
|
||||
)
|
||||
|
||||
# Run the task through a crew
|
||||
crew = Crew(agents=[web_scraper_agent], tasks=[extract_task])
|
||||
result = crew.kickoff()
|
||||
```
|
||||
|
||||
## Implementation Details
|
||||
|
||||
The `ScrapeElementFromWebsiteTool` uses the `requests` library to fetch the web page and `BeautifulSoup` to parse the HTML and extract the specified elements:
|
||||
|
||||
```python Code
|
||||
class ScrapeElementFromWebsiteTool(BaseTool):
|
||||
name: str = "Read a website content"
|
||||
description: str = "A tool that can be used to read a website content."
|
||||
|
||||
# Implementation details...
|
||||
|
||||
def _run(self, **kwargs: Any) -> Any:
|
||||
website_url = kwargs.get("website_url", self.website_url)
|
||||
css_element = kwargs.get("css_element", self.css_element)
|
||||
page = requests.get(
|
||||
website_url,
|
||||
headers=self.headers,
|
||||
cookies=self.cookies if self.cookies else {},
|
||||
)
|
||||
parsed = BeautifulSoup(page.content, "html.parser")
|
||||
elements = parsed.select(css_element)
|
||||
return "\n".join([element.get_text() for element in elements])
|
||||
```
|
||||
|
||||
## Conclusion
|
||||
|
||||
The `ScrapeElementFromWebsiteTool` provides a powerful way to extract specific elements from websites using CSS selectors. By enabling agents to target only the content they need, it makes web scraping tasks more efficient and focused. This tool is particularly useful for data extraction, content monitoring, and research tasks where specific information needs to be extracted from web pages.
|
||||
@@ -1,196 +0,0 @@
|
||||
---
|
||||
title: Scrapegraph Scrape Tool
|
||||
description: The `ScrapegraphScrapeTool` leverages Scrapegraph AI's SmartScraper API to intelligently extract content from websites.
|
||||
icon: chart-area
|
||||
---
|
||||
|
||||
# `ScrapegraphScrapeTool`
|
||||
|
||||
## Description
|
||||
|
||||
The `ScrapegraphScrapeTool` is designed to leverage Scrapegraph AI's SmartScraper API to intelligently extract content from websites. This tool provides advanced web scraping capabilities with AI-powered content extraction, making it ideal for targeted data collection and content analysis tasks. Unlike traditional web scrapers, it can understand the context and structure of web pages to extract the most relevant information based on natural language prompts.
|
||||
|
||||
## Installation
|
||||
|
||||
To use this tool, you need to install the Scrapegraph Python client:
|
||||
|
||||
```shell
|
||||
uv add scrapegraph-py
|
||||
```
|
||||
|
||||
You'll also need to set up your Scrapegraph API key as an environment variable:
|
||||
|
||||
```shell
|
||||
export SCRAPEGRAPH_API_KEY="your_api_key"
|
||||
```
|
||||
|
||||
You can obtain an API key from [Scrapegraph AI](https://scrapegraphai.com).
|
||||
|
||||
## Steps to Get Started
|
||||
|
||||
To effectively use the `ScrapegraphScrapeTool`, follow these steps:
|
||||
|
||||
1. **Install Dependencies**: Install the required package using the command above.
|
||||
2. **Set Up API Key**: Set your Scrapegraph API key as an environment variable or provide it during initialization.
|
||||
3. **Initialize the Tool**: Create an instance of the tool with the necessary parameters.
|
||||
4. **Define Extraction Prompts**: Create natural language prompts to guide the extraction of specific content.
|
||||
|
||||
## Example
|
||||
|
||||
The following example demonstrates how to use the `ScrapegraphScrapeTool` to extract content from a website:
|
||||
|
||||
```python Code
|
||||
from crewai import Agent, Task, Crew
|
||||
from crewai_tools import ScrapegraphScrapeTool
|
||||
|
||||
# Initialize the tool
|
||||
scrape_tool = ScrapegraphScrapeTool(api_key="your_api_key")
|
||||
|
||||
# Define an agent that uses the tool
|
||||
web_scraper_agent = Agent(
|
||||
role="Web Scraper",
|
||||
goal="Extract specific information from websites",
|
||||
backstory="An expert in web scraping who can extract targeted content from web pages.",
|
||||
tools=[scrape_tool],
|
||||
verbose=True,
|
||||
)
|
||||
|
||||
# Example task to extract product information from an e-commerce site
|
||||
scrape_task = Task(
|
||||
description="Extract product names, prices, and descriptions from the featured products section of example.com.",
|
||||
expected_output="A structured list of product information including names, prices, and descriptions.",
|
||||
agent=web_scraper_agent,
|
||||
)
|
||||
|
||||
# Create and run the crew
|
||||
crew = Crew(agents=[web_scraper_agent], tasks=[scrape_task])
|
||||
result = crew.kickoff()
|
||||
```
|
||||
|
||||
You can also initialize the tool with predefined parameters:
|
||||
|
||||
```python Code
|
||||
# Initialize the tool with predefined parameters
|
||||
scrape_tool = ScrapegraphScrapeTool(
|
||||
website_url="https://www.example.com",
|
||||
user_prompt="Extract all product prices and descriptions",
|
||||
api_key="your_api_key"
|
||||
)
|
||||
```
|
||||
|
||||
## Parameters
|
||||
|
||||
The `ScrapegraphScrapeTool` accepts the following parameters during initialization:
|
||||
|
||||
- **api_key**: Optional. Your Scrapegraph API key. If not provided, it will look for the `SCRAPEGRAPH_API_KEY` environment variable.
|
||||
- **website_url**: Optional. The URL of the website to scrape. If provided during initialization, the agent won't need to specify it when using the tool.
|
||||
- **user_prompt**: Optional. Custom instructions for content extraction. If provided during initialization, the agent won't need to specify it when using the tool.
|
||||
- **enable_logging**: Optional. Whether to enable logging for the Scrapegraph client. Default is `False`.
|
||||
|
||||
## Usage
|
||||
|
||||
When using the `ScrapegraphScrapeTool` with an agent, the agent will need to provide the following parameters (unless they were specified during initialization):
|
||||
|
||||
- **website_url**: The URL of the website to scrape.
|
||||
- **user_prompt**: Optional. Custom instructions for content extraction. Default is "Extract the main content of the webpage".
|
||||
|
||||
The tool will return the extracted content based on the provided prompt.
|
||||
|
||||
```python Code
|
||||
# Example of using the tool with an agent
|
||||
web_scraper_agent = Agent(
|
||||
role="Web Scraper",
|
||||
goal="Extract specific information from websites",
|
||||
backstory="An expert in web scraping who can extract targeted content from web pages.",
|
||||
tools=[scrape_tool],
|
||||
verbose=True,
|
||||
)
|
||||
|
||||
# Create a task for the agent to extract specific content
|
||||
extract_task = Task(
|
||||
description="Extract the main heading and summary from example.com",
|
||||
expected_output="The main heading and summary from the website",
|
||||
agent=web_scraper_agent,
|
||||
)
|
||||
|
||||
# Run the task
|
||||
crew = Crew(agents=[web_scraper_agent], tasks=[extract_task])
|
||||
result = crew.kickoff()
|
||||
```
|
||||
|
||||
## Error Handling
|
||||
|
||||
The `ScrapegraphScrapeTool` may raise the following exceptions:
|
||||
|
||||
- **ValueError**: When API key is missing or URL format is invalid.
|
||||
- **RateLimitError**: When API rate limits are exceeded.
|
||||
- **RuntimeError**: When scraping operation fails (network issues, API errors).
|
||||
|
||||
It's recommended to instruct agents to handle potential errors gracefully:
|
||||
|
||||
```python Code
|
||||
# Create a task that includes error handling instructions
|
||||
robust_extract_task = Task(
|
||||
description="""
|
||||
Extract the main heading from example.com.
|
||||
Be aware that you might encounter errors such as:
|
||||
- Invalid URL format
|
||||
- Missing API key
|
||||
- Rate limit exceeded
|
||||
- Network or API errors
|
||||
|
||||
If you encounter any errors, provide a clear explanation of what went wrong
|
||||
and suggest possible solutions.
|
||||
""",
|
||||
expected_output="Either the extracted heading or a clear error explanation",
|
||||
agent=web_scraper_agent,
|
||||
)
|
||||
```
|
||||
|
||||
## Rate Limiting
|
||||
|
||||
The Scrapegraph API has rate limits that vary based on your subscription plan. Consider the following best practices:
|
||||
|
||||
- Implement appropriate delays between requests when processing multiple URLs.
|
||||
- Handle rate limit errors gracefully in your application.
|
||||
- Check your API plan limits on the Scrapegraph dashboard.
|
||||
|
||||
## Implementation Details
|
||||
|
||||
The `ScrapegraphScrapeTool` uses the Scrapegraph Python client to interact with the SmartScraper API:
|
||||
|
||||
```python Code
|
||||
class ScrapegraphScrapeTool(BaseTool):
|
||||
"""
|
||||
A tool that uses Scrapegraph AI to intelligently scrape website content.
|
||||
"""
|
||||
|
||||
# Implementation details...
|
||||
|
||||
def _run(self, **kwargs: Any) -> Any:
|
||||
website_url = kwargs.get("website_url", self.website_url)
|
||||
user_prompt = (
|
||||
kwargs.get("user_prompt", self.user_prompt)
|
||||
or "Extract the main content of the webpage"
|
||||
)
|
||||
|
||||
if not website_url:
|
||||
raise ValueError("website_url is required")
|
||||
|
||||
# Validate URL format
|
||||
self._validate_url(website_url)
|
||||
|
||||
try:
|
||||
# Make the SmartScraper request
|
||||
response = self._client.smartscraper(
|
||||
website_url=website_url,
|
||||
user_prompt=user_prompt,
|
||||
)
|
||||
|
||||
return response
|
||||
# Error handling...
|
||||
```
|
||||
|
||||
## Conclusion
|
||||
|
||||
The `ScrapegraphScrapeTool` provides a powerful way to extract content from websites using AI-powered understanding of web page structure. By enabling agents to target specific information using natural language prompts, it makes web scraping tasks more efficient and focused. This tool is particularly useful for data extraction, content monitoring, and research tasks where specific information needs to be extracted from web pages.
|
||||
@@ -1,220 +0,0 @@
|
||||
---
|
||||
title: Scrapfly Scrape Website Tool
|
||||
description: The `ScrapflyScrapeWebsiteTool` leverages Scrapfly's web scraping API to extract content from websites in various formats.
|
||||
icon: spider
|
||||
---
|
||||
|
||||
# `ScrapflyScrapeWebsiteTool`
|
||||
|
||||
## Description
|
||||
|
||||
The `ScrapflyScrapeWebsiteTool` is designed to leverage [Scrapfly](https://scrapfly.io/)'s web scraping API to extract content from websites. This tool provides advanced web scraping capabilities with headless browser support, proxies, and anti-bot bypass features. It allows for extracting web page data in various formats, including raw HTML, markdown, and plain text, making it ideal for a wide range of web scraping tasks.
|
||||
|
||||
## Installation
|
||||
|
||||
To use this tool, you need to install the Scrapfly SDK:
|
||||
|
||||
```shell
|
||||
uv add scrapfly-sdk
|
||||
```
|
||||
|
||||
You'll also need to obtain a Scrapfly API key by registering at [scrapfly.io/register](https://www.scrapfly.io/register/).
|
||||
|
||||
## Steps to Get Started
|
||||
|
||||
To effectively use the `ScrapflyScrapeWebsiteTool`, follow these steps:
|
||||
|
||||
1. **Install Dependencies**: Install the Scrapfly SDK using the command above.
|
||||
2. **Obtain API Key**: Register at Scrapfly to get your API key.
|
||||
3. **Initialize the Tool**: Create an instance of the tool with your API key.
|
||||
4. **Configure Scraping Parameters**: Customize the scraping parameters based on your needs.
|
||||
|
||||
## Example
|
||||
|
||||
The following example demonstrates how to use the `ScrapflyScrapeWebsiteTool` to extract content from a website:
|
||||
|
||||
```python Code
|
||||
from crewai import Agent, Task, Crew
|
||||
from crewai_tools import ScrapflyScrapeWebsiteTool
|
||||
|
||||
# Initialize the tool
|
||||
scrape_tool = ScrapflyScrapeWebsiteTool(api_key="your_scrapfly_api_key")
|
||||
|
||||
# Define an agent that uses the tool
|
||||
web_scraper_agent = Agent(
|
||||
role="Web Scraper",
|
||||
goal="Extract information from websites",
|
||||
backstory="An expert in web scraping who can extract content from any website.",
|
||||
tools=[scrape_tool],
|
||||
verbose=True,
|
||||
)
|
||||
|
||||
# Example task to extract content from a website
|
||||
scrape_task = Task(
|
||||
description="Extract the main content from the product page at https://web-scraping.dev/products and summarize the available products.",
|
||||
expected_output="A summary of the products available on the website.",
|
||||
agent=web_scraper_agent,
|
||||
)
|
||||
|
||||
# Create and run the crew
|
||||
crew = Crew(agents=[web_scraper_agent], tasks=[scrape_task])
|
||||
result = crew.kickoff()
|
||||
```
|
||||
|
||||
You can also customize the scraping parameters:
|
||||
|
||||
```python Code
|
||||
# Example with custom scraping parameters
|
||||
web_scraper_agent = Agent(
|
||||
role="Web Scraper",
|
||||
goal="Extract information from websites with custom parameters",
|
||||
backstory="An expert in web scraping who can extract content from any website.",
|
||||
tools=[scrape_tool],
|
||||
verbose=True,
|
||||
)
|
||||
|
||||
# The agent will use the tool with parameters like:
|
||||
# url="https://web-scraping.dev/products"
|
||||
# scrape_format="markdown"
|
||||
# ignore_scrape_failures=True
|
||||
# scrape_config={
|
||||
# "asp": True, # Bypass scraping blocking solutions, like Cloudflare
|
||||
# "render_js": True, # Enable JavaScript rendering with a cloud headless browser
|
||||
# "proxy_pool": "public_residential_pool", # Select a proxy pool
|
||||
# "country": "us", # Select a proxy location
|
||||
# "auto_scroll": True, # Auto scroll the page
|
||||
# }
|
||||
|
||||
scrape_task = Task(
|
||||
description="Extract the main content from the product page at https://web-scraping.dev/products using advanced scraping options including JavaScript rendering and proxy settings.",
|
||||
expected_output="A detailed summary of the products with all available information.",
|
||||
agent=web_scraper_agent,
|
||||
)
|
||||
```
|
||||
|
||||
## Parameters
|
||||
|
||||
The `ScrapflyScrapeWebsiteTool` accepts the following parameters:
|
||||
|
||||
### Initialization Parameters
|
||||
|
||||
- **api_key**: Required. Your Scrapfly API key.
|
||||
|
||||
### Run Parameters
|
||||
|
||||
- **url**: Required. The URL of the website to scrape.
|
||||
- **scrape_format**: Optional. The format in which to extract the web page content. Options are "raw" (HTML), "markdown", or "text". Default is "markdown".
|
||||
- **scrape_config**: Optional. A dictionary containing additional Scrapfly scraping configuration options.
|
||||
- **ignore_scrape_failures**: Optional. Whether to ignore failures during scraping. If set to `True`, the tool will return `None` instead of raising an exception when scraping fails.
|
||||
|
||||
## Scrapfly Configuration Options
|
||||
|
||||
The `scrape_config` parameter allows you to customize the scraping behavior with the following options:
|
||||
|
||||
- **asp**: Enable anti-scraping protection bypass.
|
||||
- **render_js**: Enable JavaScript rendering with a cloud headless browser.
|
||||
- **proxy_pool**: Select a proxy pool (e.g., "public_residential_pool", "datacenter").
|
||||
- **country**: Select a proxy location (e.g., "us", "uk").
|
||||
- **auto_scroll**: Automatically scroll the page to load lazy-loaded content.
|
||||
- **js**: Execute custom JavaScript code by the headless browser.
|
||||
|
||||
For a complete list of configuration options, refer to the [Scrapfly API documentation](https://scrapfly.io/docs/scrape-api/getting-started).
|
||||
|
||||
## Usage
|
||||
|
||||
When using the `ScrapflyScrapeWebsiteTool` with an agent, the agent will need to provide the URL of the website to scrape and can optionally specify the format and additional configuration options:
|
||||
|
||||
```python Code
|
||||
# Example of using the tool with an agent
|
||||
web_scraper_agent = Agent(
|
||||
role="Web Scraper",
|
||||
goal="Extract information from websites",
|
||||
backstory="An expert in web scraping who can extract content from any website.",
|
||||
tools=[scrape_tool],
|
||||
verbose=True,
|
||||
)
|
||||
|
||||
# Create a task for the agent
|
||||
scrape_task = Task(
|
||||
description="Extract the main content from example.com in markdown format.",
|
||||
expected_output="The main content of example.com in markdown format.",
|
||||
agent=web_scraper_agent,
|
||||
)
|
||||
|
||||
# Run the task
|
||||
crew = Crew(agents=[web_scraper_agent], tasks=[scrape_task])
|
||||
result = crew.kickoff()
|
||||
```
|
||||
|
||||
For more advanced usage with custom configuration:
|
||||
|
||||
```python Code
|
||||
# Create a task with more specific instructions
|
||||
advanced_scrape_task = Task(
|
||||
description="""
|
||||
Extract content from example.com with the following requirements:
|
||||
- Convert the content to plain text format
|
||||
- Enable JavaScript rendering
|
||||
- Use a US-based proxy
|
||||
- Handle any scraping failures gracefully
|
||||
""",
|
||||
expected_output="The extracted content from example.com",
|
||||
agent=web_scraper_agent,
|
||||
)
|
||||
```
|
||||
|
||||
## Error Handling
|
||||
|
||||
By default, the `ScrapflyScrapeWebsiteTool` will raise an exception if scraping fails. Agents can be instructed to handle failures gracefully by specifying the `ignore_scrape_failures` parameter:
|
||||
|
||||
```python Code
|
||||
# Create a task that instructs the agent to handle errors
|
||||
error_handling_task = Task(
|
||||
description="""
|
||||
Extract content from a potentially problematic website and make sure to handle any
|
||||
scraping failures gracefully by setting ignore_scrape_failures to True.
|
||||
""",
|
||||
expected_output="Either the extracted content or a graceful error message",
|
||||
agent=web_scraper_agent,
|
||||
)
|
||||
```
|
||||
|
||||
## Implementation Details
|
||||
|
||||
The `ScrapflyScrapeWebsiteTool` uses the Scrapfly SDK to interact with the Scrapfly API:
|
||||
|
||||
```python Code
|
||||
class ScrapflyScrapeWebsiteTool(BaseTool):
|
||||
name: str = "Scrapfly web scraping API tool"
|
||||
description: str = (
|
||||
"Scrape a webpage url using Scrapfly and return its content as markdown or text"
|
||||
)
|
||||
|
||||
# Implementation details...
|
||||
|
||||
def _run(
|
||||
self,
|
||||
url: str,
|
||||
scrape_format: str = "markdown",
|
||||
scrape_config: Optional[Dict[str, Any]] = None,
|
||||
ignore_scrape_failures: Optional[bool] = None,
|
||||
):
|
||||
from scrapfly import ScrapeApiResponse, ScrapeConfig
|
||||
|
||||
scrape_config = scrape_config if scrape_config is not None else {}
|
||||
try:
|
||||
response: ScrapeApiResponse = self.scrapfly.scrape(
|
||||
ScrapeConfig(url, format=scrape_format, **scrape_config)
|
||||
)
|
||||
return response.scrape_result["content"]
|
||||
except Exception as e:
|
||||
if ignore_scrape_failures:
|
||||
logger.error(f"Error fetching data from {url}, exception: {e}")
|
||||
return None
|
||||
else:
|
||||
raise e
|
||||
```
|
||||
|
||||
## Conclusion
|
||||
|
||||
The `ScrapflyScrapeWebsiteTool` provides a powerful way to extract content from websites using Scrapfly's advanced web scraping capabilities. With features like headless browser support, proxies, and anti-bot bypass, it can handle complex websites and extract content in various formats. This tool is particularly useful for data extraction, content monitoring, and research tasks where reliable web scraping is required.
|
||||
@@ -13,183 +13,64 @@ icon: clipboard-user
|
||||
|
||||
## Description
|
||||
|
||||
The `SeleniumScrapingTool` is crafted for high-efficiency web scraping tasks.
|
||||
The SeleniumScrapingTool is crafted for high-efficiency web scraping tasks.
|
||||
It allows for precise extraction of content from web pages by using CSS selectors to target specific elements.
|
||||
Its design caters to a wide range of scraping needs, offering flexibility to work with any provided website URL.
|
||||
|
||||
## Installation
|
||||
|
||||
To use this tool, you need to install the CrewAI tools package and Selenium:
|
||||
To get started with the SeleniumScrapingTool, install the crewai_tools package using pip:
|
||||
|
||||
```shell
|
||||
pip install 'crewai[tools]'
|
||||
uv add selenium webdriver-manager
|
||||
```
|
||||
|
||||
You'll also need to have Chrome installed on your system, as the tool uses Chrome WebDriver for browser automation.
|
||||
## Usage Examples
|
||||
|
||||
## Example
|
||||
|
||||
The following example demonstrates how to use the `SeleniumScrapingTool` with a CrewAI agent:
|
||||
Below are some scenarios where the SeleniumScrapingTool can be utilized:
|
||||
|
||||
```python Code
|
||||
from crewai import Agent, Task, Crew, Process
|
||||
from crewai_tools import SeleniumScrapingTool
|
||||
|
||||
# Initialize the tool
|
||||
selenium_tool = SeleniumScrapingTool()
|
||||
# Example 1:
|
||||
# Initialize the tool without any parameters to scrape
|
||||
# the current page it navigates to
|
||||
tool = SeleniumScrapingTool()
|
||||
|
||||
# Define an agent that uses the tool
|
||||
web_scraper_agent = Agent(
|
||||
role="Web Scraper",
|
||||
goal="Extract information from websites using Selenium",
|
||||
backstory="An expert web scraper who can extract content from dynamic websites.",
|
||||
tools=[selenium_tool],
|
||||
verbose=True,
|
||||
# Example 2:
|
||||
# Scrape the entire webpage of a given URL
|
||||
tool = SeleniumScrapingTool(website_url='https://example.com')
|
||||
|
||||
# Example 3:
|
||||
# Target and scrape a specific CSS element from a webpage
|
||||
tool = SeleniumScrapingTool(
|
||||
website_url='https://example.com',
|
||||
css_element='.main-content'
|
||||
)
|
||||
|
||||
# Example task to scrape content from a website
|
||||
scrape_task = Task(
|
||||
description="Extract the main content from the homepage of example.com. Use the CSS selector 'main' to target the main content area.",
|
||||
expected_output="The main content from example.com's homepage.",
|
||||
agent=web_scraper_agent,
|
||||
)
|
||||
|
||||
# Create and run the crew
|
||||
crew = Crew(
|
||||
agents=[web_scraper_agent],
|
||||
tasks=[scrape_task],
|
||||
verbose=True,
|
||||
process=Process.sequential,
|
||||
)
|
||||
result = crew.kickoff()
|
||||
```
|
||||
|
||||
You can also initialize the tool with predefined parameters:
|
||||
|
||||
```python Code
|
||||
# Initialize the tool with predefined parameters
|
||||
selenium_tool = SeleniumScrapingTool(
|
||||
# Example 4:
|
||||
# Perform scraping with additional parameters for a customized experience
|
||||
tool = SeleniumScrapingTool(
|
||||
website_url='https://example.com',
|
||||
css_element='.main-content',
|
||||
wait_time=5
|
||||
)
|
||||
|
||||
# Define an agent that uses the tool
|
||||
web_scraper_agent = Agent(
|
||||
role="Web Scraper",
|
||||
goal="Extract information from websites using Selenium",
|
||||
backstory="An expert web scraper who can extract content from dynamic websites.",
|
||||
tools=[selenium_tool],
|
||||
verbose=True,
|
||||
cookie={'name': 'user', 'value': 'John Doe'},
|
||||
wait_time=10
|
||||
)
|
||||
```
|
||||
|
||||
## Parameters
|
||||
## Arguments
|
||||
|
||||
The `SeleniumScrapingTool` accepts the following parameters during initialization:
|
||||
The following parameters can be used to customize the SeleniumScrapingTool's scraping process:
|
||||
|
||||
- **website_url**: Optional. The URL of the website to scrape. If provided during initialization, the agent won't need to specify it when using the tool.
|
||||
- **css_element**: Optional. The CSS selector for the elements to extract. If provided during initialization, the agent won't need to specify it when using the tool.
|
||||
- **cookie**: Optional. A dictionary containing cookie information, useful for simulating a logged-in session to access restricted content.
|
||||
- **wait_time**: Optional. Specifies the delay (in seconds) before scraping, allowing the website and any dynamic content to fully load. Default is `3` seconds.
|
||||
- **return_html**: Optional. Whether to return the HTML content instead of just the text. Default is `False`.
|
||||
| Argument | Type | Description |
|
||||
|:---------------|:---------|:-------------------------------------------------------------------------------------------------------------------------------------|
|
||||
| **website_url** | `string` | **Mandatory**. Specifies the URL of the website from which content is to be scraped. |
|
||||
| **css_element** | `string` | **Mandatory**. The CSS selector for a specific element to target on the website, enabling focused scraping of a particular part of a webpage. |
|
||||
| **cookie** | `object` | **Optional**. A dictionary containing cookie information, useful for simulating a logged-in session to access restricted content. |
|
||||
| **wait_time** | `int` | **Optional**. Specifies the delay (in seconds) before scraping, allowing the website and any dynamic content to fully load. |
|
||||
|
||||
When using the tool with an agent, the agent will need to provide the following parameters (unless they were specified during initialization):
|
||||
|
||||
- **website_url**: Required. The URL of the website to scrape.
|
||||
- **css_element**: Required. The CSS selector for the elements to extract.
|
||||
|
||||
## Agent Integration Example
|
||||
|
||||
Here's a more detailed example of how to integrate the `SeleniumScrapingTool` with a CrewAI agent:
|
||||
|
||||
```python Code
|
||||
from crewai import Agent, Task, Crew, Process
|
||||
from crewai_tools import SeleniumScrapingTool
|
||||
|
||||
# Initialize the tool
|
||||
selenium_tool = SeleniumScrapingTool()
|
||||
|
||||
# Define an agent that uses the tool
|
||||
web_scraper_agent = Agent(
|
||||
role="Web Scraper",
|
||||
goal="Extract and analyze information from dynamic websites",
|
||||
backstory="""You are an expert web scraper who specializes in extracting
|
||||
content from dynamic websites that require browser automation. You have
|
||||
extensive knowledge of CSS selectors and can identify the right selectors
|
||||
to target specific content on any website.""",
|
||||
tools=[selenium_tool],
|
||||
verbose=True,
|
||||
)
|
||||
|
||||
# Create a task for the agent
|
||||
scrape_task = Task(
|
||||
description="""
|
||||
Extract the following information from the news website at {website_url}:
|
||||
|
||||
1. The headlines of all featured articles (CSS selector: '.headline')
|
||||
2. The publication dates of these articles (CSS selector: '.pub-date')
|
||||
3. The author names where available (CSS selector: '.author')
|
||||
|
||||
Compile this information into a structured format with each article's details grouped together.
|
||||
""",
|
||||
expected_output="A structured list of articles with their headlines, publication dates, and authors.",
|
||||
agent=web_scraper_agent,
|
||||
)
|
||||
|
||||
# Run the task
|
||||
crew = Crew(
|
||||
agents=[web_scraper_agent],
|
||||
tasks=[scrape_task],
|
||||
verbose=True,
|
||||
process=Process.sequential,
|
||||
)
|
||||
result = crew.kickoff(inputs={"website_url": "https://news-example.com"})
|
||||
```
|
||||
|
||||
## Implementation Details
|
||||
|
||||
The `SeleniumScrapingTool` uses Selenium WebDriver to automate browser interactions:
|
||||
|
||||
```python Code
|
||||
class SeleniumScrapingTool(BaseTool):
|
||||
name: str = "Read a website content"
|
||||
description: str = "A tool that can be used to read a website content."
|
||||
args_schema: Type[BaseModel] = SeleniumScrapingToolSchema
|
||||
|
||||
def _run(self, **kwargs: Any) -> Any:
|
||||
website_url = kwargs.get("website_url", self.website_url)
|
||||
css_element = kwargs.get("css_element", self.css_element)
|
||||
return_html = kwargs.get("return_html", self.return_html)
|
||||
driver = self._create_driver(website_url, self.cookie, self.wait_time)
|
||||
|
||||
content = self._get_content(driver, css_element, return_html)
|
||||
driver.close()
|
||||
|
||||
return "\n".join(content)
|
||||
```
|
||||
|
||||
The tool performs the following steps:
|
||||
1. Creates a headless Chrome browser instance
|
||||
2. Navigates to the specified URL
|
||||
3. Waits for the specified time to allow the page to load
|
||||
4. Adds any cookies if provided
|
||||
5. Extracts content based on the CSS selector
|
||||
6. Returns the extracted content as text or HTML
|
||||
7. Closes the browser instance
|
||||
|
||||
## Handling Dynamic Content
|
||||
|
||||
The `SeleniumScrapingTool` is particularly useful for scraping websites with dynamic content that is loaded via JavaScript. By using a real browser instance, it can:
|
||||
|
||||
1. Execute JavaScript on the page
|
||||
2. Wait for dynamic content to load
|
||||
3. Interact with elements if needed
|
||||
4. Extract content that would not be available with simple HTTP requests
|
||||
|
||||
You can adjust the `wait_time` parameter to ensure that all dynamic content has loaded before extraction.
|
||||
|
||||
## Conclusion
|
||||
|
||||
The `SeleniumScrapingTool` provides a powerful way to extract content from websites using browser automation. By enabling agents to interact with websites as a real user would, it facilitates scraping of dynamic content that would be difficult or impossible to extract using simpler methods. This tool is particularly useful for research, data collection, and monitoring tasks that involve modern web applications with JavaScript-rendered content.
|
||||
<Warning>
|
||||
Since the `SeleniumScrapingTool` is under active development, the parameters and functionality may evolve over time.
|
||||
Users are encouraged to keep the tool updated and report any issues or suggestions for enhancements.
|
||||
</Warning>
|
||||
|
||||
@@ -1,202 +0,0 @@
|
||||
---
|
||||
title: Snowflake Search Tool
|
||||
description: The `SnowflakeSearchTool` enables CrewAI agents to execute SQL queries and perform semantic search on Snowflake data warehouses.
|
||||
icon: snowflake
|
||||
---
|
||||
|
||||
# `SnowflakeSearchTool`
|
||||
|
||||
## Description
|
||||
|
||||
The `SnowflakeSearchTool` is designed to connect to Snowflake data warehouses and execute SQL queries with advanced features like connection pooling, retry logic, and asynchronous execution. This tool allows CrewAI agents to interact with Snowflake databases, making it ideal for data analysis, reporting, and business intelligence tasks that require access to enterprise data stored in Snowflake.
|
||||
|
||||
## Installation
|
||||
|
||||
To use this tool, you need to install the required dependencies:
|
||||
|
||||
```shell
|
||||
uv add cryptography snowflake-connector-python snowflake-sqlalchemy
|
||||
```
|
||||
|
||||
Or alternatively:
|
||||
|
||||
```shell
|
||||
uv sync --extra snowflake
|
||||
```
|
||||
|
||||
## Steps to Get Started
|
||||
|
||||
To effectively use the `SnowflakeSearchTool`, follow these steps:
|
||||
|
||||
1. **Install Dependencies**: Install the required packages using one of the commands above.
|
||||
2. **Configure Snowflake Connection**: Create a `SnowflakeConfig` object with your Snowflake credentials.
|
||||
3. **Initialize the Tool**: Create an instance of the tool with the necessary configuration.
|
||||
4. **Execute Queries**: Use the tool to run SQL queries against your Snowflake database.
|
||||
|
||||
## Example
|
||||
|
||||
The following example demonstrates how to use the `SnowflakeSearchTool` to query data from a Snowflake database:
|
||||
|
||||
```python Code
|
||||
from crewai import Agent, Task, Crew
|
||||
from crewai_tools import SnowflakeSearchTool, SnowflakeConfig
|
||||
|
||||
# Create Snowflake configuration
|
||||
config = SnowflakeConfig(
|
||||
account="your_account",
|
||||
user="your_username",
|
||||
password="your_password",
|
||||
warehouse="COMPUTE_WH",
|
||||
database="your_database",
|
||||
snowflake_schema="your_schema"
|
||||
)
|
||||
|
||||
# Initialize the tool
|
||||
snowflake_tool = SnowflakeSearchTool(config=config)
|
||||
|
||||
# Define an agent that uses the tool
|
||||
data_analyst_agent = Agent(
|
||||
role="Data Analyst",
|
||||
goal="Analyze data from Snowflake database",
|
||||
backstory="An expert data analyst who can extract insights from enterprise data.",
|
||||
tools=[snowflake_tool],
|
||||
verbose=True,
|
||||
)
|
||||
|
||||
# Example task to query sales data
|
||||
query_task = Task(
|
||||
description="Query the sales data for the last quarter and summarize the top 5 products by revenue.",
|
||||
expected_output="A summary of the top 5 products by revenue for the last quarter.",
|
||||
agent=data_analyst_agent,
|
||||
)
|
||||
|
||||
# Create and run the crew
|
||||
crew = Crew(agents=[data_analyst_agent],
|
||||
tasks=[query_task])
|
||||
result = crew.kickoff()
|
||||
```
|
||||
|
||||
You can also customize the tool with additional parameters:
|
||||
|
||||
```python Code
|
||||
# Initialize the tool with custom parameters
|
||||
snowflake_tool = SnowflakeSearchTool(
|
||||
config=config,
|
||||
pool_size=10,
|
||||
max_retries=5,
|
||||
retry_delay=2.0,
|
||||
enable_caching=True
|
||||
)
|
||||
```
|
||||
|
||||
## Parameters
|
||||
|
||||
### SnowflakeConfig Parameters
|
||||
|
||||
The `SnowflakeConfig` class accepts the following parameters:
|
||||
|
||||
- **account**: Required. Snowflake account identifier.
|
||||
- **user**: Required. Snowflake username.
|
||||
- **password**: Optional*. Snowflake password.
|
||||
- **private_key_path**: Optional*. Path to private key file (alternative to password).
|
||||
- **warehouse**: Required. Snowflake warehouse name.
|
||||
- **database**: Required. Default database.
|
||||
- **snowflake_schema**: Required. Default schema.
|
||||
- **role**: Optional. Snowflake role.
|
||||
- **session_parameters**: Optional. Custom session parameters as a dictionary.
|
||||
|
||||
*Either `password` or `private_key_path` must be provided.
|
||||
|
||||
### SnowflakeSearchTool Parameters
|
||||
|
||||
The `SnowflakeSearchTool` accepts the following parameters during initialization:
|
||||
|
||||
- **config**: Required. A `SnowflakeConfig` object containing connection details.
|
||||
- **pool_size**: Optional. Number of connections in the pool. Default is 5.
|
||||
- **max_retries**: Optional. Maximum retry attempts for failed queries. Default is 3.
|
||||
- **retry_delay**: Optional. Delay between retries in seconds. Default is 1.0.
|
||||
- **enable_caching**: Optional. Whether to enable query result caching. Default is True.
|
||||
|
||||
## Usage
|
||||
|
||||
When using the `SnowflakeSearchTool`, you need to provide the following parameters:
|
||||
|
||||
- **query**: Required. The SQL query to execute.
|
||||
- **database**: Optional. Override the default database specified in the config.
|
||||
- **snowflake_schema**: Optional. Override the default schema specified in the config.
|
||||
- **timeout**: Optional. Query timeout in seconds. Default is 300.
|
||||
|
||||
The tool will return the query results as a list of dictionaries, where each dictionary represents a row with column names as keys.
|
||||
|
||||
```python Code
|
||||
# Example of using the tool with an agent
|
||||
data_analyst = Agent(
|
||||
role="Data Analyst",
|
||||
goal="Analyze sales data from Snowflake",
|
||||
backstory="An expert data analyst with experience in SQL and data visualization.",
|
||||
tools=[snowflake_tool],
|
||||
verbose=True
|
||||
)
|
||||
|
||||
# The agent will use the tool with parameters like:
|
||||
# query="SELECT product_name, SUM(revenue) as total_revenue FROM sales GROUP BY product_name ORDER BY total_revenue DESC LIMIT 5"
|
||||
# timeout=600
|
||||
|
||||
# Create a task for the agent
|
||||
analysis_task = Task(
|
||||
description="Query the sales database and identify the top 5 products by revenue for the last quarter.",
|
||||
expected_output="A detailed analysis of the top 5 products by revenue.",
|
||||
agent=data_analyst
|
||||
)
|
||||
|
||||
# Run the task
|
||||
crew = Crew(
|
||||
agents=[data_analyst],
|
||||
tasks=[analysis_task]
|
||||
)
|
||||
result = crew.kickoff()
|
||||
```
|
||||
|
||||
## Advanced Features
|
||||
|
||||
### Connection Pooling
|
||||
|
||||
The `SnowflakeSearchTool` implements connection pooling to improve performance by reusing database connections. You can control the pool size with the `pool_size` parameter.
|
||||
|
||||
### Automatic Retries
|
||||
|
||||
The tool automatically retries failed queries with exponential backoff. You can configure the retry behavior with the `max_retries` and `retry_delay` parameters.
|
||||
|
||||
### Query Result Caching
|
||||
|
||||
To improve performance for repeated queries, the tool can cache query results. This feature is enabled by default but can be disabled by setting `enable_caching=False`.
|
||||
|
||||
### Key-Pair Authentication
|
||||
|
||||
In addition to password authentication, the tool supports key-pair authentication for enhanced security:
|
||||
|
||||
```python Code
|
||||
config = SnowflakeConfig(
|
||||
account="your_account",
|
||||
user="your_username",
|
||||
private_key_path="/path/to/your/private/key.p8",
|
||||
warehouse="COMPUTE_WH",
|
||||
database="your_database",
|
||||
snowflake_schema="your_schema"
|
||||
)
|
||||
```
|
||||
|
||||
## Error Handling
|
||||
|
||||
The `SnowflakeSearchTool` includes comprehensive error handling for common Snowflake issues:
|
||||
|
||||
- Connection failures
|
||||
- Query timeouts
|
||||
- Authentication errors
|
||||
- Database and schema errors
|
||||
|
||||
When an error occurs, the tool will attempt to retry the operation (if configured) and provide detailed error information.
|
||||
|
||||
## Conclusion
|
||||
|
||||
The `SnowflakeSearchTool` provides a powerful way to integrate Snowflake data warehouses with CrewAI agents. With features like connection pooling, automatic retries, and query caching, it enables efficient and reliable access to enterprise data. This tool is particularly useful for data analysis, reporting, and business intelligence tasks that require access to structured data stored in Snowflake.
|
||||
@@ -8,13 +8,13 @@ icon: eye
|
||||
|
||||
## Description
|
||||
|
||||
This tool is used to extract text from images. When passed to the agent it will extract the text from the image and then use it to generate a response, report or any other output.
|
||||
This tool is used to extract text from images. When passed to the agent it will extract the text from the image and then use it to generate a response, report or any other output.
|
||||
The URL or the PATH of the image should be passed to the Agent.
|
||||
|
||||
|
||||
## Installation
|
||||
|
||||
Install the crewai_tools package
|
||||
|
||||
```shell
|
||||
pip install 'crewai[tools]'
|
||||
```
|
||||
@@ -44,6 +44,7 @@ def researcher(self) -> Agent:
|
||||
|
||||
The VisionTool requires the following arguments:
|
||||
|
||||
| Argument | Type | Description |
|
||||
| :----------------- | :------- | :------------------------------------------------------------------------------- |
|
||||
| **image_path_url** | `string` | **Mandatory**. The path to the image file from which text needs to be extracted. |
|
||||
| Argument | Type | Description |
|
||||
|:---------------|:---------|:-------------------------------------------------------------------------------------------------------------------------------------|
|
||||
| **image_path** | `string` | **Mandatory**. The path to the image file from which text needs to be extracted. |
|
||||
|
||||
|
||||
@@ -1,164 +0,0 @@
|
||||
---
|
||||
title: Weaviate Vector Search
|
||||
description: The `WeaviateVectorSearchTool` is designed to search a Weaviate vector database for semantically similar documents.
|
||||
icon: database
|
||||
---
|
||||
|
||||
# `WeaviateVectorSearchTool`
|
||||
|
||||
## Description
|
||||
|
||||
The `WeaviateVectorSearchTool` is specifically crafted for conducting semantic searches within documents stored in a Weaviate vector database. This tool allows you to find semantically similar documents to a given query, leveraging the power of vector embeddings for more accurate and contextually relevant search results.
|
||||
|
||||
[Weaviate](https://weaviate.io/) is a vector database that stores and queries vector embeddings, enabling semantic search capabilities.
|
||||
|
||||
## Installation
|
||||
|
||||
To incorporate this tool into your project, you need to install the Weaviate client:
|
||||
|
||||
```shell
|
||||
uv add weaviate-client
|
||||
```
|
||||
|
||||
## Steps to Get Started
|
||||
|
||||
To effectively use the `WeaviateVectorSearchTool`, follow these steps:
|
||||
|
||||
1. **Package Installation**: Confirm that the `crewai[tools]` and `weaviate-client` packages are installed in your Python environment.
|
||||
2. **Weaviate Setup**: Set up a Weaviate cluster. You can follow the [Weaviate documentation](https://weaviate.io/developers/wcs/connect) for instructions.
|
||||
3. **API Keys**: Obtain your Weaviate cluster URL and API key.
|
||||
4. **OpenAI API Key**: Ensure you have an OpenAI API key set in your environment variables as `OPENAI_API_KEY`.
|
||||
|
||||
## Example
|
||||
|
||||
The following example demonstrates how to initialize the tool and execute a search:
|
||||
|
||||
```python Code
|
||||
from crewai_tools import WeaviateVectorSearchTool
|
||||
|
||||
# Initialize the tool
|
||||
tool = WeaviateVectorSearchTool(
|
||||
collection_name='example_collections',
|
||||
limit=3,
|
||||
weaviate_cluster_url="https://your-weaviate-cluster-url.com",
|
||||
weaviate_api_key="your-weaviate-api-key",
|
||||
)
|
||||
|
||||
@agent
|
||||
def search_agent(self) -> Agent:
|
||||
'''
|
||||
This agent uses the WeaviateVectorSearchTool to search for
|
||||
semantically similar documents in a Weaviate vector database.
|
||||
'''
|
||||
return Agent(
|
||||
config=self.agents_config["search_agent"],
|
||||
tools=[tool]
|
||||
)
|
||||
```
|
||||
|
||||
## Parameters
|
||||
|
||||
The `WeaviateVectorSearchTool` accepts the following parameters:
|
||||
|
||||
- **collection_name**: Required. The name of the collection to search within.
|
||||
- **weaviate_cluster_url**: Required. The URL of the Weaviate cluster.
|
||||
- **weaviate_api_key**: Required. The API key for the Weaviate cluster.
|
||||
- **limit**: Optional. The number of results to return. Default is `3`.
|
||||
- **vectorizer**: Optional. The vectorizer to use. If not provided, it will use `text2vec_openai` with the `nomic-embed-text` model.
|
||||
- **generative_model**: Optional. The generative model to use. If not provided, it will use OpenAI's `gpt-4o`.
|
||||
|
||||
## Advanced Configuration
|
||||
|
||||
You can customize the vectorizer and generative model used by the tool:
|
||||
|
||||
```python Code
|
||||
from crewai_tools import WeaviateVectorSearchTool
|
||||
from weaviate.classes.config import Configure
|
||||
|
||||
# Setup custom model for vectorizer and generative model
|
||||
tool = WeaviateVectorSearchTool(
|
||||
collection_name='example_collections',
|
||||
limit=3,
|
||||
vectorizer=Configure.Vectorizer.text2vec_openai(model="nomic-embed-text"),
|
||||
generative_model=Configure.Generative.openai(model="gpt-4o-mini"),
|
||||
weaviate_cluster_url="https://your-weaviate-cluster-url.com",
|
||||
weaviate_api_key="your-weaviate-api-key",
|
||||
)
|
||||
```
|
||||
|
||||
## Preloading Documents
|
||||
|
||||
You can preload your Weaviate database with documents before using the tool:
|
||||
|
||||
```python Code
|
||||
import os
|
||||
from crewai_tools import WeaviateVectorSearchTool
|
||||
import weaviate
|
||||
from weaviate.classes.init import Auth
|
||||
|
||||
# Connect to Weaviate
|
||||
client = weaviate.connect_to_weaviate_cloud(
|
||||
cluster_url="https://your-weaviate-cluster-url.com",
|
||||
auth_credentials=Auth.api_key("your-weaviate-api-key"),
|
||||
headers={"X-OpenAI-Api-Key": "your-openai-api-key"}
|
||||
)
|
||||
|
||||
# Get or create collection
|
||||
test_docs = client.collections.get("example_collections")
|
||||
if not test_docs:
|
||||
test_docs = client.collections.create(
|
||||
name="example_collections",
|
||||
vectorizer_config=Configure.Vectorizer.text2vec_openai(model="nomic-embed-text"),
|
||||
generative_config=Configure.Generative.openai(model="gpt-4o"),
|
||||
)
|
||||
|
||||
# Load documents
|
||||
docs_to_load = os.listdir("knowledge")
|
||||
with test_docs.batch.dynamic() as batch:
|
||||
for d in docs_to_load:
|
||||
with open(os.path.join("knowledge", d), "r") as f:
|
||||
content = f.read()
|
||||
batch.add_object(
|
||||
{
|
||||
"content": content,
|
||||
"year": d.split("_")[0],
|
||||
}
|
||||
)
|
||||
|
||||
# Initialize the tool
|
||||
tool = WeaviateVectorSearchTool(
|
||||
collection_name='example_collections',
|
||||
limit=3,
|
||||
weaviate_cluster_url="https://your-weaviate-cluster-url.com",
|
||||
weaviate_api_key="your-weaviate-api-key",
|
||||
)
|
||||
```
|
||||
|
||||
## Agent Integration Example
|
||||
|
||||
Here's how to integrate the `WeaviateVectorSearchTool` with a CrewAI agent:
|
||||
|
||||
```python Code
|
||||
from crewai import Agent
|
||||
from crewai_tools import WeaviateVectorSearchTool
|
||||
|
||||
# Initialize the tool
|
||||
weaviate_tool = WeaviateVectorSearchTool(
|
||||
collection_name='example_collections',
|
||||
limit=3,
|
||||
weaviate_cluster_url="https://your-weaviate-cluster-url.com",
|
||||
weaviate_api_key="your-weaviate-api-key",
|
||||
)
|
||||
|
||||
# Create an agent with the tool
|
||||
rag_agent = Agent(
|
||||
name="rag_agent",
|
||||
role="You are a helpful assistant that can answer questions with the help of the WeaviateVectorSearchTool.",
|
||||
llm="gpt-4o-mini",
|
||||
tools=[weaviate_tool],
|
||||
)
|
||||
```
|
||||
|
||||
## Conclusion
|
||||
|
||||
The `WeaviateVectorSearchTool` provides a powerful way to search for semantically similar documents in a Weaviate vector database. By leveraging vector embeddings, it enables more accurate and contextually relevant search results compared to traditional keyword-based searches. This tool is particularly useful for applications that require finding information based on meaning rather than exact matches.
|
||||
@@ -27,73 +27,31 @@ pip install 'crewai[tools]'
|
||||
|
||||
## Example
|
||||
|
||||
The following example demonstrates how to use the `YoutubeChannelSearchTool` with a CrewAI agent:
|
||||
To begin using the YoutubeChannelSearchTool, follow the example below.
|
||||
This demonstrates initializing the tool with a specific Youtube channel handle and conducting a search within that channel's content.
|
||||
|
||||
```python Code
|
||||
from crewai import Agent, Task, Crew
|
||||
from crewai_tools import YoutubeChannelSearchTool
|
||||
|
||||
# Initialize the tool for general YouTube channel searches
|
||||
youtube_channel_tool = YoutubeChannelSearchTool()
|
||||
# Initialize the tool to search within any Youtube channel's content the agent learns about during its execution
|
||||
tool = YoutubeChannelSearchTool()
|
||||
|
||||
# Define an agent that uses the tool
|
||||
channel_researcher = Agent(
|
||||
role="Channel Researcher",
|
||||
goal="Extract relevant information from YouTube channels",
|
||||
backstory="An expert researcher who specializes in analyzing YouTube channel content.",
|
||||
tools=[youtube_channel_tool],
|
||||
verbose=True,
|
||||
)
|
||||
# OR
|
||||
|
||||
# Example task to search for information in a specific channel
|
||||
research_task = Task(
|
||||
description="Search for information about machine learning tutorials in the YouTube channel {youtube_channel_handle}",
|
||||
expected_output="A summary of the key machine learning tutorials available on the channel.",
|
||||
agent=channel_researcher,
|
||||
)
|
||||
|
||||
# Create and run the crew
|
||||
crew = Crew(agents=[channel_researcher], tasks=[research_task])
|
||||
result = crew.kickoff(inputs={"youtube_channel_handle": "@exampleChannel"})
|
||||
# Initialize the tool with a specific Youtube channel handle to target your search
|
||||
tool = YoutubeChannelSearchTool(youtube_channel_handle='@exampleChannel')
|
||||
```
|
||||
|
||||
You can also initialize the tool with a specific YouTube channel handle:
|
||||
## Arguments
|
||||
|
||||
```python Code
|
||||
# Initialize the tool with a specific YouTube channel handle
|
||||
youtube_channel_tool = YoutubeChannelSearchTool(
|
||||
youtube_channel_handle='@exampleChannel'
|
||||
)
|
||||
- `youtube_channel_handle` : A mandatory string representing the Youtube channel handle. This parameter is crucial for initializing the tool to specify the channel you want to search within. The tool is designed to only search within the content of the provided channel handle.
|
||||
|
||||
# Define an agent that uses the tool
|
||||
channel_researcher = Agent(
|
||||
role="Channel Researcher",
|
||||
goal="Extract relevant information from a specific YouTube channel",
|
||||
backstory="An expert researcher who specializes in analyzing YouTube channel content.",
|
||||
tools=[youtube_channel_tool],
|
||||
verbose=True,
|
||||
)
|
||||
```
|
||||
|
||||
## Parameters
|
||||
|
||||
The `YoutubeChannelSearchTool` accepts the following parameters:
|
||||
|
||||
- **youtube_channel_handle**: Optional. The handle of the YouTube channel to search within. If provided during initialization, the agent won't need to specify it when using the tool. If the handle doesn't start with '@', it will be automatically added.
|
||||
- **config**: Optional. Configuration for the underlying RAG system, including LLM and embedder settings.
|
||||
- **summarize**: Optional. Whether to summarize the retrieved content. Default is `False`.
|
||||
|
||||
When using the tool with an agent, the agent will need to provide:
|
||||
|
||||
- **search_query**: Required. The search query to find relevant information in the channel content.
|
||||
- **youtube_channel_handle**: Required only if not provided during initialization. The handle of the YouTube channel to search within.
|
||||
|
||||
## Custom Model and Embeddings
|
||||
## Custom model and embeddings
|
||||
|
||||
By default, the tool uses OpenAI for both embeddings and summarization. To customize the model, you can use a config dictionary as follows:
|
||||
|
||||
```python Code
|
||||
youtube_channel_tool = YoutubeChannelSearchTool(
|
||||
```python Code
|
||||
tool = YoutubeChannelSearchTool(
|
||||
config=dict(
|
||||
llm=dict(
|
||||
provider="ollama", # or google, openai, anthropic, llama2, ...
|
||||
@@ -114,81 +72,4 @@ youtube_channel_tool = YoutubeChannelSearchTool(
|
||||
),
|
||||
)
|
||||
)
|
||||
```
|
||||
|
||||
## Agent Integration Example
|
||||
|
||||
Here's a more detailed example of how to integrate the `YoutubeChannelSearchTool` with a CrewAI agent:
|
||||
|
||||
```python Code
|
||||
from crewai import Agent, Task, Crew
|
||||
from crewai_tools import YoutubeChannelSearchTool
|
||||
|
||||
# Initialize the tool
|
||||
youtube_channel_tool = YoutubeChannelSearchTool()
|
||||
|
||||
# Define an agent that uses the tool
|
||||
channel_researcher = Agent(
|
||||
role="Channel Researcher",
|
||||
goal="Extract and analyze information from YouTube channels",
|
||||
backstory="""You are an expert channel researcher who specializes in extracting
|
||||
and analyzing information from YouTube channels. You have a keen eye for detail
|
||||
and can quickly identify key points and insights from video content across an entire channel.""",
|
||||
tools=[youtube_channel_tool],
|
||||
verbose=True,
|
||||
)
|
||||
|
||||
# Create a task for the agent
|
||||
research_task = Task(
|
||||
description="""
|
||||
Search for information about data science projects and tutorials
|
||||
in the YouTube channel {youtube_channel_handle}.
|
||||
|
||||
Focus on:
|
||||
1. Key data science techniques covered
|
||||
2. Popular tutorial series
|
||||
3. Most viewed or recommended videos
|
||||
|
||||
Provide a comprehensive summary of these points.
|
||||
""",
|
||||
expected_output="A detailed summary of data science content available on the channel.",
|
||||
agent=channel_researcher,
|
||||
)
|
||||
|
||||
# Run the task
|
||||
crew = Crew(agents=[channel_researcher], tasks=[research_task])
|
||||
result = crew.kickoff(inputs={"youtube_channel_handle": "@exampleDataScienceChannel"})
|
||||
```
|
||||
|
||||
## Implementation Details
|
||||
|
||||
The `YoutubeChannelSearchTool` is implemented as a subclass of `RagTool`, which provides the base functionality for Retrieval-Augmented Generation:
|
||||
|
||||
```python Code
|
||||
class YoutubeChannelSearchTool(RagTool):
|
||||
name: str = "Search a Youtube Channels content"
|
||||
description: str = "A tool that can be used to semantic search a query from a Youtube Channels content."
|
||||
args_schema: Type[BaseModel] = YoutubeChannelSearchToolSchema
|
||||
|
||||
def __init__(self, youtube_channel_handle: Optional[str] = None, **kwargs):
|
||||
super().__init__(**kwargs)
|
||||
if youtube_channel_handle is not None:
|
||||
kwargs["data_type"] = DataType.YOUTUBE_CHANNEL
|
||||
self.add(youtube_channel_handle)
|
||||
self.description = f"A tool that can be used to semantic search a query the {youtube_channel_handle} Youtube Channels content."
|
||||
self.args_schema = FixedYoutubeChannelSearchToolSchema
|
||||
self._generate_description()
|
||||
|
||||
def add(
|
||||
self,
|
||||
youtube_channel_handle: str,
|
||||
**kwargs: Any,
|
||||
) -> None:
|
||||
if not youtube_channel_handle.startswith("@"):
|
||||
youtube_channel_handle = f"@{youtube_channel_handle}"
|
||||
super().add(youtube_channel_handle, **kwargs)
|
||||
```
|
||||
|
||||
## Conclusion
|
||||
|
||||
The `YoutubeChannelSearchTool` provides a powerful way to search and extract information from YouTube channel content using RAG techniques. By enabling agents to search across an entire channel's videos, it facilitates information extraction and analysis tasks that would otherwise be difficult to perform. This tool is particularly useful for research, content analysis, and knowledge extraction from YouTube channels.
|
||||
```
|
||||
@@ -29,73 +29,35 @@ pip install 'crewai[tools]'
|
||||
|
||||
## Example
|
||||
|
||||
The following example demonstrates how to use the `YoutubeVideoSearchTool` with a CrewAI agent:
|
||||
To integrate the YoutubeVideoSearchTool into your Python projects, follow the example below.
|
||||
This demonstrates how to use the tool both for general Youtube content searches and for targeted searches within a specific video's content.
|
||||
|
||||
```python Code
|
||||
from crewai import Agent, Task, Crew
|
||||
from crewai_tools import YoutubeVideoSearchTool
|
||||
|
||||
# Initialize the tool for general YouTube video searches
|
||||
youtube_search_tool = YoutubeVideoSearchTool()
|
||||
# General search across Youtube content without specifying a video URL,
|
||||
# so the agent can search within any Youtube video content
|
||||
# it learns about its url during its operation
|
||||
tool = YoutubeVideoSearchTool()
|
||||
|
||||
# Define an agent that uses the tool
|
||||
video_researcher = Agent(
|
||||
role="Video Researcher",
|
||||
goal="Extract relevant information from YouTube videos",
|
||||
backstory="An expert researcher who specializes in analyzing video content.",
|
||||
tools=[youtube_search_tool],
|
||||
verbose=True,
|
||||
)
|
||||
|
||||
# Example task to search for information in a specific video
|
||||
research_task = Task(
|
||||
description="Search for information about machine learning frameworks in the YouTube video at {youtube_video_url}",
|
||||
expected_output="A summary of the key machine learning frameworks mentioned in the video.",
|
||||
agent=video_researcher,
|
||||
)
|
||||
|
||||
# Create and run the crew
|
||||
crew = Crew(agents=[video_researcher], tasks=[research_task])
|
||||
result = crew.kickoff(inputs={"youtube_video_url": "https://youtube.com/watch?v=example"})
|
||||
```
|
||||
|
||||
You can also initialize the tool with a specific YouTube video URL:
|
||||
|
||||
```python Code
|
||||
# Initialize the tool with a specific YouTube video URL
|
||||
youtube_search_tool = YoutubeVideoSearchTool(
|
||||
# Targeted search within a specific Youtube video's content
|
||||
tool = YoutubeVideoSearchTool(
|
||||
youtube_video_url='https://youtube.com/watch?v=example'
|
||||
)
|
||||
|
||||
# Define an agent that uses the tool
|
||||
video_researcher = Agent(
|
||||
role="Video Researcher",
|
||||
goal="Extract relevant information from a specific YouTube video",
|
||||
backstory="An expert researcher who specializes in analyzing video content.",
|
||||
tools=[youtube_search_tool],
|
||||
verbose=True,
|
||||
)
|
||||
```
|
||||
|
||||
## Parameters
|
||||
## Arguments
|
||||
|
||||
The `YoutubeVideoSearchTool` accepts the following parameters:
|
||||
The YoutubeVideoSearchTool accepts the following initialization arguments:
|
||||
|
||||
- **youtube_video_url**: Optional. The URL of the YouTube video to search within. If provided during initialization, the agent won't need to specify it when using the tool.
|
||||
- **config**: Optional. Configuration for the underlying RAG system, including LLM and embedder settings.
|
||||
- **summarize**: Optional. Whether to summarize the retrieved content. Default is `False`.
|
||||
- `youtube_video_url`: An optional argument at initialization but required if targeting a specific Youtube video. It specifies the Youtube video URL path you want to search within.
|
||||
|
||||
When using the tool with an agent, the agent will need to provide:
|
||||
|
||||
- **search_query**: Required. The search query to find relevant information in the video content.
|
||||
- **youtube_video_url**: Required only if not provided during initialization. The URL of the YouTube video to search within.
|
||||
|
||||
## Custom Model and Embeddings
|
||||
## Custom model and embeddings
|
||||
|
||||
By default, the tool uses OpenAI for both embeddings and summarization. To customize the model, you can use a config dictionary as follows:
|
||||
|
||||
```python Code
|
||||
youtube_search_tool = YoutubeVideoSearchTool(
|
||||
tool = YoutubeVideoSearchTool(
|
||||
config=dict(
|
||||
llm=dict(
|
||||
provider="ollama", # or google, openai, anthropic, llama2, ...
|
||||
@@ -116,72 +78,4 @@ youtube_search_tool = YoutubeVideoSearchTool(
|
||||
),
|
||||
)
|
||||
)
|
||||
```
|
||||
|
||||
## Agent Integration Example
|
||||
|
||||
Here's a more detailed example of how to integrate the `YoutubeVideoSearchTool` with a CrewAI agent:
|
||||
|
||||
```python Code
|
||||
from crewai import Agent, Task, Crew
|
||||
from crewai_tools import YoutubeVideoSearchTool
|
||||
|
||||
# Initialize the tool
|
||||
youtube_search_tool = YoutubeVideoSearchTool()
|
||||
|
||||
# Define an agent that uses the tool
|
||||
video_researcher = Agent(
|
||||
role="Video Researcher",
|
||||
goal="Extract and analyze information from YouTube videos",
|
||||
backstory="""You are an expert video researcher who specializes in extracting
|
||||
and analyzing information from YouTube videos. You have a keen eye for detail
|
||||
and can quickly identify key points and insights from video content.""",
|
||||
tools=[youtube_search_tool],
|
||||
verbose=True,
|
||||
)
|
||||
|
||||
# Create a task for the agent
|
||||
research_task = Task(
|
||||
description="""
|
||||
Search for information about recent advancements in artificial intelligence
|
||||
in the YouTube video at {youtube_video_url}.
|
||||
|
||||
Focus on:
|
||||
1. Key AI technologies mentioned
|
||||
2. Real-world applications discussed
|
||||
3. Future predictions made by the speaker
|
||||
|
||||
Provide a comprehensive summary of these points.
|
||||
""",
|
||||
expected_output="A detailed summary of AI advancements, applications, and future predictions from the video.",
|
||||
agent=video_researcher,
|
||||
)
|
||||
|
||||
# Run the task
|
||||
crew = Crew(agents=[video_researcher], tasks=[research_task])
|
||||
result = crew.kickoff(inputs={"youtube_video_url": "https://youtube.com/watch?v=example"})
|
||||
```
|
||||
|
||||
## Implementation Details
|
||||
|
||||
The `YoutubeVideoSearchTool` is implemented as a subclass of `RagTool`, which provides the base functionality for Retrieval-Augmented Generation:
|
||||
|
||||
```python Code
|
||||
class YoutubeVideoSearchTool(RagTool):
|
||||
name: str = "Search a Youtube Video content"
|
||||
description: str = "A tool that can be used to semantic search a query from a Youtube Video content."
|
||||
args_schema: Type[BaseModel] = YoutubeVideoSearchToolSchema
|
||||
|
||||
def __init__(self, youtube_video_url: Optional[str] = None, **kwargs):
|
||||
super().__init__(**kwargs)
|
||||
if youtube_video_url is not None:
|
||||
kwargs["data_type"] = DataType.YOUTUBE_VIDEO
|
||||
self.add(youtube_video_url)
|
||||
self.description = f"A tool that can be used to semantic search a query the {youtube_video_url} Youtube Video content."
|
||||
self.args_schema = FixedYoutubeVideoSearchToolSchema
|
||||
self._generate_description()
|
||||
```
|
||||
|
||||
## Conclusion
|
||||
|
||||
The `YoutubeVideoSearchTool` provides a powerful way to search and extract information from YouTube video content using RAG techniques. By enabling agents to search within video content, it facilitates information extraction and analysis tasks that would otherwise be difficult to perform. This tool is particularly useful for research, content analysis, and knowledge extraction from video sources.
|
||||
```
|
||||
@@ -129,6 +129,7 @@ nav:
|
||||
- Processes: 'core-concepts/Processes.md'
|
||||
- Crews: 'core-concepts/Crews.md'
|
||||
- Collaboration: 'core-concepts/Collaboration.md'
|
||||
- Pipeline: 'core-concepts/Pipeline.md'
|
||||
- Training: 'core-concepts/Training-Crew.md'
|
||||
- Memory: 'core-concepts/Memory.md'
|
||||
- Planning: 'core-concepts/Planning.md'
|
||||
@@ -151,8 +152,6 @@ nav:
|
||||
- Conditional Tasks: 'how-to/Conditional-Tasks.md'
|
||||
- Agent Monitoring with AgentOps: 'how-to/AgentOps-Observability.md'
|
||||
- Agent Monitoring with LangTrace: 'how-to/Langtrace-Observability.md'
|
||||
- Agent Monitoring with OpenLIT: 'how-to/openlit-Observability.md'
|
||||
- Agent Monitoring with MLflow: 'how-to/mlflow-Observability.md'
|
||||
- Tools Docs:
|
||||
- Browserbase Web Loader: 'tools/BrowserbaseLoadTool.md'
|
||||
- Code Docs RAG Search: 'tools/CodeDocsSearchTool.md'
|
||||
|
||||
7507
poetry.lock
generated
Normal file
7507
poetry.lock
generated
Normal file
File diff suppressed because it is too large
Load Diff
@@ -1,42 +1,34 @@
|
||||
[project]
|
||||
name = "crewai"
|
||||
version = "0.102.0"
|
||||
version = "0.70.1"
|
||||
description = "Cutting-edge framework for orchestrating role-playing, autonomous AI agents. By fostering collaborative intelligence, CrewAI empowers agents to work together seamlessly, tackling complex tasks."
|
||||
readme = "README.md"
|
||||
requires-python = ">=3.10,<3.13"
|
||||
requires-python = ">=3.10,<=3.13"
|
||||
authors = [
|
||||
{ name = "Joao Moura", email = "joao@crewai.com" }
|
||||
]
|
||||
dependencies = [
|
||||
# Core Dependencies
|
||||
"pydantic>=2.4.2",
|
||||
"langchain>=0.2.16",
|
||||
"openai>=1.13.3",
|
||||
"litellm==1.60.2",
|
||||
"instructor>=1.3.3",
|
||||
# Text Processing
|
||||
"pdfplumber>=0.11.4",
|
||||
"regex>=2024.9.11",
|
||||
# Telemetry and Monitoring
|
||||
"opentelemetry-api>=1.22.0",
|
||||
"opentelemetry-sdk>=1.22.0",
|
||||
"opentelemetry-exporter-otlp-proto-http>=1.22.0",
|
||||
# Data Handling
|
||||
"chromadb>=0.5.23",
|
||||
"openpyxl>=3.1.5",
|
||||
"pyvis>=0.3.2",
|
||||
# Authentication and Security
|
||||
"auth0-python>=4.7.1",
|
||||
"python-dotenv>=1.0.0",
|
||||
# Configuration and Utils
|
||||
"instructor>=1.3.3",
|
||||
"regex>=2024.9.11",
|
||||
"crewai-tools>=0.12.1",
|
||||
"click>=8.1.7",
|
||||
"python-dotenv>=1.0.0",
|
||||
"appdirs>=1.4.4",
|
||||
"jsonref>=1.1.0",
|
||||
"agentops>=0.3.0",
|
||||
"embedchain>=0.1.114",
|
||||
"json-repair>=0.25.2",
|
||||
"uv>=0.4.25",
|
||||
"auth0-python>=4.7.1",
|
||||
"litellm>=1.44.22",
|
||||
"pyvis>=0.3.2",
|
||||
"uv>=0.4.18",
|
||||
"tomli-w>=1.1.0",
|
||||
"tomli>=2.0.2",
|
||||
"blinker>=1.9.0",
|
||||
"json5>=0.10.0",
|
||||
]
|
||||
|
||||
[project.urls]
|
||||
@@ -45,29 +37,12 @@ Documentation = "https://docs.crewai.com"
|
||||
Repository = "https://github.com/crewAIInc/crewAI"
|
||||
|
||||
[project.optional-dependencies]
|
||||
tools = ["crewai-tools>=0.36.0"]
|
||||
embeddings = [
|
||||
"tiktoken~=0.7.0"
|
||||
]
|
||||
tools = ["crewai-tools>=0.12.1"]
|
||||
agentops = ["agentops>=0.3.0"]
|
||||
fastembed = ["fastembed>=0.4.1"]
|
||||
pdfplumber = [
|
||||
"pdfplumber>=0.11.4",
|
||||
]
|
||||
pandas = [
|
||||
"pandas>=2.2.3",
|
||||
]
|
||||
openpyxl = [
|
||||
"openpyxl>=3.1.5",
|
||||
]
|
||||
mem0 = ["mem0ai>=0.1.29"]
|
||||
docling = [
|
||||
"docling>=2.12.0",
|
||||
]
|
||||
|
||||
[tool.uv]
|
||||
dev-dependencies = [
|
||||
"ruff>=0.8.2",
|
||||
"ruff>=0.4.10",
|
||||
"mypy>=1.10.0",
|
||||
"pre-commit>=3.6.0",
|
||||
"mkdocs>=1.4.3",
|
||||
@@ -77,6 +52,7 @@ dev-dependencies = [
|
||||
"mkdocs-material-extensions>=1.3.1",
|
||||
"pillow>=10.2.0",
|
||||
"cairosvg>=2.7.1",
|
||||
"crewai-tools>=0.12.1",
|
||||
"pytest>=8.0.0",
|
||||
"pytest-vcr>=1.0.2",
|
||||
"python-dotenv>=1.0.0",
|
||||
|
||||
@@ -1,11 +1,11 @@
|
||||
import warnings
|
||||
|
||||
from crewai.agent import Agent
|
||||
from crewai.crew import Crew
|
||||
from crewai.flow.flow import Flow
|
||||
from crewai.knowledge.knowledge import Knowledge
|
||||
from crewai.llm import LLM
|
||||
from crewai.pipeline import Pipeline
|
||||
from crewai.process import Process
|
||||
from crewai.routers import Router
|
||||
from crewai.task import Task
|
||||
|
||||
warnings.filterwarnings(
|
||||
@@ -14,13 +14,5 @@ warnings.filterwarnings(
|
||||
category=UserWarning,
|
||||
module="pydantic.main",
|
||||
)
|
||||
__version__ = "0.102.0"
|
||||
__all__ = [
|
||||
"Agent",
|
||||
"Crew",
|
||||
"Process",
|
||||
"Task",
|
||||
"LLM",
|
||||
"Flow",
|
||||
"Knowledge",
|
||||
]
|
||||
__version__ = "0.70.1"
|
||||
__all__ = ["Agent", "Crew", "Process", "Task", "Pipeline", "Router", "LLM", "Flow"]
|
||||
|
||||
@@ -1,35 +1,43 @@
|
||||
import re
|
||||
import shutil
|
||||
import subprocess
|
||||
from typing import Any, Dict, List, Literal, Optional, Sequence, Union
|
||||
import os
|
||||
from inspect import signature
|
||||
from typing import Any, List, Optional, Union
|
||||
|
||||
from pydantic import Field, InstanceOf, PrivateAttr, model_validator
|
||||
|
||||
from crewai.agents import CacheHandler
|
||||
from crewai.agents.agent_builder.base_agent import BaseAgent
|
||||
from crewai.agents.crew_agent_executor import CrewAgentExecutor
|
||||
from crewai.knowledge.knowledge import Knowledge
|
||||
from crewai.knowledge.source.base_knowledge_source import BaseKnowledgeSource
|
||||
from crewai.knowledge.utils.knowledge_utils import extract_knowledge_context
|
||||
from crewai.llm import LLM
|
||||
from crewai.memory.contextual.contextual_memory import ContextualMemory
|
||||
from crewai.task import Task
|
||||
from crewai.tools import BaseTool
|
||||
from crewai.tools.agent_tools.agent_tools import AgentTools
|
||||
from crewai.tools.agent_tools import AgentTools
|
||||
from crewai.utilities import Converter, Prompts
|
||||
from crewai.utilities.constants import TRAINED_AGENTS_DATA_FILE, TRAINING_DATA_FILE
|
||||
from crewai.utilities.converter import generate_model_description
|
||||
from crewai.utilities.events.agent_events import (
|
||||
AgentExecutionCompletedEvent,
|
||||
AgentExecutionErrorEvent,
|
||||
AgentExecutionStartedEvent,
|
||||
)
|
||||
from crewai.utilities.events.crewai_event_bus import crewai_event_bus
|
||||
from crewai.utilities.llm_utils import create_llm
|
||||
from crewai.utilities.token_counter_callback import TokenCalcHandler
|
||||
from crewai.utilities.training_handler import CrewTrainingHandler
|
||||
|
||||
|
||||
def mock_agent_ops_provider():
|
||||
def track_agent(*args, **kwargs):
|
||||
def noop(f):
|
||||
return f
|
||||
|
||||
return noop
|
||||
|
||||
return track_agent
|
||||
|
||||
|
||||
agentops = None
|
||||
|
||||
if os.environ.get("AGENTOPS_API_KEY"):
|
||||
try:
|
||||
from agentops import track_agent
|
||||
except ImportError:
|
||||
track_agent = mock_agent_ops_provider()
|
||||
else:
|
||||
track_agent = mock_agent_ops_provider()
|
||||
|
||||
|
||||
@track_agent()
|
||||
class Agent(BaseAgent):
|
||||
"""Represents an agent in a system.
|
||||
|
||||
@@ -41,18 +49,16 @@ class Agent(BaseAgent):
|
||||
role: The role of the agent.
|
||||
goal: The objective of the agent.
|
||||
backstory: The backstory of the agent.
|
||||
knowledge: The knowledge base of the agent.
|
||||
config: Dict representation of agent configuration.
|
||||
llm: The language model that will run the agent.
|
||||
function_calling_llm: The language model that will handle the tool calling for this agent, it overrides the crew function_calling_llm.
|
||||
max_iter: Maximum number of iterations for an agent to execute a task.
|
||||
memory: Whether the agent should have memory or not.
|
||||
max_rpm: Maximum number of requests per minute for the agent execution to be respected.
|
||||
verbose: Whether the agent execution should be in verbose mode.
|
||||
allow_delegation: Whether the agent is allowed to delegate tasks to other agents.
|
||||
tools: Tools at agents disposal
|
||||
step_callback: Callback to be executed after each step of the agent execution.
|
||||
knowledge_sources: Knowledge sources for the agent.
|
||||
embedder: Embedder configuration for the agent.
|
||||
"""
|
||||
|
||||
_times_executed: int = PrivateAttr(default=0)
|
||||
@@ -62,6 +68,9 @@ class Agent(BaseAgent):
|
||||
)
|
||||
agent_ops_agent_name: str = None # type: ignore # Incompatible types in assignment (expression has type "None", variable has type "str")
|
||||
agent_ops_agent_id: str = None # type: ignore # Incompatible types in assignment (expression has type "None", variable has type "str")
|
||||
cache_handler: InstanceOf[CacheHandler] = Field(
|
||||
default=None, description="An instance of the CacheHandler class."
|
||||
)
|
||||
step_callback: Optional[Any] = Field(
|
||||
default=None,
|
||||
description="Callback to be executed after each step of the agent execution.",
|
||||
@@ -73,7 +82,7 @@ class Agent(BaseAgent):
|
||||
llm: Union[str, InstanceOf[LLM], Any] = Field(
|
||||
description="Language model that will run the agent.", default=None
|
||||
)
|
||||
function_calling_llm: Optional[Union[str, InstanceOf[LLM], Any]] = Field(
|
||||
function_calling_llm: Optional[Any] = Field(
|
||||
description="Language model that will run the agent.", default=None
|
||||
)
|
||||
system_template: Optional[str] = Field(
|
||||
@@ -95,37 +104,75 @@ class Agent(BaseAgent):
|
||||
default=True,
|
||||
description="Keep messages under the context window size by summarizing content.",
|
||||
)
|
||||
max_iter: int = Field(
|
||||
default=20,
|
||||
description="Maximum number of iterations for an agent to execute a task before giving it's best answer",
|
||||
)
|
||||
max_retry_limit: int = Field(
|
||||
default=2,
|
||||
description="Maximum number of retries for an agent to execute a task when an error occurs.",
|
||||
)
|
||||
multimodal: bool = Field(
|
||||
default=False,
|
||||
description="Whether the agent is multimodal.",
|
||||
)
|
||||
code_execution_mode: Literal["safe", "unsafe"] = Field(
|
||||
default="safe",
|
||||
description="Mode for code execution: 'safe' (using Docker) or 'unsafe' (direct execution).",
|
||||
)
|
||||
embedder: Optional[Dict[str, Any]] = Field(
|
||||
default=None,
|
||||
description="Embedder configuration for the agent.",
|
||||
)
|
||||
|
||||
@model_validator(mode="after")
|
||||
def post_init_setup(self):
|
||||
self.agent_ops_agent_name = self.role
|
||||
|
||||
self.llm = create_llm(self.llm)
|
||||
if self.function_calling_llm and not isinstance(self.function_calling_llm, LLM):
|
||||
self.function_calling_llm = create_llm(self.function_calling_llm)
|
||||
# Handle different cases for self.llm
|
||||
if isinstance(self.llm, str):
|
||||
# If it's a string, create an LLM instance
|
||||
self.llm = LLM(model=self.llm)
|
||||
elif isinstance(self.llm, LLM):
|
||||
# If it's already an LLM instance, keep it as is
|
||||
pass
|
||||
elif self.llm is None:
|
||||
# If it's None, use environment variables or default
|
||||
model_name = os.environ.get("OPENAI_MODEL_NAME", "gpt-4o-mini")
|
||||
llm_params = {"model": model_name}
|
||||
|
||||
api_base = os.environ.get("OPENAI_API_BASE") or os.environ.get(
|
||||
"OPENAI_BASE_URL"
|
||||
)
|
||||
if api_base:
|
||||
llm_params["base_url"] = api_base
|
||||
|
||||
api_key = os.environ.get("OPENAI_API_KEY")
|
||||
if api_key:
|
||||
llm_params["api_key"] = api_key
|
||||
|
||||
self.llm = LLM(**llm_params)
|
||||
else:
|
||||
# For any other type, attempt to extract relevant attributes
|
||||
llm_params = {
|
||||
"model": getattr(self.llm, "model_name", None)
|
||||
or getattr(self.llm, "deployment_name", None)
|
||||
or str(self.llm),
|
||||
"temperature": getattr(self.llm, "temperature", None),
|
||||
"max_tokens": getattr(self.llm, "max_tokens", None),
|
||||
"logprobs": getattr(self.llm, "logprobs", None),
|
||||
"timeout": getattr(self.llm, "timeout", None),
|
||||
"max_retries": getattr(self.llm, "max_retries", None),
|
||||
"api_key": getattr(self.llm, "api_key", None),
|
||||
"base_url": getattr(self.llm, "base_url", None),
|
||||
"organization": getattr(self.llm, "organization", None),
|
||||
}
|
||||
# Remove None values to avoid passing unnecessary parameters
|
||||
llm_params = {k: v for k, v in llm_params.items() if v is not None}
|
||||
self.llm = LLM(**llm_params)
|
||||
|
||||
# Similar handling for function_calling_llm
|
||||
if self.function_calling_llm:
|
||||
if isinstance(self.function_calling_llm, str):
|
||||
self.function_calling_llm = LLM(model=self.function_calling_llm)
|
||||
elif not isinstance(self.function_calling_llm, LLM):
|
||||
self.function_calling_llm = LLM(
|
||||
model=getattr(self.function_calling_llm, "model_name", None)
|
||||
or getattr(self.function_calling_llm, "deployment_name", None)
|
||||
or str(self.function_calling_llm)
|
||||
)
|
||||
|
||||
if not self.agent_executor:
|
||||
self._setup_agent_executor()
|
||||
|
||||
if self.allow_code_execution:
|
||||
self._validate_docker_installation()
|
||||
|
||||
return self
|
||||
|
||||
def _setup_agent_executor(self):
|
||||
@@ -133,31 +180,11 @@ class Agent(BaseAgent):
|
||||
self.cache_handler = CacheHandler()
|
||||
self.set_cache_handler(self.cache_handler)
|
||||
|
||||
def set_knowledge(self, crew_embedder: Optional[Dict[str, Any]] = None):
|
||||
try:
|
||||
if self.embedder is None and crew_embedder:
|
||||
self.embedder = crew_embedder
|
||||
|
||||
if self.knowledge_sources:
|
||||
full_pattern = re.compile(r"[^a-zA-Z0-9\-_\r\n]|(\.\.)")
|
||||
knowledge_agent_name = f"{re.sub(full_pattern, '_', self.role)}"
|
||||
if isinstance(self.knowledge_sources, list) and all(
|
||||
isinstance(k, BaseKnowledgeSource) for k in self.knowledge_sources
|
||||
):
|
||||
self.knowledge = Knowledge(
|
||||
sources=self.knowledge_sources,
|
||||
embedder=self.embedder,
|
||||
collection_name=knowledge_agent_name,
|
||||
storage=self.knowledge_storage or None,
|
||||
)
|
||||
except (TypeError, ValueError) as e:
|
||||
raise ValueError(f"Invalid Knowledge Configuration: {str(e)}")
|
||||
|
||||
def execute_task(
|
||||
self,
|
||||
task: Task,
|
||||
task: Any,
|
||||
context: Optional[str] = None,
|
||||
tools: Optional[List[BaseTool]] = None,
|
||||
tools: Optional[List[Any]] = None,
|
||||
) -> str:
|
||||
"""Execute a task with the agent.
|
||||
|
||||
@@ -174,24 +201,6 @@ class Agent(BaseAgent):
|
||||
|
||||
task_prompt = task.prompt()
|
||||
|
||||
# If the task requires output in JSON or Pydantic format,
|
||||
# append specific instructions to the task prompt to ensure
|
||||
# that the final answer does not include any code block markers
|
||||
if task.output_json or task.output_pydantic:
|
||||
# Generate the schema based on the output format
|
||||
if task.output_json:
|
||||
# schema = json.dumps(task.output_json, indent=2)
|
||||
schema = generate_model_description(task.output_json)
|
||||
task_prompt += "\n" + self.i18n.slice(
|
||||
"formatted_task_instructions"
|
||||
).format(output_format=schema)
|
||||
|
||||
elif task.output_pydantic:
|
||||
schema = generate_model_description(task.output_pydantic)
|
||||
task_prompt += "\n" + self.i18n.slice(
|
||||
"formatted_task_instructions"
|
||||
).format(output_format=schema)
|
||||
|
||||
if context:
|
||||
task_prompt = self.i18n.slice("task_with_context").format(
|
||||
task=task_prompt, context=context
|
||||
@@ -199,32 +208,14 @@ class Agent(BaseAgent):
|
||||
|
||||
if self.crew and self.crew.memory:
|
||||
contextual_memory = ContextualMemory(
|
||||
self.crew.memory_config,
|
||||
self.crew._short_term_memory,
|
||||
self.crew._long_term_memory,
|
||||
self.crew._entity_memory,
|
||||
self.crew._user_memory,
|
||||
)
|
||||
memory = contextual_memory.build_context_for_task(task, context)
|
||||
if memory.strip() != "":
|
||||
task_prompt += self.i18n.slice("memory").format(memory=memory)
|
||||
|
||||
if self.knowledge:
|
||||
agent_knowledge_snippets = self.knowledge.query([task.prompt()])
|
||||
if agent_knowledge_snippets:
|
||||
agent_knowledge_context = extract_knowledge_context(
|
||||
agent_knowledge_snippets
|
||||
)
|
||||
if agent_knowledge_context:
|
||||
task_prompt += agent_knowledge_context
|
||||
|
||||
if self.crew:
|
||||
knowledge_snippets = self.crew.query_knowledge([task.prompt()])
|
||||
if knowledge_snippets:
|
||||
crew_knowledge_context = extract_knowledge_context(knowledge_snippets)
|
||||
if crew_knowledge_context:
|
||||
task_prompt += crew_knowledge_context
|
||||
|
||||
tools = tools or self.tools or []
|
||||
self.create_agent_executor(tools=tools, task=task)
|
||||
|
||||
@@ -234,15 +225,6 @@ class Agent(BaseAgent):
|
||||
task_prompt = self._use_trained_data(task_prompt=task_prompt)
|
||||
|
||||
try:
|
||||
crewai_event_bus.emit(
|
||||
self,
|
||||
event=AgentExecutionStartedEvent(
|
||||
agent=self,
|
||||
tools=self.tools,
|
||||
task_prompt=task_prompt,
|
||||
task=task,
|
||||
),
|
||||
)
|
||||
result = self.agent_executor.invoke(
|
||||
{
|
||||
"input": task_prompt,
|
||||
@@ -252,27 +234,8 @@ class Agent(BaseAgent):
|
||||
}
|
||||
)["output"]
|
||||
except Exception as e:
|
||||
if e.__class__.__module__.startswith("litellm"):
|
||||
# Do not retry on litellm errors
|
||||
crewai_event_bus.emit(
|
||||
self,
|
||||
event=AgentExecutionErrorEvent(
|
||||
agent=self,
|
||||
task=task,
|
||||
error=str(e),
|
||||
),
|
||||
)
|
||||
raise e
|
||||
self._times_executed += 1
|
||||
if self._times_executed > self.max_retry_limit:
|
||||
crewai_event_bus.emit(
|
||||
self,
|
||||
event=AgentExecutionErrorEvent(
|
||||
agent=self,
|
||||
task=task,
|
||||
error=str(e),
|
||||
),
|
||||
)
|
||||
raise e
|
||||
result = self.execute_task(task, context, tools)
|
||||
|
||||
@@ -285,15 +248,10 @@ class Agent(BaseAgent):
|
||||
for tool_result in self.tools_results: # type: ignore # Item "None" of "list[Any] | None" has no attribute "__iter__" (not iterable)
|
||||
if tool_result.get("result_as_answer", False):
|
||||
result = tool_result["result"]
|
||||
crewai_event_bus.emit(
|
||||
self,
|
||||
event=AgentExecutionCompletedEvent(agent=self, task=task, output=result),
|
||||
)
|
||||
|
||||
return result
|
||||
|
||||
def create_agent_executor(
|
||||
self, tools: Optional[List[BaseTool]] = None, task=None
|
||||
) -> None:
|
||||
def create_agent_executor(self, tools=None, task=None) -> None:
|
||||
"""Create an agent executor for the agent.
|
||||
|
||||
Returns:
|
||||
@@ -346,18 +304,11 @@ class Agent(BaseAgent):
|
||||
tools = agent_tools.tools()
|
||||
return tools
|
||||
|
||||
def get_multimodal_tools(self) -> Sequence[BaseTool]:
|
||||
from crewai.tools.agent_tools.add_image_tool import AddImageTool
|
||||
|
||||
return [AddImageTool()]
|
||||
|
||||
def get_code_execution_tools(self):
|
||||
try:
|
||||
from crewai_tools import CodeInterpreterTool # type: ignore
|
||||
from crewai_tools import CodeInterpreterTool
|
||||
|
||||
# Set the unsafe_mode based on the code_execution_mode attribute
|
||||
unsafe_mode = self.code_execution_mode == "unsafe"
|
||||
return [CodeInterpreterTool(unsafe_mode=unsafe_mode)]
|
||||
return [CodeInterpreterTool()]
|
||||
except ModuleNotFoundError:
|
||||
self._logger.log(
|
||||
"info", "Coding tools not available. Install crewai_tools. "
|
||||
@@ -371,11 +322,11 @@ class Agent(BaseAgent):
|
||||
tools_list = []
|
||||
try:
|
||||
# tentatively try to import from crewai_tools import BaseTool as CrewAITool
|
||||
from crewai.tools import BaseTool as CrewAITool
|
||||
from crewai_tools import BaseTool as CrewAITool
|
||||
|
||||
for tool in tools:
|
||||
if isinstance(tool, CrewAITool):
|
||||
tools_list.append(tool.to_structured_tool())
|
||||
tools_list.append(tool.to_langchain())
|
||||
else:
|
||||
tools_list.append(tool)
|
||||
except ModuleNotFoundError:
|
||||
@@ -430,42 +381,33 @@ class Agent(BaseAgent):
|
||||
|
||||
return description
|
||||
|
||||
def _render_text_description_and_args(self, tools: List[BaseTool]) -> str:
|
||||
def _render_text_description_and_args(self, tools: List[Any]) -> str:
|
||||
"""Render the tool name, description, and args in plain text.
|
||||
|
||||
Output will be in the format of:
|
||||
Output will be in the format of:
|
||||
|
||||
.. code-block:: markdown
|
||||
.. code-block:: markdown
|
||||
|
||||
search: This tool is used for search, args: {"query": {"type": "string"}}
|
||||
calculator: This tool is used for math, \
|
||||
args: {"expression": {"type": "string"}}
|
||||
args: {"expression": {"type": "string"}}
|
||||
"""
|
||||
tool_strings = []
|
||||
for tool in tools:
|
||||
tool_strings.append(tool.description)
|
||||
args_schema = str(tool.args)
|
||||
if hasattr(tool, "func") and tool.func:
|
||||
sig = signature(tool.func)
|
||||
description = (
|
||||
f"Tool Name: {tool.name}{sig}\nTool Description: {tool.description}"
|
||||
)
|
||||
else:
|
||||
description = (
|
||||
f"Tool Name: {tool.name}\nTool Description: {tool.description}"
|
||||
)
|
||||
tool_strings.append(f"{description}\nTool Arguments: {args_schema}")
|
||||
|
||||
return "\n".join(tool_strings)
|
||||
|
||||
def _validate_docker_installation(self) -> None:
|
||||
"""Check if Docker is installed and running."""
|
||||
if not shutil.which("docker"):
|
||||
raise RuntimeError(
|
||||
f"Docker is not installed. Please install Docker to use code execution with agent: {self.role}"
|
||||
)
|
||||
|
||||
try:
|
||||
subprocess.run(
|
||||
["docker", "info"],
|
||||
check=True,
|
||||
stdout=subprocess.PIPE,
|
||||
stderr=subprocess.PIPE,
|
||||
)
|
||||
except subprocess.CalledProcessError:
|
||||
raise RuntimeError(
|
||||
f"Docker is not running. Please start Docker to use code execution with agent: {self.role}"
|
||||
)
|
||||
|
||||
@staticmethod
|
||||
def __tools_names(tools) -> str:
|
||||
return ", ".join([t.name for t in tools])
|
||||
|
||||
@@ -18,12 +18,8 @@ from pydantic_core import PydanticCustomError
|
||||
from crewai.agents.agent_builder.utilities.base_token_process import TokenProcess
|
||||
from crewai.agents.cache.cache_handler import CacheHandler
|
||||
from crewai.agents.tools_handler import ToolsHandler
|
||||
from crewai.knowledge.knowledge import Knowledge
|
||||
from crewai.knowledge.source.base_knowledge_source import BaseKnowledgeSource
|
||||
from crewai.tools.base_tool import BaseTool, Tool
|
||||
from crewai.utilities import I18N, Logger, RPMController
|
||||
from crewai.utilities.config import process_config
|
||||
from crewai.utilities.converter import Converter
|
||||
|
||||
T = TypeVar("T", bound="BaseAgent")
|
||||
|
||||
@@ -42,7 +38,7 @@ class BaseAgent(ABC, BaseModel):
|
||||
max_rpm (Optional[int]): Maximum number of requests per minute for the agent execution.
|
||||
allow_delegation (bool): Allow delegation of tasks to agents.
|
||||
tools (Optional[List[Any]]): Tools at the agent's disposal.
|
||||
max_iter (int): Maximum iterations for an agent to execute a task.
|
||||
max_iter (Optional[int]): Maximum iterations for an agent to execute a task.
|
||||
agent_executor (InstanceOf): An instance of the CrewAgentExecutor class.
|
||||
llm (Any): Language model that will run the agent.
|
||||
crew (Any): Crew to which the agent belongs.
|
||||
@@ -50,16 +46,14 @@ class BaseAgent(ABC, BaseModel):
|
||||
cache_handler (InstanceOf[CacheHandler]): An instance of the CacheHandler class.
|
||||
tools_handler (InstanceOf[ToolsHandler]): An instance of the ToolsHandler class.
|
||||
max_tokens: Maximum number of tokens for the agent to generate in a response.
|
||||
knowledge_sources: Knowledge sources for the agent.
|
||||
knowledge_storage: Custom knowledge storage for the agent.
|
||||
|
||||
|
||||
Methods:
|
||||
execute_task(task: Any, context: Optional[str] = None, tools: Optional[List[BaseTool]] = None) -> str:
|
||||
execute_task(task: Any, context: Optional[str] = None, tools: Optional[List[Any]] = None) -> str:
|
||||
Abstract method to execute a task.
|
||||
create_agent_executor(tools=None) -> None:
|
||||
Abstract method to create an agent executor.
|
||||
_parse_tools(tools: List[BaseTool]) -> List[Any]:
|
||||
_parse_tools(tools: List[Any]) -> List[Any]:
|
||||
Abstract method to parse tools.
|
||||
get_delegation_tools(agents: List["BaseAgent"]):
|
||||
Abstract method to set the agents task tools for handling delegation and question asking to other agents in crew.
|
||||
@@ -111,10 +105,10 @@ class BaseAgent(ABC, BaseModel):
|
||||
default=False,
|
||||
description="Enable agent to delegate and ask questions among each other.",
|
||||
)
|
||||
tools: Optional[List[BaseTool]] = Field(
|
||||
tools: Optional[List[Any]] = Field(
|
||||
default_factory=list, description="Tools at agents' disposal"
|
||||
)
|
||||
max_iter: int = Field(
|
||||
max_iter: Optional[int] = Field(
|
||||
default=25, description="Maximum iterations for an agent to execute a task"
|
||||
)
|
||||
agent_executor: InstanceOf = Field(
|
||||
@@ -125,62 +119,21 @@ class BaseAgent(ABC, BaseModel):
|
||||
)
|
||||
crew: Any = Field(default=None, description="Crew to which the agent belongs.")
|
||||
i18n: I18N = Field(default=I18N(), description="Internationalization settings.")
|
||||
cache_handler: Optional[InstanceOf[CacheHandler]] = Field(
|
||||
cache_handler: InstanceOf[CacheHandler] = Field(
|
||||
default=None, description="An instance of the CacheHandler class."
|
||||
)
|
||||
tools_handler: InstanceOf[ToolsHandler] = Field(
|
||||
default_factory=ToolsHandler,
|
||||
description="An instance of the ToolsHandler class.",
|
||||
default=None, description="An instance of the ToolsHandler class."
|
||||
)
|
||||
max_tokens: Optional[int] = Field(
|
||||
default=None, description="Maximum number of tokens for the agent's execution."
|
||||
)
|
||||
knowledge: Optional[Knowledge] = Field(
|
||||
default=None, description="Knowledge for the agent."
|
||||
)
|
||||
knowledge_sources: Optional[List[BaseKnowledgeSource]] = Field(
|
||||
default=None,
|
||||
description="Knowledge sources for the agent.",
|
||||
)
|
||||
knowledge_storage: Optional[Any] = Field(
|
||||
default=None,
|
||||
description="Custom knowledge storage for the agent.",
|
||||
)
|
||||
|
||||
@model_validator(mode="before")
|
||||
@classmethod
|
||||
def process_model_config(cls, values):
|
||||
return process_config(values, cls)
|
||||
|
||||
@field_validator("tools")
|
||||
@classmethod
|
||||
def validate_tools(cls, tools: List[Any]) -> List[BaseTool]:
|
||||
"""Validate and process the tools provided to the agent.
|
||||
|
||||
This method ensures that each tool is either an instance of BaseTool
|
||||
or an object with 'name', 'func', and 'description' attributes. If the
|
||||
tool meets these criteria, it is processed and added to the list of
|
||||
tools. Otherwise, a ValueError is raised.
|
||||
"""
|
||||
processed_tools = []
|
||||
for tool in tools:
|
||||
if isinstance(tool, BaseTool):
|
||||
processed_tools.append(tool)
|
||||
elif (
|
||||
hasattr(tool, "name")
|
||||
and hasattr(tool, "func")
|
||||
and hasattr(tool, "description")
|
||||
):
|
||||
# Tool has the required attributes, create a Tool instance
|
||||
processed_tools.append(Tool.from_langchain(tool))
|
||||
else:
|
||||
raise ValueError(
|
||||
f"Invalid tool type: {type(tool)}. "
|
||||
"Tool must be an instance of BaseTool or "
|
||||
"an object with 'name', 'func', and 'description' attributes."
|
||||
)
|
||||
return processed_tools
|
||||
|
||||
@model_validator(mode="after")
|
||||
def validate_and_set_attributes(self):
|
||||
# Validate required fields
|
||||
@@ -235,7 +188,7 @@ class BaseAgent(ABC, BaseModel):
|
||||
self,
|
||||
task: Any,
|
||||
context: Optional[str] = None,
|
||||
tools: Optional[List[BaseTool]] = None,
|
||||
tools: Optional[List[Any]] = None,
|
||||
) -> str:
|
||||
pass
|
||||
|
||||
@@ -244,18 +197,18 @@ class BaseAgent(ABC, BaseModel):
|
||||
pass
|
||||
|
||||
@abstractmethod
|
||||
def _parse_tools(self, tools: List[BaseTool]) -> List[BaseTool]:
|
||||
def _parse_tools(self, tools: List[Any]) -> List[Any]:
|
||||
pass
|
||||
|
||||
@abstractmethod
|
||||
def get_delegation_tools(self, agents: List["BaseAgent"]) -> List[BaseTool]:
|
||||
def get_delegation_tools(self, agents: List["BaseAgent"]) -> List[Any]:
|
||||
"""Set the task tools that init BaseAgenTools class."""
|
||||
pass
|
||||
|
||||
@abstractmethod
|
||||
def get_output_converter(
|
||||
self, llm: Any, text: str, model: type[BaseModel] | None, instructions: str
|
||||
) -> Converter:
|
||||
):
|
||||
"""Get the converter class for the agent to create json/pydantic outputs."""
|
||||
pass
|
||||
|
||||
@@ -272,44 +225,13 @@ class BaseAgent(ABC, BaseModel):
|
||||
"tools_handler",
|
||||
"cache_handler",
|
||||
"llm",
|
||||
"knowledge_sources",
|
||||
"knowledge_storage",
|
||||
"knowledge",
|
||||
}
|
||||
|
||||
# Copy llm
|
||||
# Copy llm and clear callbacks
|
||||
existing_llm = shallow_copy(self.llm)
|
||||
copied_knowledge = shallow_copy(self.knowledge)
|
||||
copied_knowledge_storage = shallow_copy(self.knowledge_storage)
|
||||
# Properly copy knowledge sources if they exist
|
||||
existing_knowledge_sources = None
|
||||
if self.knowledge_sources:
|
||||
# Create a shared storage instance for all knowledge sources
|
||||
shared_storage = (
|
||||
self.knowledge_sources[0].storage if self.knowledge_sources else None
|
||||
)
|
||||
|
||||
existing_knowledge_sources = []
|
||||
for source in self.knowledge_sources:
|
||||
copied_source = (
|
||||
source.model_copy()
|
||||
if hasattr(source, "model_copy")
|
||||
else shallow_copy(source)
|
||||
)
|
||||
# Ensure all copied sources use the same storage instance
|
||||
copied_source.storage = shared_storage
|
||||
existing_knowledge_sources.append(copied_source)
|
||||
|
||||
copied_data = self.model_dump(exclude=exclude)
|
||||
copied_data = {k: v for k, v in copied_data.items() if v is not None}
|
||||
copied_agent = type(self)(
|
||||
**copied_data,
|
||||
llm=existing_llm,
|
||||
tools=self.tools,
|
||||
knowledge_sources=existing_knowledge_sources,
|
||||
knowledge=copied_knowledge,
|
||||
knowledge_storage=copied_knowledge_storage,
|
||||
)
|
||||
copied_agent = type(self)(**copied_data, llm=existing_llm, tools=self.tools)
|
||||
|
||||
return copied_agent
|
||||
|
||||
@@ -351,6 +273,3 @@ class BaseAgent(ABC, BaseModel):
|
||||
if not self._rpm_controller:
|
||||
self._rpm_controller = rpm_controller
|
||||
self.create_agent_executor()
|
||||
|
||||
def set_knowledge(self, crew_embedder: Optional[Dict[str, Any]] = None):
|
||||
pass
|
||||
|
||||
@@ -3,33 +3,39 @@ from typing import TYPE_CHECKING, Optional
|
||||
|
||||
from crewai.memory.entity.entity_memory_item import EntityMemoryItem
|
||||
from crewai.memory.long_term.long_term_memory_item import LongTermMemoryItem
|
||||
from crewai.utilities import I18N
|
||||
from crewai.utilities.converter import ConverterError
|
||||
from crewai.utilities.evaluators.task_evaluator import TaskEvaluator
|
||||
from crewai.utilities import I18N
|
||||
from crewai.utilities.printer import Printer
|
||||
|
||||
|
||||
if TYPE_CHECKING:
|
||||
from crewai.agents.agent_builder.base_agent import BaseAgent
|
||||
from crewai.crew import Crew
|
||||
from crewai.task import Task
|
||||
from crewai.agents.agent_builder.base_agent import BaseAgent
|
||||
|
||||
|
||||
class CrewAgentExecutorMixin:
|
||||
crew: Optional["Crew"]
|
||||
agent: Optional["BaseAgent"]
|
||||
crew_agent: Optional["BaseAgent"]
|
||||
task: Optional["Task"]
|
||||
iterations: int
|
||||
have_forced_answer: bool
|
||||
max_iter: int
|
||||
_i18n: I18N
|
||||
_printer: Printer = Printer()
|
||||
|
||||
def _should_force_answer(self) -> bool:
|
||||
"""Determine if a forced answer is required based on iteration count."""
|
||||
return (self.iterations >= self.max_iter) and not self.have_forced_answer
|
||||
|
||||
def _create_short_term_memory(self, output) -> None:
|
||||
"""Create and save a short-term memory item if conditions are met."""
|
||||
if (
|
||||
self.crew
|
||||
and self.agent
|
||||
and self.crew_agent
|
||||
and self.task
|
||||
and "Action: Delegate work to coworker" not in output.text
|
||||
and "Action: Delegate work to coworker" not in output.log
|
||||
):
|
||||
try:
|
||||
if (
|
||||
@@ -37,11 +43,11 @@ class CrewAgentExecutorMixin:
|
||||
and self.crew._short_term_memory
|
||||
):
|
||||
self.crew._short_term_memory.save(
|
||||
value=output.text,
|
||||
value=output.log,
|
||||
metadata={
|
||||
"observation": self.task.description,
|
||||
},
|
||||
agent=self.agent.role,
|
||||
agent=self.crew_agent.role,
|
||||
)
|
||||
except Exception as e:
|
||||
print(f"Failed to add to short term memory: {e}")
|
||||
@@ -55,18 +61,18 @@ class CrewAgentExecutorMixin:
|
||||
and self.crew._long_term_memory
|
||||
and self.crew._entity_memory
|
||||
and self.task
|
||||
and self.agent
|
||||
and self.crew_agent
|
||||
):
|
||||
try:
|
||||
ltm_agent = TaskEvaluator(self.agent)
|
||||
evaluation = ltm_agent.evaluate(self.task, output.text)
|
||||
ltm_agent = TaskEvaluator(self.crew_agent)
|
||||
evaluation = ltm_agent.evaluate(self.task, output.log)
|
||||
|
||||
if isinstance(evaluation, ConverterError):
|
||||
return
|
||||
|
||||
long_term_memory = LongTermMemoryItem(
|
||||
task=self.task.description,
|
||||
agent=self.agent.role,
|
||||
agent=self.crew_agent.role,
|
||||
quality=evaluation.quality,
|
||||
datetime=str(time.time()),
|
||||
expected_output=self.task.expected_output,
|
||||
@@ -94,35 +100,14 @@ class CrewAgentExecutorMixin:
|
||||
print(f"Failed to add to long term memory: {e}")
|
||||
pass
|
||||
|
||||
def _ask_human_input(self, final_answer: str) -> str:
|
||||
"""Prompt human input with mode-appropriate messaging."""
|
||||
def _ask_human_input(self, final_answer: dict) -> str:
|
||||
"""Prompt human input for final decision making."""
|
||||
self._printer.print(
|
||||
content=f"\033[1m\033[95m ## Final Result:\033[00m \033[92m{final_answer}\033[00m"
|
||||
)
|
||||
|
||||
# Training mode prompt (single iteration)
|
||||
if self.crew and getattr(self.crew, "_train", False):
|
||||
prompt = (
|
||||
"\n\n=====\n"
|
||||
"## TRAINING MODE: Provide feedback to improve the agent's performance.\n"
|
||||
"This will be used to train better versions of the agent.\n"
|
||||
"Please provide detailed feedback about the result quality and reasoning process.\n"
|
||||
"=====\n"
|
||||
)
|
||||
# Regular human-in-the-loop prompt (multiple iterations)
|
||||
else:
|
||||
prompt = (
|
||||
"\n\n=====\n"
|
||||
"## HUMAN FEEDBACK: Provide feedback on the Final Result and Agent's actions.\n"
|
||||
"Please follow these guidelines:\n"
|
||||
" - If you are happy with the result, simply hit Enter without typing anything.\n"
|
||||
" - Otherwise, provide specific improvement requests.\n"
|
||||
" - You can provide multiple rounds of feedback until satisfied.\n"
|
||||
"=====\n"
|
||||
)
|
||||
|
||||
self._printer.print(content=prompt, color="bold_yellow")
|
||||
response = input()
|
||||
if response.strip() != "":
|
||||
self._printer.print(content="\nProcessing your feedback...", color="cyan")
|
||||
return response
|
||||
self._printer.print(
|
||||
content="\n\n=====\n## Please provide feedback on the Final Result and the Agent's actions:",
|
||||
color="bold_yellow",
|
||||
)
|
||||
return input()
|
||||
|
||||
87
src/crewai/agents/agent_builder/utilities/base_agent_tool.py
Normal file
87
src/crewai/agents/agent_builder/utilities/base_agent_tool.py
Normal file
@@ -0,0 +1,87 @@
|
||||
from abc import ABC, abstractmethod
|
||||
from typing import List, Optional, Union
|
||||
|
||||
from pydantic import BaseModel, Field
|
||||
|
||||
from crewai.agents.agent_builder.base_agent import BaseAgent
|
||||
from crewai.task import Task
|
||||
from crewai.utilities import I18N
|
||||
|
||||
|
||||
class BaseAgentTools(BaseModel, ABC):
|
||||
"""Default tools around agent delegation"""
|
||||
|
||||
agents: List[BaseAgent] = Field(description="List of agents in this crew.")
|
||||
i18n: I18N = Field(default=I18N(), description="Internationalization settings.")
|
||||
|
||||
@abstractmethod
|
||||
def tools(self):
|
||||
pass
|
||||
|
||||
def _get_coworker(self, coworker: Optional[str], **kwargs) -> Optional[str]:
|
||||
coworker = coworker or kwargs.get("co_worker") or kwargs.get("coworker")
|
||||
if coworker:
|
||||
is_list = coworker.startswith("[") and coworker.endswith("]")
|
||||
if is_list:
|
||||
coworker = coworker[1:-1].split(",")[0]
|
||||
|
||||
return coworker
|
||||
|
||||
def delegate_work(
|
||||
self, task: str, context: str, coworker: Optional[str] = None, **kwargs
|
||||
):
|
||||
"""Useful to delegate a specific task to a coworker passing all necessary context and names."""
|
||||
coworker = self._get_coworker(coworker, **kwargs)
|
||||
return self._execute(coworker, task, context)
|
||||
|
||||
def ask_question(
|
||||
self, question: str, context: str, coworker: Optional[str] = None, **kwargs
|
||||
):
|
||||
"""Useful to ask a question, opinion or take from a coworker passing all necessary context and names."""
|
||||
coworker = self._get_coworker(coworker, **kwargs)
|
||||
return self._execute(coworker, question, context)
|
||||
|
||||
def _execute(
|
||||
self, agent_name: Union[str, None], task: str, context: Union[str, None]
|
||||
):
|
||||
"""Execute the command."""
|
||||
try:
|
||||
if agent_name is None:
|
||||
agent_name = ""
|
||||
|
||||
# It is important to remove the quotes from the agent name.
|
||||
# The reason we have to do this is because less-powerful LLM's
|
||||
# have difficulty producing valid JSON.
|
||||
# As a result, we end up with invalid JSON that is truncated like this:
|
||||
# {"task": "....", "coworker": "....
|
||||
# when it should look like this:
|
||||
# {"task": "....", "coworker": "...."}
|
||||
agent_name = agent_name.casefold().replace('"', "").replace("\n", "")
|
||||
|
||||
agent = [ # type: ignore # Incompatible types in assignment (expression has type "list[BaseAgent]", variable has type "str | None")
|
||||
available_agent
|
||||
for available_agent in self.agents
|
||||
if available_agent.role.casefold().replace("\n", "") == agent_name
|
||||
]
|
||||
except Exception as _:
|
||||
return self.i18n.errors("agent_tool_unexsiting_coworker").format(
|
||||
coworkers="\n".join(
|
||||
[f"- {agent.role.casefold()}" for agent in self.agents]
|
||||
)
|
||||
)
|
||||
|
||||
if not agent:
|
||||
return self.i18n.errors("agent_tool_unexsiting_coworker").format(
|
||||
coworkers="\n".join(
|
||||
[f"- {agent.role.casefold()}" for agent in self.agents]
|
||||
)
|
||||
)
|
||||
|
||||
agent = agent[0]
|
||||
task_with_assigned_agent = Task( # type: ignore # Incompatible types in assignment (expression has type "Task", variable has type "str")
|
||||
description=task,
|
||||
agent=agent,
|
||||
expected_output=agent.i18n.slice("manager_request"),
|
||||
i18n=agent.i18n,
|
||||
)
|
||||
return agent.execute_task(task_with_assigned_agent, context)
|
||||
@@ -25,17 +25,17 @@ class OutputConverter(BaseModel, ABC):
|
||||
llm: Any = Field(description="The language model to be used to convert the text.")
|
||||
model: Any = Field(description="The model to be used to convert the text.")
|
||||
instructions: str = Field(description="Conversion instructions to the LLM.")
|
||||
max_attempts: int = Field(
|
||||
max_attempts: Optional[int] = Field(
|
||||
description="Max number of attempts to try to get the output formatted.",
|
||||
default=3,
|
||||
)
|
||||
|
||||
@abstractmethod
|
||||
def to_pydantic(self, current_attempt=1) -> BaseModel:
|
||||
def to_pydantic(self, current_attempt=1):
|
||||
"""Convert text to pydantic."""
|
||||
pass
|
||||
|
||||
@abstractmethod
|
||||
def to_json(self, current_attempt=1) -> dict:
|
||||
def to_json(self, current_attempt=1):
|
||||
"""Convert text to json."""
|
||||
pass
|
||||
|
||||
@@ -2,32 +2,26 @@ from crewai.types.usage_metrics import UsageMetrics
|
||||
|
||||
|
||||
class TokenProcess:
|
||||
def __init__(self) -> None:
|
||||
self.total_tokens: int = 0
|
||||
self.prompt_tokens: int = 0
|
||||
self.cached_prompt_tokens: int = 0
|
||||
self.completion_tokens: int = 0
|
||||
self.successful_requests: int = 0
|
||||
total_tokens: int = 0
|
||||
prompt_tokens: int = 0
|
||||
completion_tokens: int = 0
|
||||
successful_requests: int = 0
|
||||
|
||||
def sum_prompt_tokens(self, tokens: int) -> None:
|
||||
self.prompt_tokens += tokens
|
||||
self.total_tokens += tokens
|
||||
def sum_prompt_tokens(self, tokens: int):
|
||||
self.prompt_tokens = self.prompt_tokens + tokens
|
||||
self.total_tokens = self.total_tokens + tokens
|
||||
|
||||
def sum_completion_tokens(self, tokens: int) -> None:
|
||||
self.completion_tokens += tokens
|
||||
self.total_tokens += tokens
|
||||
def sum_completion_tokens(self, tokens: int):
|
||||
self.completion_tokens = self.completion_tokens + tokens
|
||||
self.total_tokens = self.total_tokens + tokens
|
||||
|
||||
def sum_cached_prompt_tokens(self, tokens: int) -> None:
|
||||
self.cached_prompt_tokens += tokens
|
||||
|
||||
def sum_successful_requests(self, requests: int) -> None:
|
||||
self.successful_requests += requests
|
||||
def sum_successful_requests(self, requests: int):
|
||||
self.successful_requests = self.successful_requests + requests
|
||||
|
||||
def get_summary(self) -> UsageMetrics:
|
||||
return UsageMetrics(
|
||||
total_tokens=self.total_tokens,
|
||||
prompt_tokens=self.prompt_tokens,
|
||||
cached_prompt_tokens=self.cached_prompt_tokens,
|
||||
completion_tokens=self.completion_tokens,
|
||||
successful_requests=self.successful_requests,
|
||||
)
|
||||
|
||||
@@ -1,9 +1,7 @@
|
||||
import json
|
||||
import re
|
||||
from dataclasses import dataclass
|
||||
from typing import Any, Callable, Dict, List, Optional, Union
|
||||
from typing import Any, Dict, List, Union
|
||||
|
||||
from crewai.agents.agent_builder.base_agent import BaseAgent
|
||||
from crewai.agents.agent_builder.base_agent_executor_mixin import CrewAgentExecutorMixin
|
||||
from crewai.agents.parser import (
|
||||
FINAL_ANSWER_AND_PARSABLE_ACTION_ERROR_MESSAGE,
|
||||
@@ -13,17 +11,9 @@ from crewai.agents.parser import (
|
||||
OutputParserException,
|
||||
)
|
||||
from crewai.agents.tools_handler import ToolsHandler
|
||||
from crewai.llm import LLM
|
||||
from crewai.tools.base_tool import BaseTool
|
||||
from crewai.tools.tool_usage import ToolUsage, ToolUsageErrorException
|
||||
from crewai.utilities import I18N, Printer
|
||||
from crewai.utilities.constants import MAX_LLM_RETRY, TRAINING_DATA_FILE
|
||||
from crewai.utilities.events import (
|
||||
ToolUsageErrorEvent,
|
||||
ToolUsageStartedEvent,
|
||||
crewai_event_bus,
|
||||
)
|
||||
from crewai.utilities.events.tool_usage_events import ToolUsageStartedEvent
|
||||
from crewai.utilities.constants import TRAINING_DATA_FILE
|
||||
from crewai.utilities.exceptions.context_window_exceeding_exception import (
|
||||
LLMContextLengthExceededException,
|
||||
)
|
||||
@@ -31,12 +21,6 @@ from crewai.utilities.logger import Logger
|
||||
from crewai.utilities.training_handler import CrewTrainingHandler
|
||||
|
||||
|
||||
@dataclass
|
||||
class ToolResult:
|
||||
result: Any
|
||||
result_as_answer: bool
|
||||
|
||||
|
||||
class CrewAgentExecutor(CrewAgentExecutorMixin):
|
||||
_logger: Logger = Logger()
|
||||
|
||||
@@ -45,10 +29,10 @@ class CrewAgentExecutor(CrewAgentExecutorMixin):
|
||||
llm: Any,
|
||||
task: Any,
|
||||
crew: Any,
|
||||
agent: BaseAgent,
|
||||
agent: Any,
|
||||
prompt: dict[str, str],
|
||||
max_iter: int,
|
||||
tools: List[BaseTool],
|
||||
tools: List[Any],
|
||||
tools_names: str,
|
||||
stop_words: List[str],
|
||||
tools_description: str,
|
||||
@@ -57,11 +41,11 @@ class CrewAgentExecutor(CrewAgentExecutorMixin):
|
||||
original_tools: List[Any] = [],
|
||||
function_calling_llm: Any = None,
|
||||
respect_context_window: bool = False,
|
||||
request_within_rpm_limit: Optional[Callable[[], bool]] = None,
|
||||
request_within_rpm_limit: Any = None,
|
||||
callbacks: List[Any] = [],
|
||||
):
|
||||
self._i18n: I18N = I18N()
|
||||
self.llm: LLM = llm
|
||||
self.llm = llm
|
||||
self.task = task
|
||||
self.agent = agent
|
||||
self.crew = crew
|
||||
@@ -84,16 +68,18 @@ class CrewAgentExecutor(CrewAgentExecutorMixin):
|
||||
self.messages: List[Dict[str, str]] = []
|
||||
self.iterations = 0
|
||||
self.log_error_after = 3
|
||||
self.tool_name_to_tool_map: Dict[str, BaseTool] = {
|
||||
tool.name: tool for tool in self.tools
|
||||
}
|
||||
self.stop = stop_words
|
||||
self.llm.stop = list(set(self.llm.stop + self.stop))
|
||||
self.have_forced_answer = False
|
||||
self.name_to_tool_map = {tool.name: tool for tool in self.tools}
|
||||
if self.llm.stop:
|
||||
self.llm.stop = list(set(self.llm.stop + self.stop))
|
||||
else:
|
||||
self.llm.stop = self.stop
|
||||
|
||||
def invoke(self, inputs: Dict[str, str]) -> Dict[str, Any]:
|
||||
if "system" in self.prompt:
|
||||
system_prompt = self._format_prompt(self.prompt.get("system", ""), inputs)
|
||||
user_prompt = self._format_prompt(self.prompt.get("user", ""), inputs)
|
||||
|
||||
self.messages.append(self._format_msg(system_prompt, role="system"))
|
||||
self.messages.append(self._format_msg(user_prompt))
|
||||
else:
|
||||
@@ -103,205 +89,93 @@ class CrewAgentExecutor(CrewAgentExecutorMixin):
|
||||
self._show_start_logs()
|
||||
|
||||
self.ask_for_human_input = bool(inputs.get("ask_for_human_input", False))
|
||||
formatted_answer = self._invoke_loop()
|
||||
|
||||
try:
|
||||
if self.ask_for_human_input:
|
||||
human_feedback = self._ask_human_input(formatted_answer.output)
|
||||
if self.crew and self.crew._train:
|
||||
self._handle_crew_training_output(formatted_answer, human_feedback)
|
||||
|
||||
# Making sure we only ask for it once, so disabling for the next thought loop
|
||||
self.ask_for_human_input = False
|
||||
self.messages.append(self._format_msg(f"Feedback: {human_feedback}"))
|
||||
formatted_answer = self._invoke_loop()
|
||||
except AssertionError:
|
||||
self._printer.print(
|
||||
content="Agent failed to reach a final answer. This is likely a bug - please report it.",
|
||||
color="red",
|
||||
)
|
||||
raise
|
||||
|
||||
if self.crew and self.crew._train:
|
||||
self._handle_crew_training_output(formatted_answer)
|
||||
|
||||
return {"output": formatted_answer.output}
|
||||
|
||||
def _invoke_loop(self, formatted_answer=None):
|
||||
try:
|
||||
while not isinstance(formatted_answer, AgentFinish):
|
||||
if not self.request_within_rpm_limit or self.request_within_rpm_limit():
|
||||
answer = self.llm.call(
|
||||
self.messages,
|
||||
callbacks=self.callbacks,
|
||||
)
|
||||
|
||||
if not self.use_stop_words:
|
||||
try:
|
||||
self._format_answer(answer)
|
||||
except OutputParserException as e:
|
||||
if (
|
||||
FINAL_ANSWER_AND_PARSABLE_ACTION_ERROR_MESSAGE
|
||||
in e.error
|
||||
):
|
||||
answer = answer.split("Observation:")[0].strip()
|
||||
|
||||
self.iterations += 1
|
||||
formatted_answer = self._format_answer(answer)
|
||||
|
||||
if isinstance(formatted_answer, AgentAction):
|
||||
action_result = self._use_tool(formatted_answer)
|
||||
formatted_answer.text += f"\nObservation: {action_result}"
|
||||
formatted_answer.result = action_result
|
||||
self._show_logs(formatted_answer)
|
||||
|
||||
if self.step_callback:
|
||||
self.step_callback(formatted_answer)
|
||||
|
||||
if self._should_force_answer():
|
||||
if self.have_forced_answer:
|
||||
return AgentFinish(
|
||||
output=self._i18n.errors(
|
||||
"force_final_answer_error"
|
||||
).format(formatted_answer.text),
|
||||
text=formatted_answer.text,
|
||||
)
|
||||
else:
|
||||
formatted_answer.text += (
|
||||
f'\n{self._i18n.errors("force_final_answer")}'
|
||||
)
|
||||
self.have_forced_answer = True
|
||||
self.messages.append(
|
||||
self._format_msg(formatted_answer.text, role="assistant")
|
||||
)
|
||||
|
||||
except OutputParserException as e:
|
||||
self.messages.append({"role": "user", "content": e.error})
|
||||
if self.iterations > self.log_error_after:
|
||||
self._printer.print(
|
||||
content=f"Error parsing LLM output, agent will retry: {e.error}",
|
||||
color="red",
|
||||
)
|
||||
return self._invoke_loop(formatted_answer)
|
||||
|
||||
except Exception as e:
|
||||
self._handle_unknown_error(e)
|
||||
if e.__class__.__module__.startswith("litellm"):
|
||||
# Do not retry on litellm errors
|
||||
raise e
|
||||
if LLMContextLengthExceededException(str(e))._is_context_limit_error(
|
||||
str(e)
|
||||
):
|
||||
self._handle_context_length()
|
||||
return self._invoke_loop(formatted_answer)
|
||||
else:
|
||||
raise e
|
||||
|
||||
if self.ask_for_human_input:
|
||||
formatted_answer = self._handle_human_feedback(formatted_answer)
|
||||
|
||||
self._create_short_term_memory(formatted_answer)
|
||||
self._create_long_term_memory(formatted_answer)
|
||||
return {"output": formatted_answer.output}
|
||||
|
||||
def _invoke_loop(self) -> AgentFinish:
|
||||
"""
|
||||
Main loop to invoke the agent's thought process until it reaches a conclusion
|
||||
or the maximum number of iterations is reached.
|
||||
"""
|
||||
formatted_answer = None
|
||||
while not isinstance(formatted_answer, AgentFinish):
|
||||
try:
|
||||
if self._has_reached_max_iterations():
|
||||
formatted_answer = self._handle_max_iterations_exceeded(
|
||||
formatted_answer
|
||||
)
|
||||
break
|
||||
|
||||
self._enforce_rpm_limit()
|
||||
|
||||
answer = self._get_llm_response()
|
||||
formatted_answer = self._process_llm_response(answer)
|
||||
|
||||
if isinstance(formatted_answer, AgentAction):
|
||||
tool_result = self._execute_tool_and_check_finality(
|
||||
formatted_answer
|
||||
)
|
||||
formatted_answer = self._handle_agent_action(
|
||||
formatted_answer, tool_result
|
||||
)
|
||||
|
||||
self._invoke_step_callback(formatted_answer)
|
||||
self._append_message(formatted_answer.text, role="assistant")
|
||||
|
||||
except OutputParserException as e:
|
||||
formatted_answer = self._handle_output_parser_exception(e)
|
||||
|
||||
except Exception as e:
|
||||
if e.__class__.__module__.startswith("litellm"):
|
||||
# Do not retry on litellm errors
|
||||
raise e
|
||||
if self._is_context_length_exceeded(e):
|
||||
self._handle_context_length()
|
||||
continue
|
||||
else:
|
||||
self._handle_unknown_error(e)
|
||||
raise e
|
||||
finally:
|
||||
self.iterations += 1
|
||||
|
||||
# During the invoke loop, formatted_answer alternates between AgentAction
|
||||
# (when the agent is using tools) and eventually becomes AgentFinish
|
||||
# (when the agent reaches a final answer). This assertion confirms we've
|
||||
# reached a final answer and helps type checking understand this transition.
|
||||
assert isinstance(formatted_answer, AgentFinish)
|
||||
self._show_logs(formatted_answer)
|
||||
return formatted_answer
|
||||
|
||||
def _handle_unknown_error(self, exception: Exception) -> None:
|
||||
"""Handle unknown errors by informing the user."""
|
||||
self._printer.print(
|
||||
content="An unknown error occurred. Please check the details below.",
|
||||
color="red",
|
||||
)
|
||||
self._printer.print(
|
||||
content=f"Error details: {exception}",
|
||||
color="red",
|
||||
)
|
||||
|
||||
def _has_reached_max_iterations(self) -> bool:
|
||||
"""Check if the maximum number of iterations has been reached."""
|
||||
return self.iterations >= self.max_iter
|
||||
|
||||
def _enforce_rpm_limit(self) -> None:
|
||||
"""Enforce the requests per minute (RPM) limit if applicable."""
|
||||
if self.request_within_rpm_limit:
|
||||
self.request_within_rpm_limit()
|
||||
|
||||
def _get_llm_response(self) -> str:
|
||||
"""Call the LLM and return the response, handling any invalid responses."""
|
||||
try:
|
||||
answer = self.llm.call(
|
||||
self.messages,
|
||||
callbacks=self.callbacks,
|
||||
)
|
||||
except Exception as e:
|
||||
self._printer.print(
|
||||
content=f"Error during LLM call: {e}",
|
||||
color="red",
|
||||
)
|
||||
raise e
|
||||
|
||||
if not answer:
|
||||
self._printer.print(
|
||||
content="Received None or empty response from LLM call.",
|
||||
color="red",
|
||||
)
|
||||
raise ValueError("Invalid response from LLM call - None or empty.")
|
||||
|
||||
return answer
|
||||
|
||||
def _process_llm_response(self, answer: str) -> Union[AgentAction, AgentFinish]:
|
||||
"""Process the LLM response and format it into an AgentAction or AgentFinish."""
|
||||
if not self.use_stop_words:
|
||||
try:
|
||||
# Preliminary parsing to check for errors.
|
||||
self._format_answer(answer)
|
||||
except OutputParserException as e:
|
||||
if FINAL_ANSWER_AND_PARSABLE_ACTION_ERROR_MESSAGE in e.error:
|
||||
answer = answer.split("Observation:")[0].strip()
|
||||
|
||||
return self._format_answer(answer)
|
||||
|
||||
def _handle_agent_action(
|
||||
self, formatted_answer: AgentAction, tool_result: ToolResult
|
||||
) -> Union[AgentAction, AgentFinish]:
|
||||
"""Handle the AgentAction, execute tools, and process the results."""
|
||||
add_image_tool = self._i18n.tools("add_image")
|
||||
if (
|
||||
isinstance(add_image_tool, dict)
|
||||
and formatted_answer.tool.casefold().strip()
|
||||
== add_image_tool.get("name", "").casefold().strip()
|
||||
):
|
||||
self.messages.append(tool_result.result)
|
||||
return formatted_answer # Continue the loop
|
||||
|
||||
if self.step_callback:
|
||||
self.step_callback(tool_result)
|
||||
|
||||
formatted_answer.text += f"\nObservation: {tool_result.result}"
|
||||
formatted_answer.result = tool_result.result
|
||||
|
||||
if tool_result.result_as_answer:
|
||||
return AgentFinish(
|
||||
thought="",
|
||||
output=tool_result.result,
|
||||
text=formatted_answer.text,
|
||||
)
|
||||
|
||||
self._show_logs(formatted_answer)
|
||||
return formatted_answer
|
||||
|
||||
def _invoke_step_callback(self, formatted_answer) -> None:
|
||||
"""Invoke the step callback if it exists."""
|
||||
if self.step_callback:
|
||||
self.step_callback(formatted_answer)
|
||||
|
||||
def _append_message(self, text: str, role: str = "assistant") -> None:
|
||||
"""Append a message to the message list with the given role."""
|
||||
self.messages.append(self._format_msg(text, role=role))
|
||||
|
||||
def _handle_output_parser_exception(self, e: OutputParserException) -> AgentAction:
|
||||
"""Handle OutputParserException by updating messages and formatted_answer."""
|
||||
self.messages.append({"role": "user", "content": e.error})
|
||||
|
||||
formatted_answer = AgentAction(
|
||||
text=e.error,
|
||||
tool="",
|
||||
tool_input="",
|
||||
thought="",
|
||||
)
|
||||
|
||||
if self.iterations > self.log_error_after:
|
||||
self._printer.print(
|
||||
content=f"Error parsing LLM output, agent will retry: {e.error}",
|
||||
color="red",
|
||||
)
|
||||
|
||||
return formatted_answer
|
||||
|
||||
def _is_context_length_exceeded(self, exception: Exception) -> bool:
|
||||
"""Check if the exception is due to context length exceeding."""
|
||||
return LLMContextLengthExceededException(
|
||||
str(exception)
|
||||
)._is_context_limit_error(str(exception))
|
||||
|
||||
def _show_start_logs(self):
|
||||
if self.agent is None:
|
||||
raise ValueError("Agent cannot be None")
|
||||
if self.agent.verbose or (
|
||||
hasattr(self, "crew") and getattr(self.crew, "verbose", False)
|
||||
):
|
||||
@@ -309,16 +183,11 @@ class CrewAgentExecutor(CrewAgentExecutorMixin):
|
||||
self._printer.print(
|
||||
content=f"\033[1m\033[95m# Agent:\033[00m \033[1m\033[92m{agent_role}\033[00m"
|
||||
)
|
||||
description = (
|
||||
getattr(self.task, "description") if self.task else "Not Found"
|
||||
)
|
||||
self._printer.print(
|
||||
content=f"\033[95m## Task:\033[00m \033[92m{description}\033[00m"
|
||||
content=f"\033[95m## Task:\033[00m \033[92m{self.task.description}\033[00m"
|
||||
)
|
||||
|
||||
def _show_logs(self, formatted_answer: Union[AgentAction, AgentFinish]):
|
||||
if self.agent is None:
|
||||
raise ValueError("Agent cannot be None")
|
||||
if self.agent.verbose or (
|
||||
hasattr(self, "crew") and getattr(self.crew, "verbose", False)
|
||||
):
|
||||
@@ -354,69 +223,35 @@ class CrewAgentExecutor(CrewAgentExecutorMixin):
|
||||
content=f"\033[95m## Final Answer:\033[00m \033[92m\n{formatted_answer.output}\033[00m\n\n"
|
||||
)
|
||||
|
||||
def _execute_tool_and_check_finality(self, agent_action: AgentAction) -> ToolResult:
|
||||
try:
|
||||
if self.agent:
|
||||
crewai_event_bus.emit(
|
||||
self,
|
||||
event=ToolUsageStartedEvent(
|
||||
agent_key=self.agent.key,
|
||||
agent_role=self.agent.role,
|
||||
tool_name=agent_action.tool,
|
||||
tool_args=agent_action.tool_input,
|
||||
tool_class=agent_action.tool,
|
||||
),
|
||||
)
|
||||
tool_usage = ToolUsage(
|
||||
tools_handler=self.tools_handler,
|
||||
tools=self.tools,
|
||||
original_tools=self.original_tools,
|
||||
tools_description=self.tools_description,
|
||||
tools_names=self.tools_names,
|
||||
function_calling_llm=self.function_calling_llm,
|
||||
task=self.task, # type: ignore[arg-type]
|
||||
agent=self.agent,
|
||||
action=agent_action,
|
||||
)
|
||||
tool_calling = tool_usage.parse_tool_calling(agent_action.text)
|
||||
def _use_tool(self, agent_action: AgentAction) -> Any:
|
||||
tool_usage = ToolUsage(
|
||||
tools_handler=self.tools_handler,
|
||||
tools=self.tools,
|
||||
original_tools=self.original_tools,
|
||||
tools_description=self.tools_description,
|
||||
tools_names=self.tools_names,
|
||||
function_calling_llm=self.function_calling_llm,
|
||||
task=self.task, # type: ignore[arg-type]
|
||||
agent=self.agent,
|
||||
action=agent_action,
|
||||
)
|
||||
tool_calling = tool_usage.parse(agent_action.text)
|
||||
|
||||
if isinstance(tool_calling, ToolUsageErrorException):
|
||||
tool_result = tool_calling.message
|
||||
return ToolResult(result=tool_result, result_as_answer=False)
|
||||
if isinstance(tool_calling, ToolUsageErrorException):
|
||||
tool_result = tool_calling.message
|
||||
else:
|
||||
if tool_calling.tool_name.casefold().strip() in [
|
||||
name.casefold().strip() for name in self.name_to_tool_map
|
||||
] or tool_calling.tool_name.casefold().replace("_", " ") in [
|
||||
name.casefold().strip() for name in self.name_to_tool_map
|
||||
]:
|
||||
tool_result = tool_usage.use(tool_calling, agent_action.text)
|
||||
else:
|
||||
if tool_calling.tool_name.casefold().strip() in [
|
||||
name.casefold().strip() for name in self.tool_name_to_tool_map
|
||||
] or tool_calling.tool_name.casefold().replace("_", " ") in [
|
||||
name.casefold().strip() for name in self.tool_name_to_tool_map
|
||||
]:
|
||||
tool_result = tool_usage.use(tool_calling, agent_action.text)
|
||||
tool = self.tool_name_to_tool_map.get(tool_calling.tool_name)
|
||||
if tool:
|
||||
return ToolResult(
|
||||
result=tool_result, result_as_answer=tool.result_as_answer
|
||||
)
|
||||
else:
|
||||
tool_result = self._i18n.errors("wrong_tool_name").format(
|
||||
tool=tool_calling.tool_name,
|
||||
tools=", ".join([tool.name.casefold() for tool in self.tools]),
|
||||
)
|
||||
return ToolResult(result=tool_result, result_as_answer=False)
|
||||
|
||||
except Exception as e:
|
||||
# TODO: drop
|
||||
if self.agent:
|
||||
crewai_event_bus.emit(
|
||||
self,
|
||||
event=ToolUsageErrorEvent( # validation error
|
||||
agent_key=self.agent.key,
|
||||
agent_role=self.agent.role,
|
||||
tool_name=agent_action.tool,
|
||||
tool_args=agent_action.tool_input,
|
||||
tool_class=agent_action.tool,
|
||||
error=str(e),
|
||||
),
|
||||
tool_result = self._i18n.errors("wrong_tool_name").format(
|
||||
tool=tool_calling.tool_name,
|
||||
tools=", ".join([tool.name.casefold() for tool in self.tools]),
|
||||
)
|
||||
raise e
|
||||
return tool_result
|
||||
|
||||
def _summarize_messages(self) -> None:
|
||||
messages_groups = []
|
||||
@@ -434,7 +269,7 @@ class CrewAgentExecutor(CrewAgentExecutorMixin):
|
||||
self._i18n.slice("summarizer_system_message"), role="system"
|
||||
),
|
||||
self._format_msg(
|
||||
self._i18n.slice("summarize_instruction").format(group=group),
|
||||
self._i18n.slice("sumamrize_instruction").format(group=group),
|
||||
),
|
||||
],
|
||||
callbacks=self.callbacks,
|
||||
@@ -451,14 +286,16 @@ class CrewAgentExecutor(CrewAgentExecutorMixin):
|
||||
|
||||
def _handle_context_length(self) -> None:
|
||||
if self.respect_context_window:
|
||||
self._printer.print(
|
||||
content="Context length exceeded. Summarizing content to fit the model context window.",
|
||||
self._logger.log(
|
||||
"debug",
|
||||
"Context length exceeded. Summarizing content to fit the model context window.",
|
||||
color="yellow",
|
||||
)
|
||||
self._summarize_messages()
|
||||
else:
|
||||
self._printer.print(
|
||||
content="Context length exceeded. Consider using smaller text or RAG tools from crewai_tools.",
|
||||
self._logger.log(
|
||||
"debug",
|
||||
"Context length exceeded. Consider using smaller text or RAG tools from crewai_tools.",
|
||||
color="red",
|
||||
)
|
||||
raise SystemExit(
|
||||
@@ -466,50 +303,62 @@ class CrewAgentExecutor(CrewAgentExecutorMixin):
|
||||
)
|
||||
|
||||
def _handle_crew_training_output(
|
||||
self, result: AgentFinish, human_feedback: Optional[str] = None
|
||||
self, result: AgentFinish, human_feedback: str | None = None
|
||||
) -> None:
|
||||
"""Handle the process of saving training data."""
|
||||
agent_id = str(self.agent.id) # type: ignore
|
||||
train_iteration = (
|
||||
getattr(self.crew, "_train_iteration", None) if self.crew else None
|
||||
)
|
||||
|
||||
if train_iteration is None or not isinstance(train_iteration, int):
|
||||
self._printer.print(
|
||||
content="Invalid or missing train iteration. Cannot save training data.",
|
||||
color="red",
|
||||
)
|
||||
return
|
||||
"""Function to handle the process of the training data."""
|
||||
agent_id = str(self.agent.id)
|
||||
|
||||
# Load training data
|
||||
training_handler = CrewTrainingHandler(TRAINING_DATA_FILE)
|
||||
training_data = training_handler.load() or {}
|
||||
training_data = training_handler.load()
|
||||
|
||||
# Initialize or retrieve agent's training data
|
||||
agent_training_data = training_data.get(agent_id, {})
|
||||
|
||||
if human_feedback is not None:
|
||||
# Save initial output and human feedback
|
||||
agent_training_data[train_iteration] = {
|
||||
"initial_output": result.output,
|
||||
"human_feedback": human_feedback,
|
||||
}
|
||||
else:
|
||||
# Save improved output
|
||||
if train_iteration in agent_training_data:
|
||||
agent_training_data[train_iteration]["improved_output"] = result.output
|
||||
# Check if training data exists, human input is not requested, and self.crew is valid
|
||||
if training_data and not self.ask_for_human_input:
|
||||
if self.crew is not None and hasattr(self.crew, "_train_iteration"):
|
||||
train_iteration = self.crew._train_iteration
|
||||
if agent_id in training_data and isinstance(train_iteration, int):
|
||||
training_data[agent_id][train_iteration]["improved_output"] = (
|
||||
result.output
|
||||
)
|
||||
training_handler.save(training_data)
|
||||
else:
|
||||
self._logger.log(
|
||||
"error",
|
||||
"Invalid train iteration type or agent_id not in training data.",
|
||||
color="red",
|
||||
)
|
||||
else:
|
||||
self._printer.print(
|
||||
content=(
|
||||
f"No existing training data for agent {agent_id} and iteration "
|
||||
f"{train_iteration}. Cannot save improved output."
|
||||
),
|
||||
self._logger.log(
|
||||
"error",
|
||||
"Crew is None or does not have _train_iteration attribute.",
|
||||
color="red",
|
||||
)
|
||||
return
|
||||
|
||||
# Update the training data and save
|
||||
training_data[agent_id] = agent_training_data
|
||||
training_handler.save(training_data)
|
||||
if self.ask_for_human_input and human_feedback is not None:
|
||||
training_data = {
|
||||
"initial_output": result.output,
|
||||
"human_feedback": human_feedback,
|
||||
"agent": agent_id,
|
||||
"agent_role": self.agent.role,
|
||||
}
|
||||
if self.crew is not None and hasattr(self.crew, "_train_iteration"):
|
||||
train_iteration = self.crew._train_iteration
|
||||
if isinstance(train_iteration, int):
|
||||
CrewTrainingHandler(TRAINING_DATA_FILE).append(
|
||||
train_iteration, agent_id, training_data
|
||||
)
|
||||
else:
|
||||
self._logger.log(
|
||||
"error",
|
||||
"Invalid train iteration type. Expected int.",
|
||||
color="red",
|
||||
)
|
||||
else:
|
||||
self._logger.log(
|
||||
"error",
|
||||
"Crew is None or does not have _train_iteration attribute.",
|
||||
color="red",
|
||||
)
|
||||
|
||||
def _format_prompt(self, prompt: str, inputs: Dict[str, str]) -> str:
|
||||
prompt = prompt.replace("{input}", inputs["input"])
|
||||
@@ -521,128 +370,4 @@ class CrewAgentExecutor(CrewAgentExecutorMixin):
|
||||
return CrewAgentParser(agent=self.agent).parse(answer)
|
||||
|
||||
def _format_msg(self, prompt: str, role: str = "user") -> Dict[str, str]:
|
||||
prompt = prompt.rstrip()
|
||||
return {"role": role, "content": prompt}
|
||||
|
||||
def _handle_human_feedback(self, formatted_answer: AgentFinish) -> AgentFinish:
|
||||
"""Handle human feedback with different flows for training vs regular use.
|
||||
|
||||
Args:
|
||||
formatted_answer: The initial AgentFinish result to get feedback on
|
||||
|
||||
Returns:
|
||||
AgentFinish: The final answer after processing feedback
|
||||
"""
|
||||
human_feedback = self._ask_human_input(formatted_answer.output)
|
||||
|
||||
if self._is_training_mode():
|
||||
return self._handle_training_feedback(formatted_answer, human_feedback)
|
||||
|
||||
return self._handle_regular_feedback(formatted_answer, human_feedback)
|
||||
|
||||
def _is_training_mode(self) -> bool:
|
||||
"""Check if crew is in training mode."""
|
||||
return bool(self.crew and self.crew._train)
|
||||
|
||||
def _handle_training_feedback(
|
||||
self, initial_answer: AgentFinish, feedback: str
|
||||
) -> AgentFinish:
|
||||
"""Process feedback for training scenarios with single iteration."""
|
||||
self._handle_crew_training_output(initial_answer, feedback)
|
||||
self.messages.append(
|
||||
self._format_msg(
|
||||
self._i18n.slice("feedback_instructions").format(feedback=feedback)
|
||||
)
|
||||
)
|
||||
improved_answer = self._invoke_loop()
|
||||
self._handle_crew_training_output(improved_answer)
|
||||
self.ask_for_human_input = False
|
||||
return improved_answer
|
||||
|
||||
def _handle_regular_feedback(
|
||||
self, current_answer: AgentFinish, initial_feedback: str
|
||||
) -> AgentFinish:
|
||||
"""Process feedback for regular use with potential multiple iterations."""
|
||||
feedback = initial_feedback
|
||||
answer = current_answer
|
||||
|
||||
while self.ask_for_human_input:
|
||||
# If the user provides a blank response, assume they are happy with the result
|
||||
if feedback.strip() == "":
|
||||
self.ask_for_human_input = False
|
||||
else:
|
||||
answer = self._process_feedback_iteration(feedback)
|
||||
feedback = self._ask_human_input(answer.output)
|
||||
|
||||
return answer
|
||||
|
||||
def _process_feedback_iteration(self, feedback: str) -> AgentFinish:
|
||||
"""Process a single feedback iteration."""
|
||||
self.messages.append(
|
||||
self._format_msg(
|
||||
self._i18n.slice("feedback_instructions").format(feedback=feedback)
|
||||
)
|
||||
)
|
||||
return self._invoke_loop()
|
||||
|
||||
def _log_feedback_error(self, retry_count: int, error: Exception) -> None:
|
||||
"""Log feedback processing errors."""
|
||||
self._printer.print(
|
||||
content=(
|
||||
f"Error processing feedback: {error}. "
|
||||
f"Retrying... ({retry_count + 1}/{MAX_LLM_RETRY})"
|
||||
),
|
||||
color="red",
|
||||
)
|
||||
|
||||
def _log_max_retries_exceeded(self) -> None:
|
||||
"""Log when max retries for feedback processing are exceeded."""
|
||||
self._printer.print(
|
||||
content=(
|
||||
f"Failed to process feedback after {MAX_LLM_RETRY} attempts. "
|
||||
"Ending feedback loop."
|
||||
),
|
||||
color="red",
|
||||
)
|
||||
|
||||
def _handle_max_iterations_exceeded(self, formatted_answer):
|
||||
"""
|
||||
Handles the case when the maximum number of iterations is exceeded.
|
||||
Performs one more LLM call to get the final answer.
|
||||
|
||||
Parameters:
|
||||
formatted_answer: The last formatted answer from the agent.
|
||||
|
||||
Returns:
|
||||
The final formatted answer after exceeding max iterations.
|
||||
"""
|
||||
self._printer.print(
|
||||
content="Maximum iterations reached. Requesting final answer.",
|
||||
color="yellow",
|
||||
)
|
||||
|
||||
if formatted_answer and hasattr(formatted_answer, "text"):
|
||||
assistant_message = (
|
||||
formatted_answer.text + f'\n{self._i18n.errors("force_final_answer")}'
|
||||
)
|
||||
else:
|
||||
assistant_message = self._i18n.errors("force_final_answer")
|
||||
|
||||
self.messages.append(self._format_msg(assistant_message, role="assistant"))
|
||||
|
||||
# Perform one more LLM call to get the final answer
|
||||
answer = self.llm.call(
|
||||
self.messages,
|
||||
callbacks=self.callbacks,
|
||||
)
|
||||
|
||||
if answer is None or answer == "":
|
||||
self._printer.print(
|
||||
content="Received None or empty response from LLM call.",
|
||||
color="red",
|
||||
)
|
||||
raise ValueError("Invalid response from LLM call - None or empty.")
|
||||
|
||||
formatted_answer = self._format_answer(answer)
|
||||
# Return the formatted answer, regardless of its type
|
||||
return formatted_answer
|
||||
|
||||
@@ -1,6 +1,5 @@
|
||||
import re
|
||||
from typing import Any, Union
|
||||
|
||||
from json_repair import repair_json
|
||||
|
||||
from crewai.utilities import I18N
|
||||
@@ -94,13 +93,6 @@ class CrewAgentParser:
|
||||
|
||||
elif includes_answer:
|
||||
final_answer = text.split(FINAL_ANSWER_ACTION)[-1].strip()
|
||||
# Check whether the final answer ends with triple backticks.
|
||||
if final_answer.endswith("```"):
|
||||
# Count occurrences of triple backticks in the final answer.
|
||||
count = final_answer.count("```")
|
||||
# If count is odd then it's an unmatched trailing set; remove it.
|
||||
if count % 2 != 0:
|
||||
final_answer = final_answer[:-3].rstrip()
|
||||
return AgentFinish(thought, final_answer, text)
|
||||
|
||||
if not re.search(r"Action\s*\d*\s*:[\s]*(.*?)", text, re.DOTALL):
|
||||
@@ -124,15 +116,11 @@ class CrewAgentParser:
|
||||
)
|
||||
|
||||
def _extract_thought(self, text: str) -> str:
|
||||
thought_index = text.find("\n\nAction")
|
||||
if thought_index == -1:
|
||||
thought_index = text.find("\n\nFinal Answer")
|
||||
if thought_index == -1:
|
||||
return ""
|
||||
thought = text[:thought_index].strip()
|
||||
# Remove any triple backticks from the thought string
|
||||
thought = thought.replace("```", "").strip()
|
||||
return thought
|
||||
regex = r"(.*?)(?:\n\nAction|\n\nFinal Answer)"
|
||||
thought_match = re.search(regex, text, re.DOTALL)
|
||||
if thought_match:
|
||||
return thought_match.group(1).strip()
|
||||
return ""
|
||||
|
||||
def _clean_action(self, text: str) -> str:
|
||||
"""Clean action string by removing non-essential formatting characters."""
|
||||
|
||||
@@ -1,6 +1,6 @@
|
||||
from typing import Any, Optional, Union
|
||||
|
||||
from ..tools.cache_tools.cache_tools import CacheTools
|
||||
from ..tools.cache_tools import CacheTools
|
||||
from ..tools.tool_calling import InstructorToolCalling, ToolCalling
|
||||
from .cache.cache_handler import CacheHandler
|
||||
|
||||
|
||||
@@ -1,70 +0,0 @@
|
||||
from pathlib import Path
|
||||
|
||||
import click
|
||||
|
||||
from crewai.cli.utils import copy_template
|
||||
|
||||
|
||||
def add_crew_to_flow(crew_name: str) -> None:
|
||||
"""Add a new crew to the current flow."""
|
||||
# Check if pyproject.toml exists in the current directory
|
||||
if not Path("pyproject.toml").exists():
|
||||
print("This command must be run from the root of a flow project.")
|
||||
raise click.ClickException(
|
||||
"This command must be run from the root of a flow project."
|
||||
)
|
||||
|
||||
# Determine the flow folder based on the current directory
|
||||
flow_folder = Path.cwd()
|
||||
crews_folder = flow_folder / "src" / flow_folder.name / "crews"
|
||||
|
||||
if not crews_folder.exists():
|
||||
print("Crews folder does not exist in the current flow.")
|
||||
raise click.ClickException("Crews folder does not exist in the current flow.")
|
||||
|
||||
# Create the crew within the flow's crews directory
|
||||
create_embedded_crew(crew_name, parent_folder=crews_folder)
|
||||
|
||||
click.echo(
|
||||
f"Crew {crew_name} added to the current flow successfully!",
|
||||
)
|
||||
|
||||
|
||||
def create_embedded_crew(crew_name: str, parent_folder: Path) -> None:
|
||||
"""Create a new crew within an existing flow project."""
|
||||
folder_name = crew_name.replace(" ", "_").replace("-", "_").lower()
|
||||
class_name = crew_name.replace("_", " ").replace("-", " ").title().replace(" ", "")
|
||||
|
||||
crew_folder = parent_folder / folder_name
|
||||
|
||||
if crew_folder.exists():
|
||||
if not click.confirm(
|
||||
f"Crew {folder_name} already exists. Do you want to override it?"
|
||||
):
|
||||
click.secho("Operation cancelled.", fg="yellow")
|
||||
return
|
||||
click.secho(f"Overriding crew {folder_name}...", fg="green", bold=True)
|
||||
else:
|
||||
click.secho(f"Creating crew {folder_name}...", fg="green", bold=True)
|
||||
crew_folder.mkdir(parents=True)
|
||||
|
||||
# Create config and crew.py files
|
||||
config_folder = crew_folder / "config"
|
||||
config_folder.mkdir(exist_ok=True)
|
||||
|
||||
templates_dir = Path(__file__).parent / "templates" / "crew"
|
||||
config_template_files = ["agents.yaml", "tasks.yaml"]
|
||||
crew_template_file = f"{folder_name}.py" # Updated file name
|
||||
|
||||
for file_name in config_template_files:
|
||||
src_file = templates_dir / "config" / file_name
|
||||
dst_file = config_folder / file_name
|
||||
copy_template(src_file, dst_file, crew_name, class_name, folder_name)
|
||||
|
||||
src_file = templates_dir / "crew.py"
|
||||
dst_file = crew_folder / crew_template_file
|
||||
copy_template(src_file, dst_file, crew_name, class_name, folder_name)
|
||||
|
||||
click.secho(
|
||||
f"Crew {crew_name} added to the flow successfully!", fg="green", bold=True
|
||||
)
|
||||
@@ -5,8 +5,6 @@ from typing import Any, Dict
|
||||
import requests
|
||||
from rich.console import Console
|
||||
|
||||
from crewai.cli.tools.main import ToolCommand
|
||||
|
||||
from .constants import AUTH0_AUDIENCE, AUTH0_CLIENT_ID, AUTH0_DOMAIN
|
||||
from .utils import TokenManager, validate_token
|
||||
|
||||
@@ -36,9 +34,7 @@ class AuthenticationCommand:
|
||||
"scope": "openid",
|
||||
"audience": AUTH0_AUDIENCE,
|
||||
}
|
||||
response = requests.post(
|
||||
url=self.DEVICE_CODE_URL, data=device_code_payload, timeout=20
|
||||
)
|
||||
response = requests.post(url=self.DEVICE_CODE_URL, data=device_code_payload)
|
||||
response.raise_for_status()
|
||||
return response.json()
|
||||
|
||||
@@ -58,31 +54,14 @@ class AuthenticationCommand:
|
||||
|
||||
attempts = 0
|
||||
while True and attempts < 5:
|
||||
response = requests.post(self.TOKEN_URL, data=token_payload, timeout=30)
|
||||
response = requests.post(self.TOKEN_URL, data=token_payload)
|
||||
token_data = response.json()
|
||||
|
||||
if response.status_code == 200:
|
||||
validate_token(token_data["id_token"])
|
||||
expires_in = 360000 # Token expiration time in seconds
|
||||
self.token_manager.save_tokens(token_data["access_token"], expires_in)
|
||||
|
||||
try:
|
||||
ToolCommand().login()
|
||||
except Exception:
|
||||
console.print(
|
||||
"\n[bold yellow]Warning:[/bold yellow] Authentication with the Tool Repository failed.",
|
||||
style="yellow",
|
||||
)
|
||||
console.print(
|
||||
"Other features will work normally, but you may experience limitations "
|
||||
"with downloading and publishing tools."
|
||||
"\nRun [bold]crewai login[/bold] to try logging in again.\n",
|
||||
style="yellow",
|
||||
)
|
||||
|
||||
console.print(
|
||||
"\n[bold green]Welcome to CrewAI Enterprise![/bold green]\n"
|
||||
)
|
||||
console.print("\nWelcome to CrewAI+ !!", style="green")
|
||||
return
|
||||
|
||||
if token_data["error"] not in ("authorization_pending", "slow_down"):
|
||||
|
||||
@@ -1,9 +0,0 @@
|
||||
from .utils import TokenManager
|
||||
|
||||
|
||||
def get_auth_token() -> str:
|
||||
"""Get the authentication token."""
|
||||
access_token = TokenManager().get_token()
|
||||
if not access_token:
|
||||
raise Exception()
|
||||
return access_token
|
||||
@@ -1,13 +1,11 @@
|
||||
import os
|
||||
from importlib.metadata import version as get_version
|
||||
from typing import Optional, Tuple
|
||||
from typing import Optional
|
||||
|
||||
import click
|
||||
import pkg_resources
|
||||
|
||||
from crewai.cli.add_crew_to_flow import add_crew_to_flow
|
||||
from crewai.cli.create_crew import create_crew
|
||||
from crewai.cli.create_flow import create_flow
|
||||
from crewai.cli.crew_chat import run_chat
|
||||
from crewai.cli.create_pipeline import create_pipeline
|
||||
from crewai.memory.storage.kickoff_task_outputs_storage import (
|
||||
KickoffTaskOutputsSQLiteStorage,
|
||||
)
|
||||
@@ -16,35 +14,36 @@ from .authentication.main import AuthenticationCommand
|
||||
from .deploy.main import DeployCommand
|
||||
from .evaluate_crew import evaluate_crew
|
||||
from .install_crew import install_crew
|
||||
from .kickoff_flow import kickoff_flow
|
||||
from .plot_flow import plot_flow
|
||||
from .replay_from_task import replay_task_command
|
||||
from .reset_memories_command import reset_memories_command
|
||||
from .run_crew import run_crew
|
||||
from .run_flow import run_flow
|
||||
from .tools.main import ToolCommand
|
||||
from .train_crew import train_crew
|
||||
from .update_crew import update_crew
|
||||
|
||||
|
||||
@click.group()
|
||||
@click.version_option(get_version("crewai"))
|
||||
def crewai():
|
||||
"""Top-level command group for crewai."""
|
||||
|
||||
|
||||
@crewai.command()
|
||||
@click.argument("type", type=click.Choice(["crew", "flow"]))
|
||||
@click.argument("type", type=click.Choice(["crew", "pipeline", "flow"]))
|
||||
@click.argument("name")
|
||||
@click.option("--provider", type=str, help="The provider to use for the crew")
|
||||
@click.option("--skip_provider", is_flag=True, help="Skip provider validation")
|
||||
def create(type, name, provider, skip_provider=False):
|
||||
"""Create a new crew, or flow."""
|
||||
def create(type, name):
|
||||
"""Create a new crew, pipeline, or flow."""
|
||||
if type == "crew":
|
||||
create_crew(name, provider, skip_provider)
|
||||
create_crew(name)
|
||||
elif type == "pipeline":
|
||||
create_pipeline(name)
|
||||
elif type == "flow":
|
||||
create_flow(name)
|
||||
else:
|
||||
click.secho("Error: Invalid type. Must be 'crew' or 'flow'.", fg="red")
|
||||
click.secho(
|
||||
"Error: Invalid type. Must be 'crew', 'pipeline', or 'flow'.", fg="red"
|
||||
)
|
||||
|
||||
|
||||
@crewai.command()
|
||||
@@ -53,17 +52,14 @@ def create(type, name, provider, skip_provider=False):
|
||||
)
|
||||
def version(tools):
|
||||
"""Show the installed version of crewai."""
|
||||
try:
|
||||
crewai_version = get_version("crewai")
|
||||
except Exception:
|
||||
crewai_version = "unknown version"
|
||||
crewai_version = pkg_resources.get_distribution("crewai").version
|
||||
click.echo(f"crewai version: {crewai_version}")
|
||||
|
||||
if tools:
|
||||
try:
|
||||
tools_version = get_version("crewai")
|
||||
tools_version = pkg_resources.get_distribution("crewai-tools").version
|
||||
click.echo(f"crewai tools version: {tools_version}")
|
||||
except Exception:
|
||||
except pkg_resources.DistributionNotFound:
|
||||
click.echo("crewai tools not installed")
|
||||
|
||||
|
||||
@@ -137,7 +133,6 @@ def log_tasks_outputs() -> None:
|
||||
@click.option("-l", "--long", is_flag=True, help="Reset LONG TERM memory")
|
||||
@click.option("-s", "--short", is_flag=True, help="Reset SHORT TERM memory")
|
||||
@click.option("-e", "--entities", is_flag=True, help="Reset ENTITIES memory")
|
||||
@click.option("-kn", "--knowledge", is_flag=True, help="Reset KNOWLEDGE storage")
|
||||
@click.option(
|
||||
"-k",
|
||||
"--kickoff-outputs",
|
||||
@@ -145,24 +140,17 @@ def log_tasks_outputs() -> None:
|
||||
help="Reset LATEST KICKOFF TASK OUTPUTS",
|
||||
)
|
||||
@click.option("-a", "--all", is_flag=True, help="Reset ALL memories")
|
||||
def reset_memories(
|
||||
long: bool,
|
||||
short: bool,
|
||||
entities: bool,
|
||||
knowledge: bool,
|
||||
kickoff_outputs: bool,
|
||||
all: bool,
|
||||
) -> None:
|
||||
def reset_memories(long, short, entities, kickoff_outputs, all):
|
||||
"""
|
||||
Reset the crew memories (long, short, entity, latest_crew_kickoff_ouputs). This will delete all the data saved.
|
||||
"""
|
||||
try:
|
||||
if not all and not (long or short or entities or knowledge or kickoff_outputs):
|
||||
if not all and not (long or short or entities or kickoff_outputs):
|
||||
click.echo(
|
||||
"Please specify at least one memory type to reset using the appropriate flags."
|
||||
)
|
||||
return
|
||||
reset_memories_command(long, short, entities, knowledge, kickoff_outputs, all)
|
||||
reset_memories_command(long, short, entities, kickoff_outputs, all)
|
||||
except Exception as e:
|
||||
click.echo(f"An error occurred while resetting memories: {e}", err=True)
|
||||
|
||||
@@ -188,21 +176,16 @@ def test(n_iterations: int, model: str):
|
||||
evaluate_crew(n_iterations, model)
|
||||
|
||||
|
||||
@crewai.command(
|
||||
context_settings=dict(
|
||||
ignore_unknown_options=True,
|
||||
allow_extra_args=True,
|
||||
)
|
||||
)
|
||||
@click.pass_context
|
||||
def install(context):
|
||||
@crewai.command()
|
||||
def install():
|
||||
"""Install the Crew."""
|
||||
install_crew(context.args)
|
||||
install_crew()
|
||||
|
||||
|
||||
@crewai.command()
|
||||
def run():
|
||||
"""Run the Crew."""
|
||||
click.echo("Running the Crew")
|
||||
run_crew()
|
||||
|
||||
|
||||
@@ -321,11 +304,11 @@ def flow():
|
||||
pass
|
||||
|
||||
|
||||
@flow.command(name="kickoff")
|
||||
@flow.command(name="run")
|
||||
def flow_run():
|
||||
"""Kickoff the Flow."""
|
||||
"""Run the Flow."""
|
||||
click.echo("Running the Flow")
|
||||
kickoff_flow()
|
||||
run_flow()
|
||||
|
||||
|
||||
@flow.command(name="plot")
|
||||
@@ -335,26 +318,5 @@ def flow_plot():
|
||||
plot_flow()
|
||||
|
||||
|
||||
@flow.command(name="add-crew")
|
||||
@click.argument("crew_name")
|
||||
def flow_add_crew(crew_name):
|
||||
"""Add a crew to an existing flow."""
|
||||
click.echo(f"Adding crew {crew_name} to the flow")
|
||||
add_crew_to_flow(crew_name)
|
||||
|
||||
|
||||
@crewai.command()
|
||||
def chat():
|
||||
"""
|
||||
Start a conversation with the Crew, collecting user-supplied inputs,
|
||||
and using the Chat LLM to generate responses.
|
||||
"""
|
||||
click.secho(
|
||||
"\nStarting a conversation with the Crew\n" "Type 'exit' or Ctrl+C to quit.\n",
|
||||
)
|
||||
|
||||
run_chat()
|
||||
|
||||
|
||||
if __name__ == "__main__":
|
||||
crewai()
|
||||
|
||||
@@ -1,9 +1,8 @@
|
||||
import requests
|
||||
from requests.exceptions import JSONDecodeError
|
||||
from rich.console import Console
|
||||
|
||||
from crewai.cli.authentication.token import get_auth_token
|
||||
from crewai.cli.plus_api import PlusAPI
|
||||
from crewai.cli.utils import get_auth_token
|
||||
from crewai.telemetry.telemetry import Telemetry
|
||||
|
||||
console = Console()
|
||||
|
||||
@@ -1,44 +0,0 @@
|
||||
import json
|
||||
from pathlib import Path
|
||||
from typing import Optional
|
||||
|
||||
from pydantic import BaseModel, Field
|
||||
|
||||
DEFAULT_CONFIG_PATH = Path.home() / ".config" / "crewai" / "settings.json"
|
||||
|
||||
|
||||
class Settings(BaseModel):
|
||||
tool_repository_username: Optional[str] = Field(
|
||||
None, description="Username for interacting with the Tool Repository"
|
||||
)
|
||||
tool_repository_password: Optional[str] = Field(
|
||||
None, description="Password for interacting with the Tool Repository"
|
||||
)
|
||||
config_path: Path = Field(default=DEFAULT_CONFIG_PATH, exclude=True)
|
||||
|
||||
def __init__(self, config_path: Path = DEFAULT_CONFIG_PATH, **data):
|
||||
"""Load Settings from config path"""
|
||||
config_path.parent.mkdir(parents=True, exist_ok=True)
|
||||
|
||||
file_data = {}
|
||||
if config_path.is_file():
|
||||
try:
|
||||
with config_path.open("r") as f:
|
||||
file_data = json.load(f)
|
||||
except json.JSONDecodeError:
|
||||
file_data = {}
|
||||
|
||||
merged_data = {**file_data, **data}
|
||||
super().__init__(config_path=config_path, **merged_data)
|
||||
|
||||
def dump(self) -> None:
|
||||
"""Save current settings to settings.json"""
|
||||
if self.config_path.is_file():
|
||||
with self.config_path.open("r") as f:
|
||||
existing_data = json.load(f)
|
||||
else:
|
||||
existing_data = {}
|
||||
|
||||
updated_data = {**existing_data, **self.model_dump(exclude_unset=True)}
|
||||
with self.config_path.open("w") as f:
|
||||
json.dump(updated_data, f, indent=4)
|
||||
@@ -1,293 +1,19 @@
|
||||
ENV_VARS = {
|
||||
"openai": [
|
||||
{
|
||||
"prompt": "Enter your OPENAI API key (press Enter to skip)",
|
||||
"key_name": "OPENAI_API_KEY",
|
||||
}
|
||||
],
|
||||
"anthropic": [
|
||||
{
|
||||
"prompt": "Enter your ANTHROPIC API key (press Enter to skip)",
|
||||
"key_name": "ANTHROPIC_API_KEY",
|
||||
}
|
||||
],
|
||||
"gemini": [
|
||||
{
|
||||
"prompt": "Enter your GEMINI API key (press Enter to skip)",
|
||||
"key_name": "GEMINI_API_KEY",
|
||||
}
|
||||
],
|
||||
"nvidia_nim": [
|
||||
{
|
||||
"prompt": "Enter your NVIDIA API key (press Enter to skip)",
|
||||
"key_name": "NVIDIA_NIM_API_KEY",
|
||||
}
|
||||
],
|
||||
"groq": [
|
||||
{
|
||||
"prompt": "Enter your GROQ API key (press Enter to skip)",
|
||||
"key_name": "GROQ_API_KEY",
|
||||
}
|
||||
],
|
||||
"watson": [
|
||||
{
|
||||
"prompt": "Enter your WATSONX URL (press Enter to skip)",
|
||||
"key_name": "WATSONX_URL",
|
||||
},
|
||||
{
|
||||
"prompt": "Enter your WATSONX API Key (press Enter to skip)",
|
||||
"key_name": "WATSONX_APIKEY",
|
||||
},
|
||||
{
|
||||
"prompt": "Enter your WATSONX Project Id (press Enter to skip)",
|
||||
"key_name": "WATSONX_PROJECT_ID",
|
||||
},
|
||||
],
|
||||
"ollama": [
|
||||
{
|
||||
"default": True,
|
||||
"API_BASE": "http://localhost:11434",
|
||||
}
|
||||
],
|
||||
"bedrock": [
|
||||
{
|
||||
"prompt": "Enter your AWS Access Key ID (press Enter to skip)",
|
||||
"key_name": "AWS_ACCESS_KEY_ID",
|
||||
},
|
||||
{
|
||||
"prompt": "Enter your AWS Secret Access Key (press Enter to skip)",
|
||||
"key_name": "AWS_SECRET_ACCESS_KEY",
|
||||
},
|
||||
{
|
||||
"prompt": "Enter your AWS Region Name (press Enter to skip)",
|
||||
"key_name": "AWS_REGION_NAME",
|
||||
},
|
||||
],
|
||||
"azure": [
|
||||
{
|
||||
"prompt": "Enter your Azure deployment name (must start with 'azure/')",
|
||||
"key_name": "model",
|
||||
},
|
||||
{
|
||||
"prompt": "Enter your AZURE API key (press Enter to skip)",
|
||||
"key_name": "AZURE_API_KEY",
|
||||
},
|
||||
{
|
||||
"prompt": "Enter your AZURE API base URL (press Enter to skip)",
|
||||
"key_name": "AZURE_API_BASE",
|
||||
},
|
||||
{
|
||||
"prompt": "Enter your AZURE API version (press Enter to skip)",
|
||||
"key_name": "AZURE_API_VERSION",
|
||||
},
|
||||
],
|
||||
"cerebras": [
|
||||
{
|
||||
"prompt": "Enter your Cerebras model name (must start with 'cerebras/')",
|
||||
"key_name": "model",
|
||||
},
|
||||
{
|
||||
"prompt": "Enter your Cerebras API version (press Enter to skip)",
|
||||
"key_name": "CEREBRAS_API_KEY",
|
||||
},
|
||||
],
|
||||
"sambanova": [
|
||||
{
|
||||
"prompt": "Enter your SambaNovaCloud API key (press Enter to skip)",
|
||||
"key_name": "SAMBANOVA_API_KEY",
|
||||
}
|
||||
],
|
||||
'openai': ['OPENAI_API_KEY'],
|
||||
'anthropic': ['ANTHROPIC_API_KEY'],
|
||||
'gemini': ['GEMINI_API_KEY'],
|
||||
'groq': ['GROQ_API_KEY'],
|
||||
'ollama': ['FAKE_KEY'],
|
||||
}
|
||||
|
||||
|
||||
PROVIDERS = [
|
||||
"openai",
|
||||
"anthropic",
|
||||
"gemini",
|
||||
"nvidia_nim",
|
||||
"groq",
|
||||
"ollama",
|
||||
"watson",
|
||||
"bedrock",
|
||||
"azure",
|
||||
"cerebras",
|
||||
"sambanova",
|
||||
]
|
||||
PROVIDERS = ['openai', 'anthropic', 'gemini', 'groq', 'ollama']
|
||||
|
||||
MODELS = {
|
||||
"openai": ["gpt-4", "gpt-4o", "gpt-4o-mini", "o1-mini", "o1-preview"],
|
||||
"anthropic": [
|
||||
"claude-3-5-sonnet-20240620",
|
||||
"claude-3-sonnet-20240229",
|
||||
"claude-3-opus-20240229",
|
||||
"claude-3-haiku-20240307",
|
||||
],
|
||||
"gemini": [
|
||||
"gemini/gemini-1.5-flash",
|
||||
"gemini/gemini-1.5-pro",
|
||||
"gemini/gemini-gemma-2-9b-it",
|
||||
"gemini/gemini-gemma-2-27b-it",
|
||||
],
|
||||
"nvidia_nim": [
|
||||
"nvidia_nim/nvidia/mistral-nemo-minitron-8b-8k-instruct",
|
||||
"nvidia_nim/nvidia/nemotron-4-mini-hindi-4b-instruct",
|
||||
"nvidia_nim/nvidia/llama-3.1-nemotron-70b-instruct",
|
||||
"nvidia_nim/nvidia/llama3-chatqa-1.5-8b",
|
||||
"nvidia_nim/nvidia/llama3-chatqa-1.5-70b",
|
||||
"nvidia_nim/nvidia/vila",
|
||||
"nvidia_nim/nvidia/neva-22",
|
||||
"nvidia_nim/nvidia/nemotron-mini-4b-instruct",
|
||||
"nvidia_nim/nvidia/usdcode-llama3-70b-instruct",
|
||||
"nvidia_nim/nvidia/nemotron-4-340b-instruct",
|
||||
"nvidia_nim/meta/codellama-70b",
|
||||
"nvidia_nim/meta/llama2-70b",
|
||||
"nvidia_nim/meta/llama3-8b-instruct",
|
||||
"nvidia_nim/meta/llama3-70b-instruct",
|
||||
"nvidia_nim/meta/llama-3.1-8b-instruct",
|
||||
"nvidia_nim/meta/llama-3.1-70b-instruct",
|
||||
"nvidia_nim/meta/llama-3.1-405b-instruct",
|
||||
"nvidia_nim/meta/llama-3.2-1b-instruct",
|
||||
"nvidia_nim/meta/llama-3.2-3b-instruct",
|
||||
"nvidia_nim/meta/llama-3.2-11b-vision-instruct",
|
||||
"nvidia_nim/meta/llama-3.2-90b-vision-instruct",
|
||||
"nvidia_nim/meta/llama-3.1-70b-instruct",
|
||||
"nvidia_nim/google/gemma-7b",
|
||||
"nvidia_nim/google/gemma-2b",
|
||||
"nvidia_nim/google/codegemma-7b",
|
||||
"nvidia_nim/google/codegemma-1.1-7b",
|
||||
"nvidia_nim/google/recurrentgemma-2b",
|
||||
"nvidia_nim/google/gemma-2-9b-it",
|
||||
"nvidia_nim/google/gemma-2-27b-it",
|
||||
"nvidia_nim/google/gemma-2-2b-it",
|
||||
"nvidia_nim/google/deplot",
|
||||
"nvidia_nim/google/paligemma",
|
||||
"nvidia_nim/mistralai/mistral-7b-instruct-v0.2",
|
||||
"nvidia_nim/mistralai/mixtral-8x7b-instruct-v0.1",
|
||||
"nvidia_nim/mistralai/mistral-large",
|
||||
"nvidia_nim/mistralai/mixtral-8x22b-instruct-v0.1",
|
||||
"nvidia_nim/mistralai/mistral-7b-instruct-v0.3",
|
||||
"nvidia_nim/nv-mistralai/mistral-nemo-12b-instruct",
|
||||
"nvidia_nim/mistralai/mamba-codestral-7b-v0.1",
|
||||
"nvidia_nim/microsoft/phi-3-mini-128k-instruct",
|
||||
"nvidia_nim/microsoft/phi-3-mini-4k-instruct",
|
||||
"nvidia_nim/microsoft/phi-3-small-8k-instruct",
|
||||
"nvidia_nim/microsoft/phi-3-small-128k-instruct",
|
||||
"nvidia_nim/microsoft/phi-3-medium-4k-instruct",
|
||||
"nvidia_nim/microsoft/phi-3-medium-128k-instruct",
|
||||
"nvidia_nim/microsoft/phi-3.5-mini-instruct",
|
||||
"nvidia_nim/microsoft/phi-3.5-moe-instruct",
|
||||
"nvidia_nim/microsoft/kosmos-2",
|
||||
"nvidia_nim/microsoft/phi-3-vision-128k-instruct",
|
||||
"nvidia_nim/microsoft/phi-3.5-vision-instruct",
|
||||
"nvidia_nim/databricks/dbrx-instruct",
|
||||
"nvidia_nim/snowflake/arctic",
|
||||
"nvidia_nim/aisingapore/sea-lion-7b-instruct",
|
||||
"nvidia_nim/ibm/granite-8b-code-instruct",
|
||||
"nvidia_nim/ibm/granite-34b-code-instruct",
|
||||
"nvidia_nim/ibm/granite-3.0-8b-instruct",
|
||||
"nvidia_nim/ibm/granite-3.0-3b-a800m-instruct",
|
||||
"nvidia_nim/mediatek/breeze-7b-instruct",
|
||||
"nvidia_nim/upstage/solar-10.7b-instruct",
|
||||
"nvidia_nim/writer/palmyra-med-70b-32k",
|
||||
"nvidia_nim/writer/palmyra-med-70b",
|
||||
"nvidia_nim/writer/palmyra-fin-70b-32k",
|
||||
"nvidia_nim/01-ai/yi-large",
|
||||
"nvidia_nim/deepseek-ai/deepseek-coder-6.7b-instruct",
|
||||
"nvidia_nim/rakuten/rakutenai-7b-instruct",
|
||||
"nvidia_nim/rakuten/rakutenai-7b-chat",
|
||||
"nvidia_nim/baichuan-inc/baichuan2-13b-chat",
|
||||
],
|
||||
"groq": [
|
||||
"groq/llama-3.1-8b-instant",
|
||||
"groq/llama-3.1-70b-versatile",
|
||||
"groq/llama-3.1-405b-reasoning",
|
||||
"groq/gemma2-9b-it",
|
||||
"groq/gemma-7b-it",
|
||||
],
|
||||
"ollama": ["ollama/llama3.1", "ollama/mixtral"],
|
||||
"watson": [
|
||||
"watsonx/meta-llama/llama-3-1-70b-instruct",
|
||||
"watsonx/meta-llama/llama-3-1-8b-instruct",
|
||||
"watsonx/meta-llama/llama-3-2-11b-vision-instruct",
|
||||
"watsonx/meta-llama/llama-3-2-1b-instruct",
|
||||
"watsonx/meta-llama/llama-3-2-90b-vision-instruct",
|
||||
"watsonx/meta-llama/llama-3-405b-instruct",
|
||||
"watsonx/mistral/mistral-large",
|
||||
"watsonx/ibm/granite-3-8b-instruct",
|
||||
],
|
||||
"bedrock": [
|
||||
"bedrock/us.amazon.nova-pro-v1:0",
|
||||
"bedrock/us.amazon.nova-micro-v1:0",
|
||||
"bedrock/us.amazon.nova-lite-v1:0",
|
||||
"bedrock/us.anthropic.claude-3-5-sonnet-20240620-v1:0",
|
||||
"bedrock/us.anthropic.claude-3-5-haiku-20241022-v1:0",
|
||||
"bedrock/us.anthropic.claude-3-5-sonnet-20241022-v2:0",
|
||||
"bedrock/us.anthropic.claude-3-7-sonnet-20250219-v1:0",
|
||||
"bedrock/us.anthropic.claude-3-sonnet-20240229-v1:0",
|
||||
"bedrock/us.anthropic.claude-3-opus-20240229-v1:0",
|
||||
"bedrock/us.anthropic.claude-3-haiku-20240307-v1:0",
|
||||
"bedrock/us.meta.llama3-2-11b-instruct-v1:0",
|
||||
"bedrock/us.meta.llama3-2-3b-instruct-v1:0",
|
||||
"bedrock/us.meta.llama3-2-90b-instruct-v1:0",
|
||||
"bedrock/us.meta.llama3-2-1b-instruct-v1:0",
|
||||
"bedrock/us.meta.llama3-1-8b-instruct-v1:0",
|
||||
"bedrock/us.meta.llama3-1-70b-instruct-v1:0",
|
||||
"bedrock/us.meta.llama3-3-70b-instruct-v1:0",
|
||||
"bedrock/us.meta.llama3-1-405b-instruct-v1:0",
|
||||
"bedrock/eu.anthropic.claude-3-5-sonnet-20240620-v1:0",
|
||||
"bedrock/eu.anthropic.claude-3-sonnet-20240229-v1:0",
|
||||
"bedrock/eu.anthropic.claude-3-haiku-20240307-v1:0",
|
||||
"bedrock/eu.meta.llama3-2-3b-instruct-v1:0",
|
||||
"bedrock/eu.meta.llama3-2-1b-instruct-v1:0",
|
||||
"bedrock/apac.anthropic.claude-3-5-sonnet-20240620-v1:0",
|
||||
"bedrock/apac.anthropic.claude-3-5-sonnet-20241022-v2:0",
|
||||
"bedrock/apac.anthropic.claude-3-sonnet-20240229-v1:0",
|
||||
"bedrock/apac.anthropic.claude-3-haiku-20240307-v1:0",
|
||||
"bedrock/amazon.nova-pro-v1:0",
|
||||
"bedrock/amazon.nova-micro-v1:0",
|
||||
"bedrock/amazon.nova-lite-v1:0",
|
||||
"bedrock/anthropic.claude-3-5-sonnet-20240620-v1:0",
|
||||
"bedrock/anthropic.claude-3-5-haiku-20241022-v1:0",
|
||||
"bedrock/anthropic.claude-3-5-sonnet-20241022-v2:0",
|
||||
"bedrock/anthropic.claude-3-7-sonnet-20250219-v1:0",
|
||||
"bedrock/anthropic.claude-3-sonnet-20240229-v1:0",
|
||||
"bedrock/anthropic.claude-3-opus-20240229-v1:0",
|
||||
"bedrock/anthropic.claude-3-haiku-20240307-v1:0",
|
||||
"bedrock/anthropic.claude-v2:1",
|
||||
"bedrock/anthropic.claude-v2",
|
||||
"bedrock/anthropic.claude-instant-v1",
|
||||
"bedrock/meta.llama3-1-405b-instruct-v1:0",
|
||||
"bedrock/meta.llama3-1-70b-instruct-v1:0",
|
||||
"bedrock/meta.llama3-1-8b-instruct-v1:0",
|
||||
"bedrock/meta.llama3-70b-instruct-v1:0",
|
||||
"bedrock/meta.llama3-8b-instruct-v1:0",
|
||||
"bedrock/amazon.titan-text-lite-v1",
|
||||
"bedrock/amazon.titan-text-express-v1",
|
||||
"bedrock/cohere.command-text-v14",
|
||||
"bedrock/ai21.j2-mid-v1",
|
||||
"bedrock/ai21.j2-ultra-v1",
|
||||
"bedrock/ai21.jamba-instruct-v1:0",
|
||||
"bedrock/mistral.mistral-7b-instruct-v0:2",
|
||||
"bedrock/mistral.mixtral-8x7b-instruct-v0:1",
|
||||
],
|
||||
"sambanova": [
|
||||
"sambanova/Meta-Llama-3.3-70B-Instruct",
|
||||
"sambanova/QwQ-32B-Preview",
|
||||
"sambanova/Qwen2.5-72B-Instruct",
|
||||
"sambanova/Qwen2.5-Coder-32B-Instruct",
|
||||
"sambanova/Meta-Llama-3.1-405B-Instruct",
|
||||
"sambanova/Meta-Llama-3.1-70B-Instruct",
|
||||
"sambanova/Meta-Llama-3.1-8B-Instruct",
|
||||
"sambanova/Llama-3.2-90B-Vision-Instruct",
|
||||
"sambanova/Llama-3.2-11B-Vision-Instruct",
|
||||
"sambanova/Meta-Llama-3.2-3B-Instruct",
|
||||
"sambanova/Meta-Llama-3.2-1B-Instruct",
|
||||
],
|
||||
'openai': ['gpt-4', 'gpt-4o', 'gpt-4o-mini', 'o1-mini', 'o1-preview'],
|
||||
'anthropic': ['claude-3-5-sonnet-20240620', 'claude-3-sonnet-20240229', 'claude-3-opus-20240229', 'claude-3-haiku-20240307'],
|
||||
'gemini': ['gemini-1.5-flash', 'gemini-1.5-pro', 'gemini-gemma-2-9b-it', 'gemini-gemma-2-27b-it'],
|
||||
'groq': ['llama-3.1-8b-instant', 'llama-3.1-70b-versatile', 'llama-3.1-405b-reasoning', 'gemma2-9b-it', 'gemma-7b-it'],
|
||||
'ollama': ['llama3.1', 'mixtral'],
|
||||
}
|
||||
|
||||
DEFAULT_LLM_MODEL = "gpt-4o-mini"
|
||||
|
||||
JSON_URL = "https://raw.githubusercontent.com/BerriAI/litellm/main/model_prices_and_context_window.json"
|
||||
|
||||
|
||||
LITELLM_PARAMS = ["api_key", "api_base", "api_version"]
|
||||
JSON_URL = "https://raw.githubusercontent.com/BerriAI/litellm/main/model_prices_and_context_window.json"
|
||||
@@ -1,17 +1,8 @@
|
||||
import shutil
|
||||
import sys
|
||||
from pathlib import Path
|
||||
|
||||
import click
|
||||
|
||||
from crewai.cli.constants import ENV_VARS, MODELS
|
||||
from crewai.cli.provider import (
|
||||
get_provider_data,
|
||||
select_model,
|
||||
select_provider,
|
||||
)
|
||||
from crewai.cli.utils import copy_template, load_env_vars, write_env_file
|
||||
|
||||
from crewai.cli.utils import copy_template,load_env_vars, write_env_file
|
||||
from crewai.cli.provider import get_provider_data, select_provider, select_model, PROVIDERS
|
||||
from crewai.cli.constants import ENV_VARS
|
||||
|
||||
def create_folder_structure(name, parent_folder=None):
|
||||
folder_name = name.replace(" ", "_").replace("-", "_").lower()
|
||||
@@ -22,45 +13,35 @@ def create_folder_structure(name, parent_folder=None):
|
||||
else:
|
||||
folder_path = Path(folder_name)
|
||||
|
||||
if folder_path.exists():
|
||||
if not click.confirm(
|
||||
f"Folder {folder_name} already exists. Do you want to override it?"
|
||||
):
|
||||
click.secho("Operation cancelled.", fg="yellow")
|
||||
sys.exit(0)
|
||||
click.secho(f"Overriding folder {folder_name}...", fg="green", bold=True)
|
||||
shutil.rmtree(folder_path) # Delete the existing folder and its contents
|
||||
|
||||
click.secho(
|
||||
f"Creating {'crew' if parent_folder else 'folder'} {folder_name}...",
|
||||
fg="green",
|
||||
bold=True,
|
||||
)
|
||||
|
||||
folder_path.mkdir(parents=True)
|
||||
(folder_path / "tests").mkdir(exist_ok=True)
|
||||
(folder_path / "knowledge").mkdir(exist_ok=True)
|
||||
if not parent_folder:
|
||||
(folder_path / "src" / folder_name).mkdir(parents=True)
|
||||
(folder_path / "src" / folder_name / "tools").mkdir(parents=True)
|
||||
(folder_path / "src" / folder_name / "config").mkdir(parents=True)
|
||||
if not folder_path.exists():
|
||||
folder_path.mkdir(parents=True)
|
||||
(folder_path / "tests").mkdir(exist_ok=True)
|
||||
if not parent_folder:
|
||||
(folder_path / "src" / folder_name).mkdir(parents=True)
|
||||
(folder_path / "src" / folder_name / "tools").mkdir(parents=True)
|
||||
(folder_path / "src" / folder_name / "config").mkdir(parents=True)
|
||||
else:
|
||||
click.secho(
|
||||
f"\tFolder {folder_name} already exists.",
|
||||
fg="yellow",
|
||||
)
|
||||
|
||||
return folder_path, folder_name, class_name
|
||||
|
||||
|
||||
|
||||
def copy_template_files(folder_path, name, class_name, parent_folder):
|
||||
package_dir = Path(__file__).parent
|
||||
templates_dir = package_dir / "templates" / "crew"
|
||||
|
||||
root_template_files = (
|
||||
[
|
||||
".gitignore",
|
||||
"pyproject.toml",
|
||||
"README.md",
|
||||
"knowledge/user_preference.txt",
|
||||
]
|
||||
if not parent_folder
|
||||
else []
|
||||
[".gitignore", "pyproject.toml", "README.md"] if not parent_folder else []
|
||||
)
|
||||
tools_template_files = ["tools/custom_tool.py", "tools/__init__.py"]
|
||||
config_template_files = ["config/agents.yaml", "config/tasks.yaml"]
|
||||
@@ -73,9 +54,7 @@ def copy_template_files(folder_path, name, class_name, parent_folder):
|
||||
dst_file = folder_path / file_name
|
||||
copy_template(src_file, dst_file, name, class_name, folder_path.name)
|
||||
|
||||
src_folder = (
|
||||
folder_path / "src" / folder_path.name if not parent_folder else folder_path
|
||||
)
|
||||
src_folder = folder_path / "src" / folder_path.name if not parent_folder else folder_path
|
||||
|
||||
for file_name in src_template_files:
|
||||
src_file = templates_dir / file_name
|
||||
@@ -89,96 +68,43 @@ def copy_template_files(folder_path, name, class_name, parent_folder):
|
||||
copy_template(src_file, dst_file, name, class_name, folder_path.name)
|
||||
|
||||
|
||||
def create_crew(name, provider=None, skip_provider=False, parent_folder=None):
|
||||
def create_crew(name, parent_folder=None):
|
||||
folder_path, folder_name, class_name = create_folder_structure(name, parent_folder)
|
||||
env_vars = load_env_vars(folder_path)
|
||||
if not skip_provider:
|
||||
if not provider:
|
||||
provider_models = get_provider_data()
|
||||
if not provider_models:
|
||||
return
|
||||
|
||||
existing_provider = None
|
||||
for provider, env_keys in ENV_VARS.items():
|
||||
if any(
|
||||
"key_name" in details and details["key_name"] in env_vars
|
||||
for details in env_keys
|
||||
):
|
||||
existing_provider = provider
|
||||
break
|
||||
provider_models = get_provider_data()
|
||||
if not provider_models:
|
||||
return
|
||||
|
||||
if existing_provider:
|
||||
if not click.confirm(
|
||||
f"Found existing environment variable configuration for {existing_provider.capitalize()}. Do you want to override it?"
|
||||
):
|
||||
click.secho("Keeping existing provider configuration.", fg="yellow")
|
||||
return
|
||||
selected_provider = select_provider(provider_models)
|
||||
if not selected_provider:
|
||||
return
|
||||
provider = selected_provider
|
||||
|
||||
provider_models = get_provider_data()
|
||||
if not provider_models:
|
||||
return
|
||||
selected_model = select_model(provider, provider_models)
|
||||
if not selected_model:
|
||||
return
|
||||
model = selected_model
|
||||
|
||||
while True:
|
||||
selected_provider = select_provider(provider_models)
|
||||
if selected_provider is None: # User typed 'q'
|
||||
click.secho("Exiting...", fg="yellow")
|
||||
sys.exit(0)
|
||||
if selected_provider: # Valid selection
|
||||
break
|
||||
click.secho(
|
||||
"No provider selected. Please try again or press 'q' to exit.", fg="red"
|
||||
)
|
||||
if provider in PROVIDERS:
|
||||
api_key_var = ENV_VARS[provider][0]
|
||||
else:
|
||||
api_key_var = click.prompt(
|
||||
f"Enter the environment variable name for your {provider.capitalize()} API key",
|
||||
type=str
|
||||
)
|
||||
|
||||
# Check if the selected provider has predefined models
|
||||
if selected_provider in MODELS and MODELS[selected_provider]:
|
||||
while True:
|
||||
selected_model = select_model(selected_provider, provider_models)
|
||||
if selected_model is None: # User typed 'q'
|
||||
click.secho("Exiting...", fg="yellow")
|
||||
sys.exit(0)
|
||||
if selected_model: # Valid selection
|
||||
break
|
||||
click.secho(
|
||||
"No model selected. Please try again or press 'q' to exit.",
|
||||
fg="red",
|
||||
)
|
||||
env_vars["MODEL"] = selected_model
|
||||
env_vars = {api_key_var: "YOUR_API_KEY_HERE"}
|
||||
write_env_file(folder_path, env_vars)
|
||||
|
||||
# Check if the selected provider requires API keys
|
||||
if selected_provider in ENV_VARS:
|
||||
provider_env_vars = ENV_VARS[selected_provider]
|
||||
for details in provider_env_vars:
|
||||
if details.get("default", False):
|
||||
# Automatically add default key-value pairs
|
||||
for key, value in details.items():
|
||||
if key not in ["prompt", "key_name", "default"]:
|
||||
env_vars[key] = value
|
||||
elif "key_name" in details:
|
||||
# Prompt for non-default key-value pairs
|
||||
prompt = details["prompt"]
|
||||
key_name = details["key_name"]
|
||||
api_key_value = click.prompt(prompt, default="", show_default=False)
|
||||
|
||||
if api_key_value.strip():
|
||||
env_vars[key_name] = api_key_value
|
||||
|
||||
if env_vars:
|
||||
write_env_file(folder_path, env_vars)
|
||||
click.secho("API keys and model saved to .env file", fg="green")
|
||||
else:
|
||||
click.secho(
|
||||
"No API keys provided. Skipping .env file creation.", fg="yellow"
|
||||
)
|
||||
|
||||
click.secho(f"Selected model: {env_vars.get('MODEL', 'N/A')}", fg="green")
|
||||
env_vars['MODEL'] = model
|
||||
click.secho(f"Selected model: {model}", fg="green")
|
||||
|
||||
package_dir = Path(__file__).parent
|
||||
templates_dir = package_dir / "templates" / "crew"
|
||||
|
||||
root_template_files = (
|
||||
[".gitignore", "pyproject.toml", "README.md", "knowledge/user_preference.txt"]
|
||||
if not parent_folder
|
||||
else []
|
||||
[".gitignore", "pyproject.toml", "README.md"] if not parent_folder else []
|
||||
)
|
||||
tools_template_files = ["tools/custom_tool.py", "tools/__init__.py"]
|
||||
config_template_files = ["config/agents.yaml", "config/tasks.yaml"]
|
||||
|
||||
107
src/crewai/cli/create_pipeline.py
Normal file
107
src/crewai/cli/create_pipeline.py
Normal file
@@ -0,0 +1,107 @@
|
||||
import shutil
|
||||
from pathlib import Path
|
||||
|
||||
import click
|
||||
|
||||
|
||||
def create_pipeline(name, router=False):
|
||||
"""Create a new pipeline project."""
|
||||
folder_name = name.replace(" ", "_").replace("-", "_").lower()
|
||||
class_name = name.replace("_", " ").replace("-", " ").title().replace(" ", "")
|
||||
|
||||
click.secho(f"Creating pipeline {folder_name}...", fg="green", bold=True)
|
||||
|
||||
project_root = Path(folder_name)
|
||||
if project_root.exists():
|
||||
click.secho(f"Error: Folder {folder_name} already exists.", fg="red")
|
||||
return
|
||||
|
||||
# Create directory structure
|
||||
(project_root / "src" / folder_name).mkdir(parents=True)
|
||||
(project_root / "src" / folder_name / "pipelines").mkdir(parents=True)
|
||||
(project_root / "src" / folder_name / "crews").mkdir(parents=True)
|
||||
(project_root / "src" / folder_name / "tools").mkdir(parents=True)
|
||||
(project_root / "tests").mkdir(exist_ok=True)
|
||||
|
||||
# Create .env file
|
||||
with open(project_root / ".env", "w") as file:
|
||||
file.write("OPENAI_API_KEY=YOUR_API_KEY")
|
||||
|
||||
package_dir = Path(__file__).parent
|
||||
template_folder = "pipeline_router" if router else "pipeline"
|
||||
templates_dir = package_dir / "templates" / template_folder
|
||||
|
||||
# List of template files to copy
|
||||
root_template_files = [".gitignore", "pyproject.toml", "README.md"]
|
||||
src_template_files = ["__init__.py", "main.py"]
|
||||
tools_template_files = ["tools/__init__.py", "tools/custom_tool.py"]
|
||||
|
||||
if router:
|
||||
crew_folders = [
|
||||
"classifier_crew",
|
||||
"normal_crew",
|
||||
"urgent_crew",
|
||||
]
|
||||
pipelines_folders = [
|
||||
"pipelines/__init__.py",
|
||||
"pipelines/pipeline_classifier.py",
|
||||
"pipelines/pipeline_normal.py",
|
||||
"pipelines/pipeline_urgent.py",
|
||||
]
|
||||
else:
|
||||
crew_folders = [
|
||||
"research_crew",
|
||||
"write_linkedin_crew",
|
||||
"write_x_crew",
|
||||
]
|
||||
pipelines_folders = ["pipelines/__init__.py", "pipelines/pipeline.py"]
|
||||
|
||||
def process_file(src_file, dst_file):
|
||||
with open(src_file, "r") as file:
|
||||
content = file.read()
|
||||
|
||||
content = content.replace("{{name}}", name)
|
||||
content = content.replace("{{crew_name}}", class_name)
|
||||
content = content.replace("{{folder_name}}", folder_name)
|
||||
content = content.replace("{{pipeline_name}}", class_name)
|
||||
|
||||
with open(dst_file, "w") as file:
|
||||
file.write(content)
|
||||
|
||||
# Copy and process root template files
|
||||
for file_name in root_template_files:
|
||||
src_file = templates_dir / file_name
|
||||
dst_file = project_root / file_name
|
||||
process_file(src_file, dst_file)
|
||||
|
||||
# Copy and process src template files
|
||||
for file_name in src_template_files:
|
||||
src_file = templates_dir / file_name
|
||||
dst_file = project_root / "src" / folder_name / file_name
|
||||
process_file(src_file, dst_file)
|
||||
|
||||
# Copy tools files
|
||||
for file_name in tools_template_files:
|
||||
src_file = templates_dir / file_name
|
||||
dst_file = project_root / "src" / folder_name / file_name
|
||||
shutil.copy(src_file, dst_file)
|
||||
|
||||
# Copy pipelines folders
|
||||
for file_name in pipelines_folders:
|
||||
src_file = templates_dir / file_name
|
||||
dst_file = project_root / "src" / folder_name / file_name
|
||||
process_file(src_file, dst_file)
|
||||
|
||||
# Copy crew folders
|
||||
for crew_folder in crew_folders:
|
||||
src_crew_folder = templates_dir / "crews" / crew_folder
|
||||
dst_crew_folder = project_root / "src" / folder_name / "crews" / crew_folder
|
||||
if src_crew_folder.exists():
|
||||
shutil.copytree(src_crew_folder, dst_crew_folder)
|
||||
else:
|
||||
click.secho(
|
||||
f"Warning: Crew folder {crew_folder} not found in template.",
|
||||
fg="yellow",
|
||||
)
|
||||
|
||||
click.secho(f"Pipeline {name} created successfully!", fg="green", bold=True)
|
||||
@@ -1,536 +0,0 @@
|
||||
import json
|
||||
import platform
|
||||
import re
|
||||
import sys
|
||||
import threading
|
||||
import time
|
||||
from pathlib import Path
|
||||
from typing import Any, Dict, List, Optional, Set, Tuple
|
||||
|
||||
import click
|
||||
import tomli
|
||||
from packaging import version
|
||||
|
||||
from crewai.cli.utils import read_toml
|
||||
from crewai.cli.version import get_crewai_version
|
||||
from crewai.crew import Crew
|
||||
from crewai.llm import LLM
|
||||
from crewai.types.crew_chat import ChatInputField, ChatInputs
|
||||
from crewai.utilities.llm_utils import create_llm
|
||||
|
||||
MIN_REQUIRED_VERSION = "0.98.0"
|
||||
|
||||
|
||||
def check_conversational_crews_version(
|
||||
crewai_version: str, pyproject_data: dict
|
||||
) -> bool:
|
||||
"""
|
||||
Check if the installed crewAI version supports conversational crews.
|
||||
|
||||
Args:
|
||||
crewai_version: The current version of crewAI.
|
||||
pyproject_data: Dictionary containing pyproject.toml data.
|
||||
|
||||
Returns:
|
||||
bool: True if version check passes, False otherwise.
|
||||
"""
|
||||
try:
|
||||
if version.parse(crewai_version) < version.parse(MIN_REQUIRED_VERSION):
|
||||
click.secho(
|
||||
"You are using an older version of crewAI that doesn't support conversational crews. "
|
||||
"Run 'uv upgrade crewai' to get the latest version.",
|
||||
fg="red",
|
||||
)
|
||||
return False
|
||||
except version.InvalidVersion:
|
||||
click.secho("Invalid crewAI version format detected.", fg="red")
|
||||
return False
|
||||
return True
|
||||
|
||||
|
||||
def run_chat():
|
||||
"""
|
||||
Runs an interactive chat loop using the Crew's chat LLM with function calling.
|
||||
Incorporates crew_name, crew_description, and input fields to build a tool schema.
|
||||
Exits if crew_name or crew_description are missing.
|
||||
"""
|
||||
crewai_version = get_crewai_version()
|
||||
pyproject_data = read_toml()
|
||||
|
||||
if not check_conversational_crews_version(crewai_version, pyproject_data):
|
||||
return
|
||||
|
||||
crew, crew_name = load_crew_and_name()
|
||||
chat_llm = initialize_chat_llm(crew)
|
||||
if not chat_llm:
|
||||
return
|
||||
|
||||
# Indicate that the crew is being analyzed
|
||||
click.secho(
|
||||
"\nAnalyzing crew and required inputs - this may take 3 to 30 seconds "
|
||||
"depending on the complexity of your crew.",
|
||||
fg="white",
|
||||
)
|
||||
|
||||
# Start loading indicator
|
||||
loading_complete = threading.Event()
|
||||
loading_thread = threading.Thread(target=show_loading, args=(loading_complete,))
|
||||
loading_thread.start()
|
||||
|
||||
try:
|
||||
crew_chat_inputs = generate_crew_chat_inputs(crew, crew_name, chat_llm)
|
||||
crew_tool_schema = generate_crew_tool_schema(crew_chat_inputs)
|
||||
system_message = build_system_message(crew_chat_inputs)
|
||||
|
||||
# Call the LLM to generate the introductory message
|
||||
introductory_message = chat_llm.call(
|
||||
messages=[{"role": "system", "content": system_message}]
|
||||
)
|
||||
finally:
|
||||
# Stop loading indicator
|
||||
loading_complete.set()
|
||||
loading_thread.join()
|
||||
|
||||
# Indicate that the analysis is complete
|
||||
click.secho("\nFinished analyzing crew.\n", fg="white")
|
||||
|
||||
click.secho(f"Assistant: {introductory_message}\n", fg="green")
|
||||
|
||||
messages = [
|
||||
{"role": "system", "content": system_message},
|
||||
{"role": "assistant", "content": introductory_message},
|
||||
]
|
||||
|
||||
available_functions = {
|
||||
crew_chat_inputs.crew_name: create_tool_function(crew, messages),
|
||||
}
|
||||
|
||||
chat_loop(chat_llm, messages, crew_tool_schema, available_functions)
|
||||
|
||||
|
||||
def show_loading(event: threading.Event):
|
||||
"""Display animated loading dots while processing."""
|
||||
while not event.is_set():
|
||||
print(".", end="", flush=True)
|
||||
time.sleep(1)
|
||||
print()
|
||||
|
||||
|
||||
def initialize_chat_llm(crew: Crew) -> Optional[LLM]:
|
||||
"""Initializes the chat LLM and handles exceptions."""
|
||||
try:
|
||||
return create_llm(crew.chat_llm)
|
||||
except Exception as e:
|
||||
click.secho(
|
||||
f"Unable to find a Chat LLM. Please make sure you set chat_llm on the crew: {e}",
|
||||
fg="red",
|
||||
)
|
||||
return None
|
||||
|
||||
|
||||
def build_system_message(crew_chat_inputs: ChatInputs) -> str:
|
||||
"""Builds the initial system message for the chat."""
|
||||
required_fields_str = (
|
||||
", ".join(
|
||||
f"{field.name} (desc: {field.description or 'n/a'})"
|
||||
for field in crew_chat_inputs.inputs
|
||||
)
|
||||
or "(No required fields detected)"
|
||||
)
|
||||
|
||||
return (
|
||||
"You are a helpful AI assistant for the CrewAI platform. "
|
||||
"Your primary purpose is to assist users with the crew's specific tasks. "
|
||||
"You can answer general questions, but should guide users back to the crew's purpose afterward. "
|
||||
"For example, after answering a general question, remind the user of your main purpose, such as generating a research report, and prompt them to specify a topic or task related to the crew's purpose. "
|
||||
"You have a function (tool) you can call by name if you have all required inputs. "
|
||||
f"Those required inputs are: {required_fields_str}. "
|
||||
"Once you have them, call the function. "
|
||||
"Please keep your responses concise and friendly. "
|
||||
"If a user asks a question outside the crew's scope, provide a brief answer and remind them of the crew's purpose. "
|
||||
"After calling the tool, be prepared to take user feedback and make adjustments as needed. "
|
||||
"If you are ever unsure about a user's request or need clarification, ask the user for more information. "
|
||||
"Before doing anything else, introduce yourself with a friendly message like: 'Hey! I'm here to help you with [crew's purpose]. Could you please provide me with [inputs] so we can get started?' "
|
||||
"For example: 'Hey! I'm here to help you with uncovering and reporting cutting-edge developments through thorough research and detailed analysis. Could you please provide me with a topic you're interested in? This will help us generate a comprehensive research report and detailed analysis.'"
|
||||
f"\nCrew Name: {crew_chat_inputs.crew_name}"
|
||||
f"\nCrew Description: {crew_chat_inputs.crew_description}"
|
||||
)
|
||||
|
||||
|
||||
def create_tool_function(crew: Crew, messages: List[Dict[str, str]]) -> Any:
|
||||
"""Creates a wrapper function for running the crew tool with messages."""
|
||||
|
||||
def run_crew_tool_with_messages(**kwargs):
|
||||
return run_crew_tool(crew, messages, **kwargs)
|
||||
|
||||
return run_crew_tool_with_messages
|
||||
|
||||
|
||||
def flush_input():
|
||||
"""Flush any pending input from the user."""
|
||||
if platform.system() == "Windows":
|
||||
# Windows platform
|
||||
import msvcrt
|
||||
|
||||
while msvcrt.kbhit():
|
||||
msvcrt.getch()
|
||||
else:
|
||||
# Unix-like platforms (Linux, macOS)
|
||||
import termios
|
||||
|
||||
termios.tcflush(sys.stdin, termios.TCIFLUSH)
|
||||
|
||||
|
||||
def chat_loop(chat_llm, messages, crew_tool_schema, available_functions):
|
||||
"""Main chat loop for interacting with the user."""
|
||||
while True:
|
||||
try:
|
||||
# Flush any pending input before accepting new input
|
||||
flush_input()
|
||||
|
||||
user_input = get_user_input()
|
||||
handle_user_input(
|
||||
user_input, chat_llm, messages, crew_tool_schema, available_functions
|
||||
)
|
||||
|
||||
except KeyboardInterrupt:
|
||||
click.echo("\nExiting chat. Goodbye!")
|
||||
break
|
||||
except Exception as e:
|
||||
click.secho(f"An error occurred: {e}", fg="red")
|
||||
break
|
||||
|
||||
|
||||
def get_user_input() -> str:
|
||||
"""Collect multi-line user input with exit handling."""
|
||||
click.secho(
|
||||
"\nYou (type your message below. Press 'Enter' twice when you're done):",
|
||||
fg="blue",
|
||||
)
|
||||
user_input_lines = []
|
||||
while True:
|
||||
line = input()
|
||||
if line.strip().lower() == "exit":
|
||||
return "exit"
|
||||
if line == "":
|
||||
break
|
||||
user_input_lines.append(line)
|
||||
return "\n".join(user_input_lines)
|
||||
|
||||
|
||||
def handle_user_input(
|
||||
user_input: str,
|
||||
chat_llm: LLM,
|
||||
messages: List[Dict[str, str]],
|
||||
crew_tool_schema: Dict[str, Any],
|
||||
available_functions: Dict[str, Any],
|
||||
) -> None:
|
||||
if user_input.strip().lower() == "exit":
|
||||
click.echo("Exiting chat. Goodbye!")
|
||||
return
|
||||
|
||||
if not user_input.strip():
|
||||
click.echo("Empty message. Please provide input or type 'exit' to quit.")
|
||||
return
|
||||
|
||||
messages.append({"role": "user", "content": user_input})
|
||||
|
||||
# Indicate that assistant is processing
|
||||
click.echo()
|
||||
click.secho("Assistant is processing your input. Please wait...", fg="green")
|
||||
|
||||
# Process assistant's response
|
||||
final_response = chat_llm.call(
|
||||
messages=messages,
|
||||
tools=[crew_tool_schema],
|
||||
available_functions=available_functions,
|
||||
)
|
||||
|
||||
messages.append({"role": "assistant", "content": final_response})
|
||||
click.secho(f"\nAssistant: {final_response}\n", fg="green")
|
||||
|
||||
|
||||
def generate_crew_tool_schema(crew_inputs: ChatInputs) -> dict:
|
||||
"""
|
||||
Dynamically build a Littellm 'function' schema for the given crew.
|
||||
|
||||
crew_name: The name of the crew (used for the function 'name').
|
||||
crew_inputs: A ChatInputs object containing crew_description
|
||||
and a list of input fields (each with a name & description).
|
||||
"""
|
||||
properties = {}
|
||||
for field in crew_inputs.inputs:
|
||||
properties[field.name] = {
|
||||
"type": "string",
|
||||
"description": field.description or "No description provided",
|
||||
}
|
||||
|
||||
required_fields = [field.name for field in crew_inputs.inputs]
|
||||
|
||||
return {
|
||||
"type": "function",
|
||||
"function": {
|
||||
"name": crew_inputs.crew_name,
|
||||
"description": crew_inputs.crew_description or "No crew description",
|
||||
"parameters": {
|
||||
"type": "object",
|
||||
"properties": properties,
|
||||
"required": required_fields,
|
||||
},
|
||||
},
|
||||
}
|
||||
|
||||
|
||||
def run_crew_tool(crew: Crew, messages: List[Dict[str, str]], **kwargs):
|
||||
"""
|
||||
Runs the crew using crew.kickoff(inputs=kwargs) and returns the output.
|
||||
|
||||
Args:
|
||||
crew (Crew): The crew instance to run.
|
||||
messages (List[Dict[str, str]]): The chat messages up to this point.
|
||||
**kwargs: The inputs collected from the user.
|
||||
|
||||
Returns:
|
||||
str: The output from the crew's execution.
|
||||
|
||||
Raises:
|
||||
SystemExit: Exits the chat if an error occurs during crew execution.
|
||||
"""
|
||||
try:
|
||||
# Serialize 'messages' to JSON string before adding to kwargs
|
||||
kwargs["crew_chat_messages"] = json.dumps(messages)
|
||||
|
||||
# Run the crew with the provided inputs
|
||||
crew_output = crew.kickoff(inputs=kwargs)
|
||||
|
||||
# Convert CrewOutput to a string to send back to the user
|
||||
result = str(crew_output)
|
||||
|
||||
return result
|
||||
except Exception as e:
|
||||
# Exit the chat and show the error message
|
||||
click.secho("An error occurred while running the crew:", fg="red")
|
||||
click.secho(str(e), fg="red")
|
||||
sys.exit(1)
|
||||
|
||||
|
||||
def load_crew_and_name() -> Tuple[Crew, str]:
|
||||
"""
|
||||
Loads the crew by importing the crew class from the user's project.
|
||||
|
||||
Returns:
|
||||
Tuple[Crew, str]: A tuple containing the Crew instance and the name of the crew.
|
||||
"""
|
||||
# Get the current working directory
|
||||
cwd = Path.cwd()
|
||||
|
||||
# Path to the pyproject.toml file
|
||||
pyproject_path = cwd / "pyproject.toml"
|
||||
if not pyproject_path.exists():
|
||||
raise FileNotFoundError("pyproject.toml not found in the current directory.")
|
||||
|
||||
# Load the pyproject.toml file using 'tomli'
|
||||
with pyproject_path.open("rb") as f:
|
||||
pyproject_data = tomli.load(f)
|
||||
|
||||
# Get the project name from the 'project' section
|
||||
project_name = pyproject_data["project"]["name"]
|
||||
folder_name = project_name
|
||||
|
||||
# Derive the crew class name from the project name
|
||||
# E.g., if project_name is 'my_project', crew_class_name is 'MyProject'
|
||||
crew_class_name = project_name.replace("_", " ").title().replace(" ", "")
|
||||
|
||||
# Add the 'src' directory to sys.path
|
||||
src_path = cwd / "src"
|
||||
if str(src_path) not in sys.path:
|
||||
sys.path.insert(0, str(src_path))
|
||||
|
||||
# Import the crew module
|
||||
crew_module_name = f"{folder_name}.crew"
|
||||
try:
|
||||
crew_module = __import__(crew_module_name, fromlist=[crew_class_name])
|
||||
except ImportError as e:
|
||||
raise ImportError(f"Failed to import crew module {crew_module_name}: {e}")
|
||||
|
||||
# Get the crew class from the module
|
||||
try:
|
||||
crew_class = getattr(crew_module, crew_class_name)
|
||||
except AttributeError:
|
||||
raise AttributeError(
|
||||
f"Crew class {crew_class_name} not found in module {crew_module_name}"
|
||||
)
|
||||
|
||||
# Instantiate the crew
|
||||
crew_instance = crew_class().crew()
|
||||
return crew_instance, crew_class_name
|
||||
|
||||
|
||||
def generate_crew_chat_inputs(crew: Crew, crew_name: str, chat_llm) -> ChatInputs:
|
||||
"""
|
||||
Generates the ChatInputs required for the crew by analyzing the tasks and agents.
|
||||
|
||||
Args:
|
||||
crew (Crew): The crew object containing tasks and agents.
|
||||
crew_name (str): The name of the crew.
|
||||
chat_llm: The chat language model to use for AI calls.
|
||||
|
||||
Returns:
|
||||
ChatInputs: An object containing the crew's name, description, and input fields.
|
||||
"""
|
||||
# Extract placeholders from tasks and agents
|
||||
required_inputs = fetch_required_inputs(crew)
|
||||
|
||||
# Generate descriptions for each input using AI
|
||||
input_fields = []
|
||||
for input_name in required_inputs:
|
||||
description = generate_input_description_with_ai(input_name, crew, chat_llm)
|
||||
input_fields.append(ChatInputField(name=input_name, description=description))
|
||||
|
||||
# Generate crew description using AI
|
||||
crew_description = generate_crew_description_with_ai(crew, chat_llm)
|
||||
|
||||
return ChatInputs(
|
||||
crew_name=crew_name, crew_description=crew_description, inputs=input_fields
|
||||
)
|
||||
|
||||
|
||||
def fetch_required_inputs(crew: Crew) -> Set[str]:
|
||||
"""
|
||||
Extracts placeholders from the crew's tasks and agents.
|
||||
|
||||
Args:
|
||||
crew (Crew): The crew object.
|
||||
|
||||
Returns:
|
||||
Set[str]: A set of placeholder names.
|
||||
"""
|
||||
placeholder_pattern = re.compile(r"\{(.+?)\}")
|
||||
required_inputs: Set[str] = set()
|
||||
|
||||
# Scan tasks
|
||||
for task in crew.tasks:
|
||||
text = f"{task.description or ''} {task.expected_output or ''}"
|
||||
required_inputs.update(placeholder_pattern.findall(text))
|
||||
|
||||
# Scan agents
|
||||
for agent in crew.agents:
|
||||
text = f"{agent.role or ''} {agent.goal or ''} {agent.backstory or ''}"
|
||||
required_inputs.update(placeholder_pattern.findall(text))
|
||||
|
||||
return required_inputs
|
||||
|
||||
|
||||
def generate_input_description_with_ai(input_name: str, crew: Crew, chat_llm) -> str:
|
||||
"""
|
||||
Generates an input description using AI based on the context of the crew.
|
||||
|
||||
Args:
|
||||
input_name (str): The name of the input placeholder.
|
||||
crew (Crew): The crew object.
|
||||
chat_llm: The chat language model to use for AI calls.
|
||||
|
||||
Returns:
|
||||
str: A concise description of the input.
|
||||
"""
|
||||
# Gather context from tasks and agents where the input is used
|
||||
context_texts = []
|
||||
placeholder_pattern = re.compile(r"\{(.+?)\}")
|
||||
|
||||
for task in crew.tasks:
|
||||
if (
|
||||
f"{{{input_name}}}" in task.description
|
||||
or f"{{{input_name}}}" in task.expected_output
|
||||
):
|
||||
# Replace placeholders with input names
|
||||
task_description = placeholder_pattern.sub(
|
||||
lambda m: m.group(1), task.description or ""
|
||||
)
|
||||
expected_output = placeholder_pattern.sub(
|
||||
lambda m: m.group(1), task.expected_output or ""
|
||||
)
|
||||
context_texts.append(f"Task Description: {task_description}")
|
||||
context_texts.append(f"Expected Output: {expected_output}")
|
||||
for agent in crew.agents:
|
||||
if (
|
||||
f"{{{input_name}}}" in agent.role
|
||||
or f"{{{input_name}}}" in agent.goal
|
||||
or f"{{{input_name}}}" in agent.backstory
|
||||
):
|
||||
# Replace placeholders with input names
|
||||
agent_role = placeholder_pattern.sub(lambda m: m.group(1), agent.role or "")
|
||||
agent_goal = placeholder_pattern.sub(lambda m: m.group(1), agent.goal or "")
|
||||
agent_backstory = placeholder_pattern.sub(
|
||||
lambda m: m.group(1), agent.backstory or ""
|
||||
)
|
||||
context_texts.append(f"Agent Role: {agent_role}")
|
||||
context_texts.append(f"Agent Goal: {agent_goal}")
|
||||
context_texts.append(f"Agent Backstory: {agent_backstory}")
|
||||
|
||||
context = "\n".join(context_texts)
|
||||
if not context:
|
||||
# If no context is found for the input, raise an exception as per instruction
|
||||
raise ValueError(f"No context found for input '{input_name}'.")
|
||||
|
||||
prompt = (
|
||||
f"Based on the following context, write a concise description (15 words or less) of the input '{input_name}'.\n"
|
||||
"Provide only the description, without any extra text or labels. Do not include placeholders like '{topic}' in the description.\n"
|
||||
"Context:\n"
|
||||
f"{context}"
|
||||
)
|
||||
response = chat_llm.call(messages=[{"role": "user", "content": prompt}])
|
||||
description = response.strip()
|
||||
|
||||
return description
|
||||
|
||||
|
||||
def generate_crew_description_with_ai(crew: Crew, chat_llm) -> str:
|
||||
"""
|
||||
Generates a brief description of the crew using AI.
|
||||
|
||||
Args:
|
||||
crew (Crew): The crew object.
|
||||
chat_llm: The chat language model to use for AI calls.
|
||||
|
||||
Returns:
|
||||
str: A concise description of the crew's purpose (15 words or less).
|
||||
"""
|
||||
# Gather context from tasks and agents
|
||||
context_texts = []
|
||||
placeholder_pattern = re.compile(r"\{(.+?)\}")
|
||||
|
||||
for task in crew.tasks:
|
||||
# Replace placeholders with input names
|
||||
task_description = placeholder_pattern.sub(
|
||||
lambda m: m.group(1), task.description or ""
|
||||
)
|
||||
expected_output = placeholder_pattern.sub(
|
||||
lambda m: m.group(1), task.expected_output or ""
|
||||
)
|
||||
context_texts.append(f"Task Description: {task_description}")
|
||||
context_texts.append(f"Expected Output: {expected_output}")
|
||||
for agent in crew.agents:
|
||||
# Replace placeholders with input names
|
||||
agent_role = placeholder_pattern.sub(lambda m: m.group(1), agent.role or "")
|
||||
agent_goal = placeholder_pattern.sub(lambda m: m.group(1), agent.goal or "")
|
||||
agent_backstory = placeholder_pattern.sub(
|
||||
lambda m: m.group(1), agent.backstory or ""
|
||||
)
|
||||
context_texts.append(f"Agent Role: {agent_role}")
|
||||
context_texts.append(f"Agent Goal: {agent_goal}")
|
||||
context_texts.append(f"Agent Backstory: {agent_backstory}")
|
||||
|
||||
context = "\n".join(context_texts)
|
||||
if not context:
|
||||
raise ValueError("No context found for generating crew description.")
|
||||
|
||||
prompt = (
|
||||
"Based on the following context, write a concise, action-oriented description (15 words or less) of the crew's purpose.\n"
|
||||
"Provide only the description, without any extra text or labels. Do not include placeholders like '{topic}' in the description.\n"
|
||||
"Context:\n"
|
||||
f"{context}"
|
||||
)
|
||||
response = chat_llm.call(messages=[{"role": "user", "content": prompt}])
|
||||
crew_description = response.strip()
|
||||
|
||||
return crew_description
|
||||
@@ -3,13 +3,12 @@ import subprocess
|
||||
import click
|
||||
|
||||
|
||||
def install_crew(proxy_options: list[str]) -> None:
|
||||
def install_crew() -> None:
|
||||
"""
|
||||
Install the crew by running the UV command to lock and install.
|
||||
"""
|
||||
try:
|
||||
command = ["uv", "sync"] + proxy_options
|
||||
subprocess.run(command, check=True, capture_output=False, text=True)
|
||||
subprocess.run(["uv", "sync"], check=True, capture_output=False, text=True)
|
||||
|
||||
except subprocess.CalledProcessError as e:
|
||||
click.echo(f"An error occurred while running the crew: {e}", err=True)
|
||||
|
||||
@@ -7,7 +7,7 @@ def plot_flow() -> None:
|
||||
"""
|
||||
Plot the flow by running a command in the UV environment.
|
||||
"""
|
||||
command = ["uv", "run", "plot"]
|
||||
command = ["uv", "run", "plot_flow"]
|
||||
|
||||
try:
|
||||
result = subprocess.run(command, capture_output=False, text=True, check=True)
|
||||
|
||||
@@ -1,10 +1,8 @@
|
||||
from os import getenv
|
||||
from typing import Optional
|
||||
from urllib.parse import urljoin
|
||||
|
||||
import requests
|
||||
|
||||
from crewai.cli.version import get_crewai_version
|
||||
from os import getenv
|
||||
from crewai.cli.utils import get_crewai_version
|
||||
from urllib.parse import urljoin
|
||||
|
||||
|
||||
class PlusAPI:
|
||||
|
||||
@@ -1,91 +1,67 @@
|
||||
import json
|
||||
import time
|
||||
from collections import defaultdict
|
||||
from pathlib import Path
|
||||
|
||||
import click
|
||||
import requests
|
||||
|
||||
from crewai.cli.constants import JSON_URL, MODELS, PROVIDERS
|
||||
|
||||
from collections import defaultdict
|
||||
import click
|
||||
from pathlib import Path
|
||||
from crewai.cli.constants import PROVIDERS, MODELS, JSON_URL
|
||||
|
||||
def select_choice(prompt_message, choices):
|
||||
"""
|
||||
Presents a list of choices to the user and prompts them to select one.
|
||||
|
||||
|
||||
Args:
|
||||
- prompt_message (str): The message to display to the user before presenting the choices.
|
||||
- choices (list): A list of options to present to the user.
|
||||
|
||||
|
||||
Returns:
|
||||
- str: The selected choice from the list, or None if the user chooses to quit.
|
||||
- str: The selected choice from the list, or None if the operation is aborted or an invalid selection is made.
|
||||
"""
|
||||
|
||||
provider_models = get_provider_data()
|
||||
if not provider_models:
|
||||
return
|
||||
click.secho(prompt_message, fg="cyan")
|
||||
for idx, choice in enumerate(choices, start=1):
|
||||
click.secho(f"{idx}. {choice}", fg="cyan")
|
||||
click.secho("q. Quit", fg="cyan")
|
||||
|
||||
while True:
|
||||
choice = click.prompt(
|
||||
"Enter the number of your choice or 'q' to quit", type=str
|
||||
)
|
||||
|
||||
if choice.lower() == "q":
|
||||
return None
|
||||
|
||||
try:
|
||||
selected_index = int(choice) - 1
|
||||
if 0 <= selected_index < len(choices):
|
||||
return choices[selected_index]
|
||||
except ValueError:
|
||||
pass
|
||||
|
||||
click.secho(
|
||||
"Invalid selection. Please select a number between 1 and 6 or 'q' to quit.",
|
||||
fg="red",
|
||||
)
|
||||
|
||||
try:
|
||||
selected_index = click.prompt("Enter the number of your choice", type=int) - 1
|
||||
except click.exceptions.Abort:
|
||||
click.secho("Operation aborted by the user.", fg="red")
|
||||
return None
|
||||
if not (0 <= selected_index < len(choices)):
|
||||
click.secho("Invalid selection.", fg="red")
|
||||
return None
|
||||
return choices[selected_index]
|
||||
|
||||
def select_provider(provider_models):
|
||||
"""
|
||||
Presents a list of providers to the user and prompts them to select one.
|
||||
|
||||
|
||||
Args:
|
||||
- provider_models (dict): A dictionary of provider models.
|
||||
|
||||
|
||||
Returns:
|
||||
- str: The selected provider
|
||||
- None: If user explicitly quits
|
||||
- str: The selected provider, or None if the operation is aborted or an invalid selection is made.
|
||||
"""
|
||||
predefined_providers = [p.lower() for p in PROVIDERS]
|
||||
all_providers = sorted(set(predefined_providers + list(provider_models.keys())))
|
||||
|
||||
provider = select_choice(
|
||||
"Select a provider to set up:", predefined_providers + ["other"]
|
||||
)
|
||||
if provider is None: # User typed 'q'
|
||||
provider = select_choice("Select a provider to set up:", predefined_providers + ['other'])
|
||||
if not provider:
|
||||
return None
|
||||
provider = provider.lower()
|
||||
|
||||
if provider == "other":
|
||||
if provider == 'other':
|
||||
provider = select_choice("Select a provider from the full list:", all_providers)
|
||||
if provider is None: # User typed 'q'
|
||||
if not provider:
|
||||
return None
|
||||
|
||||
return provider.lower() if provider else False
|
||||
|
||||
return provider
|
||||
|
||||
def select_model(provider, provider_models):
|
||||
"""
|
||||
Presents a list of models for a given provider to the user and prompts them to select one.
|
||||
|
||||
|
||||
Args:
|
||||
- provider (str): The provider for which to select a model.
|
||||
- provider_models (dict): A dictionary of provider models.
|
||||
|
||||
|
||||
Returns:
|
||||
- str: The selected model, or None if the operation is aborted or an invalid selection is made.
|
||||
"""
|
||||
@@ -100,49 +76,37 @@ def select_model(provider, provider_models):
|
||||
click.secho(f"No models available for provider '{provider}'.", fg="red")
|
||||
return None
|
||||
|
||||
selected_model = select_choice(
|
||||
f"Select a model to use for {provider.capitalize()}:", available_models
|
||||
)
|
||||
selected_model = select_choice(f"Select a model to use for {provider.capitalize()}:", available_models)
|
||||
return selected_model
|
||||
|
||||
|
||||
def load_provider_data(cache_file, cache_expiry):
|
||||
"""
|
||||
Loads provider data from a cache file if it exists and is not expired. If the cache is expired or corrupted, it fetches the data from the web.
|
||||
|
||||
|
||||
Args:
|
||||
- cache_file (Path): The path to the cache file.
|
||||
- cache_expiry (int): The cache expiry time in seconds.
|
||||
|
||||
|
||||
Returns:
|
||||
- dict or None: The loaded provider data or None if the operation fails.
|
||||
"""
|
||||
current_time = time.time()
|
||||
if (
|
||||
cache_file.exists()
|
||||
and (current_time - cache_file.stat().st_mtime) < cache_expiry
|
||||
):
|
||||
if cache_file.exists() and (current_time - cache_file.stat().st_mtime) < cache_expiry:
|
||||
data = read_cache_file(cache_file)
|
||||
if data:
|
||||
return data
|
||||
click.secho(
|
||||
"Cache is corrupted. Fetching provider data from the web...", fg="yellow"
|
||||
)
|
||||
click.secho("Cache is corrupted. Fetching provider data from the web...", fg="yellow")
|
||||
else:
|
||||
click.secho(
|
||||
"Cache expired or not found. Fetching provider data from the web...",
|
||||
fg="cyan",
|
||||
)
|
||||
click.secho("Cache expired or not found. Fetching provider data from the web...", fg="cyan")
|
||||
return fetch_provider_data(cache_file)
|
||||
|
||||
|
||||
def read_cache_file(cache_file):
|
||||
"""
|
||||
Reads and returns the JSON content from a cache file. Returns None if the file contains invalid JSON.
|
||||
|
||||
|
||||
Args:
|
||||
- cache_file (Path): The path to the cache file.
|
||||
|
||||
|
||||
Returns:
|
||||
- dict or None: The JSON content of the cache file or None if the JSON is invalid.
|
||||
"""
|
||||
@@ -152,19 +116,18 @@ def read_cache_file(cache_file):
|
||||
except json.JSONDecodeError:
|
||||
return None
|
||||
|
||||
|
||||
def fetch_provider_data(cache_file):
|
||||
"""
|
||||
Fetches provider data from a specified URL and caches it to a file.
|
||||
|
||||
|
||||
Args:
|
||||
- cache_file (Path): The path to the cache file.
|
||||
|
||||
|
||||
Returns:
|
||||
- dict or None: The fetched provider data or None if the operation fails.
|
||||
"""
|
||||
try:
|
||||
response = requests.get(JSON_URL, stream=True, timeout=60)
|
||||
response = requests.get(JSON_URL, stream=True, timeout=10)
|
||||
response.raise_for_status()
|
||||
data = download_data(response)
|
||||
with open(cache_file, "w") as f:
|
||||
@@ -176,42 +139,38 @@ def fetch_provider_data(cache_file):
|
||||
click.secho("Error parsing provider data. Invalid JSON format.", fg="red")
|
||||
return None
|
||||
|
||||
|
||||
def download_data(response):
|
||||
"""
|
||||
Downloads data from a given HTTP response and returns the JSON content.
|
||||
|
||||
|
||||
Args:
|
||||
- response (requests.Response): The HTTP response object.
|
||||
|
||||
|
||||
Returns:
|
||||
- dict: The JSON content of the response.
|
||||
"""
|
||||
total_size = int(response.headers.get("content-length", 0))
|
||||
total_size = int(response.headers.get('content-length', 0))
|
||||
block_size = 8192
|
||||
data_chunks = []
|
||||
with click.progressbar(
|
||||
length=total_size, label="Downloading", show_pos=True
|
||||
) as progress_bar:
|
||||
with click.progressbar(length=total_size, label='Downloading', show_pos=True) as progress_bar:
|
||||
for chunk in response.iter_content(block_size):
|
||||
if chunk:
|
||||
data_chunks.append(chunk)
|
||||
progress_bar.update(len(chunk))
|
||||
data_content = b"".join(data_chunks)
|
||||
return json.loads(data_content.decode("utf-8"))
|
||||
|
||||
data_content = b''.join(data_chunks)
|
||||
return json.loads(data_content.decode('utf-8'))
|
||||
|
||||
def get_provider_data():
|
||||
"""
|
||||
Retrieves provider data from a cache file, filters out models based on provider criteria, and returns a dictionary of providers mapped to their models.
|
||||
|
||||
|
||||
Returns:
|
||||
- dict or None: A dictionary of providers mapped to their models or None if the operation fails.
|
||||
"""
|
||||
cache_dir = Path.home() / ".crewai"
|
||||
cache_dir = Path.home() / '.crewai'
|
||||
cache_dir.mkdir(exist_ok=True)
|
||||
cache_file = cache_dir / "provider_cache.json"
|
||||
cache_expiry = 24 * 3600
|
||||
cache_file = cache_dir / 'provider_cache.json'
|
||||
cache_expiry = 24 * 3600
|
||||
|
||||
data = load_provider_data(cache_file, cache_expiry)
|
||||
if not data:
|
||||
@@ -220,8 +179,8 @@ def get_provider_data():
|
||||
provider_models = defaultdict(list)
|
||||
for model_name, properties in data.items():
|
||||
provider = properties.get("litellm_provider", "").strip().lower()
|
||||
if "http" in provider or provider == "other":
|
||||
if 'http' in provider or provider == 'other':
|
||||
continue
|
||||
if provider:
|
||||
provider_models[provider].append(model_name)
|
||||
return provider_models
|
||||
return provider_models
|
||||
@@ -1,18 +1,13 @@
|
||||
import subprocess
|
||||
|
||||
import click
|
||||
|
||||
from crewai.cli.utils import get_crew
|
||||
from crewai.memory.entity.entity_memory import EntityMemory
|
||||
from crewai.memory.long_term.long_term_memory import LongTermMemory
|
||||
from crewai.memory.short_term.short_term_memory import ShortTermMemory
|
||||
from crewai.utilities.task_output_storage_handler import TaskOutputStorageHandler
|
||||
|
||||
|
||||
def reset_memories_command(
|
||||
long,
|
||||
short,
|
||||
entity,
|
||||
knowledge,
|
||||
kickoff_outputs,
|
||||
all,
|
||||
) -> None:
|
||||
def reset_memories_command(long, short, entity, kickoff_outputs, all) -> None:
|
||||
"""
|
||||
Reset the crew memories.
|
||||
|
||||
@@ -22,39 +17,29 @@ def reset_memories_command(
|
||||
entity (bool): Whether to reset the entity memory.
|
||||
kickoff_outputs (bool): Whether to reset the latest kickoff task outputs.
|
||||
all (bool): Whether to reset all memories.
|
||||
knowledge (bool): Whether to reset the knowledge.
|
||||
"""
|
||||
|
||||
try:
|
||||
crew = get_crew()
|
||||
if not crew:
|
||||
raise ValueError("No crew found.")
|
||||
if all:
|
||||
crew.reset_memories(command_type="all")
|
||||
ShortTermMemory().reset()
|
||||
EntityMemory().reset()
|
||||
LongTermMemory().reset()
|
||||
TaskOutputStorageHandler().reset()
|
||||
click.echo("All memories have been reset.")
|
||||
return
|
||||
else:
|
||||
if long:
|
||||
LongTermMemory().reset()
|
||||
click.echo("Long term memory has been reset.")
|
||||
|
||||
if not any([long, short, entity, kickoff_outputs, knowledge]):
|
||||
click.echo(
|
||||
"No memory type specified. Please specify at least one type to reset."
|
||||
)
|
||||
return
|
||||
|
||||
if long:
|
||||
crew.reset_memories(command_type="long")
|
||||
click.echo("Long term memory has been reset.")
|
||||
if short:
|
||||
crew.reset_memories(command_type="short")
|
||||
click.echo("Short term memory has been reset.")
|
||||
if entity:
|
||||
crew.reset_memories(command_type="entity")
|
||||
click.echo("Entity memory has been reset.")
|
||||
if kickoff_outputs:
|
||||
crew.reset_memories(command_type="kickoff_outputs")
|
||||
click.echo("Latest Kickoff outputs stored has been reset.")
|
||||
if knowledge:
|
||||
crew.reset_memories(command_type="knowledge")
|
||||
click.echo("Knowledge has been reset.")
|
||||
if short:
|
||||
ShortTermMemory().reset()
|
||||
click.echo("Short term memory has been reset.")
|
||||
if entity:
|
||||
EntityMemory().reset()
|
||||
click.echo("Entity memory has been reset.")
|
||||
if kickoff_outputs:
|
||||
TaskOutputStorageHandler().reset()
|
||||
click.echo("Latest Kickoff outputs stored has been reset.")
|
||||
|
||||
except subprocess.CalledProcessError as e:
|
||||
click.echo(f"An error occurred while resetting the memories: {e}", err=True)
|
||||
|
||||
@@ -1,33 +1,24 @@
|
||||
import subprocess
|
||||
from enum import Enum
|
||||
from typing import List, Optional
|
||||
|
||||
import click
|
||||
import tomllib
|
||||
from packaging import version
|
||||
|
||||
from crewai.cli.utils import read_toml
|
||||
from crewai.cli.version import get_crewai_version
|
||||
|
||||
|
||||
class CrewType(Enum):
|
||||
STANDARD = "standard"
|
||||
FLOW = "flow"
|
||||
from crewai.cli.utils import get_crewai_version
|
||||
|
||||
|
||||
def run_crew() -> None:
|
||||
"""
|
||||
Run the crew or flow by running a command in the UV environment.
|
||||
|
||||
Starting from version 0.103.0, this command can be used to run both
|
||||
standard crews and flows. For flows, it detects the type from pyproject.toml
|
||||
and automatically runs the appropriate command.
|
||||
Run the crew by running a command in the UV environment.
|
||||
"""
|
||||
command = ["uv", "run", "run_crew"]
|
||||
crewai_version = get_crewai_version()
|
||||
min_required_version = "0.71.0"
|
||||
pyproject_data = read_toml()
|
||||
|
||||
# Check for legacy poetry configuration
|
||||
if pyproject_data.get("tool", {}).get("poetry") and (
|
||||
with open("pyproject.toml", "rb") as f:
|
||||
data = tomllib.load(f)
|
||||
|
||||
if data.get("tool", {}).get("poetry") and (
|
||||
version.parse(crewai_version) < version.parse(min_required_version)
|
||||
):
|
||||
click.secho(
|
||||
@@ -35,55 +26,23 @@ def run_crew() -> None:
|
||||
f"Please run `crewai update` to update your pyproject.toml to use uv.",
|
||||
fg="red",
|
||||
)
|
||||
|
||||
# Determine crew type
|
||||
is_flow = pyproject_data.get("tool", {}).get("crewai", {}).get("type") == "flow"
|
||||
crew_type = CrewType.FLOW if is_flow else CrewType.STANDARD
|
||||
|
||||
# Display appropriate message
|
||||
click.echo(f"Running the {'Flow' if is_flow else 'Crew'}")
|
||||
|
||||
# Execute the appropriate command
|
||||
execute_command(crew_type)
|
||||
|
||||
|
||||
def execute_command(crew_type: CrewType) -> None:
|
||||
"""
|
||||
Execute the appropriate command based on crew type.
|
||||
|
||||
Args:
|
||||
crew_type: The type of crew to run
|
||||
"""
|
||||
command = ["uv", "run", "kickoff" if crew_type == CrewType.FLOW else "run_crew"]
|
||||
print()
|
||||
|
||||
try:
|
||||
subprocess.run(command, capture_output=False, text=True, check=True)
|
||||
|
||||
except subprocess.CalledProcessError as e:
|
||||
handle_error(e, crew_type)
|
||||
click.echo(f"An error occurred while running the crew: {e}", err=True)
|
||||
click.echo(e.output, err=True, nl=True)
|
||||
|
||||
with open("pyproject.toml", "rb") as f:
|
||||
data = tomllib.load(f)
|
||||
|
||||
if data.get("tool", {}).get("poetry"):
|
||||
click.secho(
|
||||
"It's possible that you are using an old version of crewAI that uses poetry, please run `crewai update` to update your pyproject.toml to use uv.",
|
||||
fg="yellow",
|
||||
)
|
||||
|
||||
except Exception as e:
|
||||
click.echo(f"An unexpected error occurred: {e}", err=True)
|
||||
|
||||
|
||||
def handle_error(error: subprocess.CalledProcessError, crew_type: CrewType) -> None:
|
||||
"""
|
||||
Handle subprocess errors with appropriate messaging.
|
||||
|
||||
Args:
|
||||
error: The subprocess error that occurred
|
||||
crew_type: The type of crew that was being run
|
||||
"""
|
||||
entity_type = "flow" if crew_type == CrewType.FLOW else "crew"
|
||||
click.echo(f"An error occurred while running the {entity_type}: {error}", err=True)
|
||||
|
||||
if error.output:
|
||||
click.echo(error.output, err=True, nl=True)
|
||||
|
||||
pyproject_data = read_toml()
|
||||
if pyproject_data.get("tool", {}).get("poetry"):
|
||||
click.secho(
|
||||
"It's possible that you are using an old version of crewAI that uses poetry, "
|
||||
"please run `crewai update` to update your pyproject.toml to use uv.",
|
||||
fg="yellow",
|
||||
)
|
||||
|
||||
Some files were not shown because too many files have changed in this diff Show More
Reference in New Issue
Block a user