---
title: Build Your First Crew
description: Step-by-step tutorial to create a collaborative AI team that works together to solve complex problems.
icon: users-gear
---
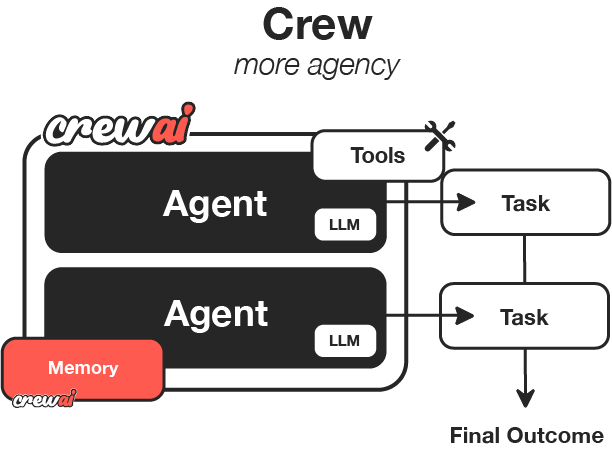
# Build Your First Crew
In this guide, we'll walk through creating a research crew that will help us research and analyze a topic, then create a comprehensive report. This is a practical example of how AI agents can collaborate to accomplish complex tasks.
Before starting, make sure you have:
1. Installed CrewAI following the [installation guide](/installation)
2. Set up your OpenAI API key in your environment variables
3. Basic understanding of Python
## Step 1: Create a New CrewAI Project
First, let's create a new CrewAI project using the CLI:
```bash
crewai create crew research_crew
cd research_crew
```
This will generate a project with the basic structure needed for your crew. The CLI automatically creates:
- A project directory with the necessary files
- Configuration files for agents and tasks
- A basic crew implementation
- A main script to run the crew
 ## Step 2: Explore the Project Structure
Let's take a moment to understand the project structure created by the CLI:
```
research_crew/
├── .gitignore
├── pyproject.toml
├── README.md
├── .env
└── src/
└── research_crew/
├── __init__.py
├── main.py
├── crew.py
├── tools/
│ ├── custom_tool.py
│ └── __init__.py
└── config/
├── agents.yaml
└── tasks.yaml
```
This structure follows best practices for Python projects and makes it easy to organize your code.
## Step 3: Configure Your Agents
Let's modify the `agents.yaml` file to define two specialized agents: a researcher and an analyst.
```yaml
# src/research_crew/config/agents.yaml
researcher:
role: >
Senior Research Specialist for {topic}
goal: >
Find comprehensive and accurate information about {topic}
with a focus on recent developments and key insights
backstory: >
You are an experienced research specialist with a talent for
finding relevant information from various sources. You excel at
organizing information in a clear and structured manner, making
complex topics accessible to others.
llm: openai/gpt-4o-mini
analyst:
role: >
Data Analyst and Report Writer for {topic}
goal: >
Analyze research findings and create a comprehensive, well-structured
report that presents insights in a clear and engaging way
backstory: >
You are a skilled analyst with a background in data interpretation
and technical writing. You have a talent for identifying patterns
and extracting meaningful insights from research data, then
communicating those insights effectively through well-crafted reports.
llm: openai/gpt-4o-mini
```
## Step 4: Define Your Tasks
Now, let's modify the `tasks.yaml` file to define the research and analysis tasks:
```yaml
# src/research_crew/config/tasks.yaml
research_task:
description: >
Conduct thorough research on {topic}. Focus on:
1. Key concepts and definitions
2. Historical development and recent trends
3. Major challenges and opportunities
4. Notable applications or case studies
5. Future outlook and potential developments
Make sure to organize your findings in a structured format with clear sections.
expected_output: >
A comprehensive research document with well-organized sections covering
all the requested aspects of {topic}. Include specific facts, figures,
and examples where relevant.
agent: researcher
analysis_task:
description: >
Analyze the research findings and create a comprehensive report on {topic}.
Your report should:
1. Begin with an executive summary
2. Include all key information from the research
3. Provide insightful analysis of trends and patterns
4. Offer recommendations or future considerations
5. Be formatted in a professional, easy-to-read style with clear headings
expected_output: >
A polished, professional report on {topic} that presents the research
findings with added analysis and insights. The report should be well-structured
with an executive summary, main sections, and conclusion.
agent: analyst
context:
- research_task
output_file: output/report.md
```
## Step 5: Configure Your Crew
Now, let's modify the `crew.py` file to set up our research crew:
```python
# src/research_crew/crew.py
from crewai import Agent, Crew, Process, Task
from crewai.project import CrewBase, agent, crew, task
from crewai_tools import SerperDevTool
@CrewBase
class ResearchCrew():
"""Research crew for comprehensive topic analysis and reporting"""
@agent
def researcher(self) -> Agent:
return Agent(
config=self.agents_config['researcher'],
verbose=True,
tools=[SerperDevTool()]
)
@agent
def analyst(self) -> Agent:
return Agent(
config=self.agents_config['analyst'],
verbose=True
)
@task
def research_task(self) -> Task:
return Task(
config=self.tasks_config['research_task']
)
@task
def analysis_task(self) -> Task:
return Task(
config=self.tasks_config['analysis_task'],
output_file='output/report.md'
)
@crew
def crew(self) -> Crew:
"""Creates the research crew"""
return Crew(
agents=self.agents,
tasks=self.tasks,
process=Process.sequential,
verbose=True,
)
```
## Step 6: Set Up Your Main Script
Let's modify the `main.py` file to run our crew:
```python
#!/usr/bin/env python
# src/research_crew/main.py
import os
from research_crew.crew import ResearchCrew
# Create output directory if it doesn't exist
os.makedirs('output', exist_ok=True)
def run():
"""
Run the research crew.
"""
inputs = {
'topic': 'Artificial Intelligence in Healthcare'
}
# Create and run the crew
result = ResearchCrew().crew().kickoff(inputs=inputs)
# Print the result
print("\n\n=== FINAL REPORT ===\n\n")
print(result.raw)
print("\n\nReport has been saved to output/report.md")
if __name__ == "__main__":
run()
```
## Step 7: Set Up Your Environment Variables
Create a `.env` file in your project root with your API keys:
```
OPENAI_API_KEY=your_openai_api_key
SERPER_API_KEY=your_serper_api_key
```
You can get a Serper API key from [Serper.dev](https://serper.dev/).
## Step 8: Install Dependencies
Install the required dependencies using the CrewAI CLI:
```bash
crewai install
```
This command will:
1. Read the dependencies from your project configuration
2. Create a virtual environment if needed
3. Install all required packages
## Step 9: Run Your Crew
Now, run your crew using the CrewAI CLI:
```bash
crewai run
```
Your crew will start working! The researcher will gather information about the specified topic, and the analyst will create a comprehensive report based on that research.
## Step 10: Review the Output
Once the crew completes its work, you'll find the final report in the `output/report.md` file. The report will include:
1. An executive summary
2. Detailed information about the topic
3. Analysis and insights
4. Recommendations or future considerations
## Exploring Other CLI Commands
CrewAI offers several other useful CLI commands for working with crews:
```bash
# View all available commands
crewai --help
# Run the crew
crewai run
# Test the crew
crewai test
# Reset crew memories
crewai reset-memories
# Replay from a specific task
crewai replay -t
# View the latest task outputs
crewai log-tasks-outputs
```
## Customizing Your Crew
You can customize your crew in several ways:
1. **Add more agents**: Create additional specialized roles like a fact-checker or editor
2. **Modify the process**: Change from `Process.sequential` to `Process.hierarchical` for more complex workflows
3. **Add custom tools**: Create and add specialized tools for your agents
4. **Change the topic**: Update the `topic` parameter in the `inputs` dictionary to research different subjects
## Next Steps
Now that you've built your first crew, you can:
1. Experiment with different agent configurations
2. Try more complex task structures
3. Implement custom tools for your agents
4. Explore [CrewAI Flows](/guides/flows/first-flow) for more advanced workflows
Congratulations! You've successfully built your first CrewAI crew that can research and analyze any topic you provide.
## Step 2: Explore the Project Structure
Let's take a moment to understand the project structure created by the CLI:
```
research_crew/
├── .gitignore
├── pyproject.toml
├── README.md
├── .env
└── src/
└── research_crew/
├── __init__.py
├── main.py
├── crew.py
├── tools/
│ ├── custom_tool.py
│ └── __init__.py
└── config/
├── agents.yaml
└── tasks.yaml
```
This structure follows best practices for Python projects and makes it easy to organize your code.
## Step 3: Configure Your Agents
Let's modify the `agents.yaml` file to define two specialized agents: a researcher and an analyst.
```yaml
# src/research_crew/config/agents.yaml
researcher:
role: >
Senior Research Specialist for {topic}
goal: >
Find comprehensive and accurate information about {topic}
with a focus on recent developments and key insights
backstory: >
You are an experienced research specialist with a talent for
finding relevant information from various sources. You excel at
organizing information in a clear and structured manner, making
complex topics accessible to others.
llm: openai/gpt-4o-mini
analyst:
role: >
Data Analyst and Report Writer for {topic}
goal: >
Analyze research findings and create a comprehensive, well-structured
report that presents insights in a clear and engaging way
backstory: >
You are a skilled analyst with a background in data interpretation
and technical writing. You have a talent for identifying patterns
and extracting meaningful insights from research data, then
communicating those insights effectively through well-crafted reports.
llm: openai/gpt-4o-mini
```
## Step 4: Define Your Tasks
Now, let's modify the `tasks.yaml` file to define the research and analysis tasks:
```yaml
# src/research_crew/config/tasks.yaml
research_task:
description: >
Conduct thorough research on {topic}. Focus on:
1. Key concepts and definitions
2. Historical development and recent trends
3. Major challenges and opportunities
4. Notable applications or case studies
5. Future outlook and potential developments
Make sure to organize your findings in a structured format with clear sections.
expected_output: >
A comprehensive research document with well-organized sections covering
all the requested aspects of {topic}. Include specific facts, figures,
and examples where relevant.
agent: researcher
analysis_task:
description: >
Analyze the research findings and create a comprehensive report on {topic}.
Your report should:
1. Begin with an executive summary
2. Include all key information from the research
3. Provide insightful analysis of trends and patterns
4. Offer recommendations or future considerations
5. Be formatted in a professional, easy-to-read style with clear headings
expected_output: >
A polished, professional report on {topic} that presents the research
findings with added analysis and insights. The report should be well-structured
with an executive summary, main sections, and conclusion.
agent: analyst
context:
- research_task
output_file: output/report.md
```
## Step 5: Configure Your Crew
Now, let's modify the `crew.py` file to set up our research crew:
```python
# src/research_crew/crew.py
from crewai import Agent, Crew, Process, Task
from crewai.project import CrewBase, agent, crew, task
from crewai_tools import SerperDevTool
@CrewBase
class ResearchCrew():
"""Research crew for comprehensive topic analysis and reporting"""
@agent
def researcher(self) -> Agent:
return Agent(
config=self.agents_config['researcher'],
verbose=True,
tools=[SerperDevTool()]
)
@agent
def analyst(self) -> Agent:
return Agent(
config=self.agents_config['analyst'],
verbose=True
)
@task
def research_task(self) -> Task:
return Task(
config=self.tasks_config['research_task']
)
@task
def analysis_task(self) -> Task:
return Task(
config=self.tasks_config['analysis_task'],
output_file='output/report.md'
)
@crew
def crew(self) -> Crew:
"""Creates the research crew"""
return Crew(
agents=self.agents,
tasks=self.tasks,
process=Process.sequential,
verbose=True,
)
```
## Step 6: Set Up Your Main Script
Let's modify the `main.py` file to run our crew:
```python
#!/usr/bin/env python
# src/research_crew/main.py
import os
from research_crew.crew import ResearchCrew
# Create output directory if it doesn't exist
os.makedirs('output', exist_ok=True)
def run():
"""
Run the research crew.
"""
inputs = {
'topic': 'Artificial Intelligence in Healthcare'
}
# Create and run the crew
result = ResearchCrew().crew().kickoff(inputs=inputs)
# Print the result
print("\n\n=== FINAL REPORT ===\n\n")
print(result.raw)
print("\n\nReport has been saved to output/report.md")
if __name__ == "__main__":
run()
```
## Step 7: Set Up Your Environment Variables
Create a `.env` file in your project root with your API keys:
```
OPENAI_API_KEY=your_openai_api_key
SERPER_API_KEY=your_serper_api_key
```
You can get a Serper API key from [Serper.dev](https://serper.dev/).
## Step 8: Install Dependencies
Install the required dependencies using the CrewAI CLI:
```bash
crewai install
```
This command will:
1. Read the dependencies from your project configuration
2. Create a virtual environment if needed
3. Install all required packages
## Step 9: Run Your Crew
Now, run your crew using the CrewAI CLI:
```bash
crewai run
```
Your crew will start working! The researcher will gather information about the specified topic, and the analyst will create a comprehensive report based on that research.
## Step 10: Review the Output
Once the crew completes its work, you'll find the final report in the `output/report.md` file. The report will include:
1. An executive summary
2. Detailed information about the topic
3. Analysis and insights
4. Recommendations or future considerations
## Exploring Other CLI Commands
CrewAI offers several other useful CLI commands for working with crews:
```bash
# View all available commands
crewai --help
# Run the crew
crewai run
# Test the crew
crewai test
# Reset crew memories
crewai reset-memories
# Replay from a specific task
crewai replay -t
# View the latest task outputs
crewai log-tasks-outputs
```
## Customizing Your Crew
You can customize your crew in several ways:
1. **Add more agents**: Create additional specialized roles like a fact-checker or editor
2. **Modify the process**: Change from `Process.sequential` to `Process.hierarchical` for more complex workflows
3. **Add custom tools**: Create and add specialized tools for your agents
4. **Change the topic**: Update the `topic` parameter in the `inputs` dictionary to research different subjects
## Next Steps
Now that you've built your first crew, you can:
1. Experiment with different agent configurations
2. Try more complex task structures
3. Implement custom tools for your agents
4. Explore [CrewAI Flows](/guides/flows/first-flow) for more advanced workflows
Congratulations! You've successfully built your first CrewAI crew that can research and analyze any topic you provide.